background image

Summary of Contents for KHDP1 38510

Page 1: ...Instructions for use GB IT ...

Page 2: ......

Page 3: ...nt 8 EC Declaration of conformity 9 Installation 9 Gas connection 10 Electrical connection 10 Installation 11 Adaption to a different type of gas supply 11 Replacing the injectors 12 Injectors replacement in the wok burner 12 Regulating the minimum flow level of the gas taps 12 Care and maintenance 13 Care and maintenance of the gas burners 13 Troubleshooting guide 14 After Sales Service 14 These ...

Page 4: ...se to position it on the symbol showing maximum flame for outer and inner ring and push down the knob to ignite the burner 2 To keep only the inner ring ignited push down the knob and turn it anticlockwise to position showing maximum flame for inner ring and turned off for outer If the burner does not ignite within about 15 seconds switch off the burner check the fitting of the burner cap and plat...

Page 5: ...ations could lead to the glass ceramic hob being damaged or broken and the safety of your appliance being compromised Burner Ø Pans wok from 24 to 26 cm Practical advice on using the hob To position the pan supports firstly align with burners and then fit into the final position paying attention to do not scratch metal top with the support For better burner performance please refer to the practica...

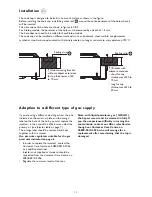
Page 6: ...ttached to its housing A panel made of wood or other insulating material must be installed under the cook top at a distance of at least 15 mm from the surface If needing to install multiple Domino products in the same cut out the Domino Connector 481010793572 not included accessory must be purchased separately from the After sales Service In addition also order special kit 480121103229 in case of ...

Page 7: ...carefully Check the appliance has not been damaged during transportation and remove all protective packing and films before installation This hob cat 3 was designed to be used exclusively for cooking food in household surroundings Any other use for example heating rooms should be regarded as improper and dangerous The installation and connection of this appliance to a gas or electrical supply must...

Page 8: ...ou finish using the hob always check that the control buttons are in the off position and shut off the tap to the gas mains or cylinder Do not obstruct the air vents at the back of the appliance in any way Packing The packing material is 100 recyclable and is labelled with the recycling symbol Please dispose of all packing responsibly and carefully Product This appliance is marked according to the...

Page 9: ...s all responsibility should any other make of oven be installed The manufacturer declines all responsibility should another make of oven be installed Before installation please ensure that Warning this is a heavy products which requires the installation to be carried out by two people The gas supply type and pressure and the calibration on the hob are compatable see serial number plate on the hob ...

Page 10: ... furniture It must pass through an area where there are no obstructions and where it is possible to inspect it on all its length After connection to the gas supply check for leaks with soapy water Light up the burners and turn the knobs from max position to minumum position to check flame stability 10 The electrical connections must comply with current legislation and be carried out by a qualified...

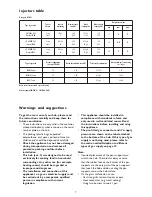
Page 11: ...he primary air see Injector table on page 7 The orange label should be removed and kept together with the manual Use pressure regulators suitable for the gas pressures indicated on page 6 In order to replace the injectors contact the Customer Care Centre on 00800 3810 4026 or a qualified electrician Injectors not supplied as standard should be requested from the Customer Care Centre on 00800 3810 ...

Page 12: ...ws and spreader Note make sure that 1 After replacement the spreader C is inserted correctly on the burner Injectors replacement in the wok burner A C B E D Regulating the minimum flow level must be done with the tap at the lowest position small flame There is no need to regulate the primary air in the burners To ensure the minimum level is properly regulated remove the control knob and adjust the...

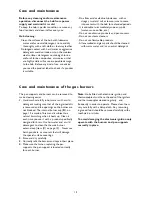
Page 13: ...and or a neutral detergent Care and maintenance The pan supports and burners can be removed to make cleaning easier 1 Hand wash carefully in hot water with a mild detergent making sure that all the ingrained dirt is removed and the openings on the burner are not blocked The internal burner cap D on page 12 is made of brass and is subject to a natural burnishing when it heats up Clean it each time ...

Page 14: ...e burner 3 the pan supports are correctly positioned with all the rubber feet in place If despite all these checks and after tuning the hon off and on again you are still experiancing problems please contact our Customer Care Centre on 00800 3810 4026 Troubleshooting guide Before contacting our Customer Care Centre please check to see if the problem can be fixed by refering to the troubleshooting ...

Page 15: ......

Page 16: ...400010780630 Printed in Italy n 05 15 Whirlpool Europe Socio Unico Viale G Borghi 27 21025 Comerio VA Phone 0332 759111 Fax 0332 759268 www whirlpool eu ...

Reviews: