background image

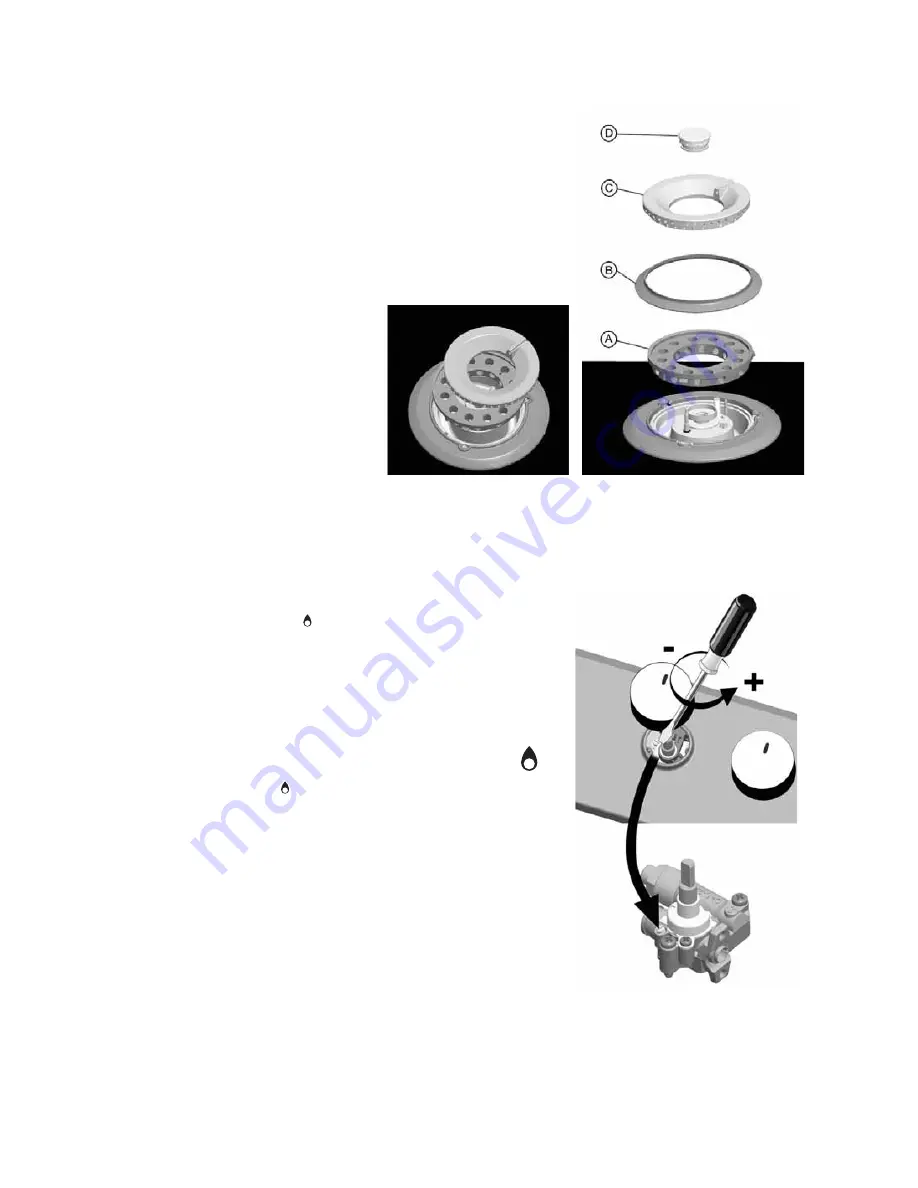
To fit the double crown wok burner:
Insert in the following order:
1. burner ring (A);
2. decorative covering ring (B);
3. external burner cap (C);
4. internal burner cap (D).

Note: make sure that:
1. the locating pin for the burner ring (A) is inserted correctly in the

slot on the burner unit.

2. that the locating pin on the external

burner cap (C) is inserted in the slot
on the burner ring (A).

Fitting the wok burner

Regulating the minimum flow level must be done with the tap at the
lowest position (small flame)

.

There is no need to regulate the primary air in the burners.
To ensure the minimum level is properly regulated, remove the
control knob and adjust the screws found on the tap as follows:

1. tighten to reduce the height of the flame 1 (-)
2. slacken to increase the height of the flame (+);
3. With the burners on, rotate the buttons from the maximum

to

the minimum position

to check the stability of the flame.

Once you have finished regulating, close up the seals again using
sealing wax.

Regulating the minimum flow level of the gas taps

13

Summary of Contents for KHPF 9010

Page 1: ...KHPF 9010 KHPS 9010 ...

Page 2: ......

Page 3: ...Flush and Traditional fitting 9 Gas connection 9 Electrical connection 10 Fixing the hob to the work top Traditionally fitted model 10 Fixing the hob to the work top Flush fitted model 11 Adaption to a different type of gas supply 12 Replacing the injectors 12 Fitting the wok burner 13 Regulating the minimum flow level of the gas taps 13 General cleaning maintenance 14 Care and maintenance of the ...

Page 4: ...um flame symbol 2 Press the control knob to ignite the burner 3 Once the burner has lit keep the control knob pressed for about 5 seconds to allow the safety thermocouple fitted to each burner to engage The thermocouple will switch off the gas supply to the burner should the flame be accidentally lost A gust of air momentary interruption of gas supply or liquid spillage etc If the burner does not ...

Page 5: ...taneously with just one container such as a fish kettle Important Do not rest or drag the pan supports upside down on the hob as this could scratch it Failure to comply with these recommendations could lead to the glass ceramic hob being damaged or broken and the safety of your appliance being compromised Burner Pan diameter wok from 24 to 26 cm fast from 24 to 26 cm semi fast from 16 to 24 cm aux...

Page 6: ... 20 3 00 1 65 1 00 400 l h 286 l h 157 l h 95 l h 1 40 0 90 0 40 0 30 17 20 25 LIQUID PETROLEUM GAS Butane G30 wok fast semi fast auxiliary 100 85 65 50 11 4 20 3 00 1 65 1 00 305 g h 218 g h 120 g h 73 g h 1 40 0 90 0 40 0 30 20 28 30 35 LIQUID PETROLEUM GAS Propane G31 wok fast semi fast auxiliary 100 85 65 50 11 4 20 3 00 1 65 1 00 300 g h 214 g h 118 g h 71 g h 1 40 0 90 0 35 0 30 25 37 45 Typ...

Page 7: ...e hob If this type of gas supply is not being used please refer to the section called Adaption to different types of gas supply on page 11 Note Incorrect placement of the pan supports can scratch the hob To avoid this always ensure that the rubber feet on the bottom of the pan supports are the only part of the pan supports that touch the hob and do not drag the pan supports accross the hob surface...

Page 8: ...equirements of the EMC CEE Directive 89 336 the requirements in CEE Directive 93 68 this appliance was designed to come into contact with foods and complies with EC Regulation 1935 2004 Note Incorrect placement of the pan supports can scratch the hob To avoid this always ensure that the rubber feet on the bottom of the pan supports are the only part of the pan supports that touch the hob Do not dr...

Page 9: ...100cm2 in cross section which must be permanent and accessible on the walls of the room being ventilated and extracting towards the outside created in such a way that the openings both inside and out cannot be obstructed even by accident Protected by plastic grill and metallic netting etc that should not reduce the 100cm2 cross section Located in such a position so as not to interfere with the ext...

Page 10: ...amage to persons pets or goods as a result of failure to comply with the regulations above Electrical connection L Earth yellow green N Important The following procedure must be carried out by competent technical personnel only The hob can be installed on or into different types of materials such as masonry metal wood and heat resistant laminate coated wood 90 C Cut an opening in the worktop to th...

Page 11: ...ded tightening them until the hob is perfectly flush fig 3 Carefully trim off the excess gasket seal In case of installation on wood particularly chipboard any small spaces between the edge of the worktop and the hob should be filled with small quantities of silicon sealant see fig 4 Once the appliance has been installed the bottom of the hob should be completely accessible Important tighten the f...

Page 12: ...mm spanner 5 Slacken the holding screw H to regulate the position X of the gas inlet coupling G with regard to the injector Replacing the injectors If you are using a different kind of gas from the one indicated on the serial no plate and the orange label on the back of the hob you must replace the injectors in the case of the Wok burner adjust the primary air see Injector table on page 6 The oran...

Page 13: ...he minimum flow level must be done with the tap at the lowest position small flame There is no need to regulate the primary air in the burners To ensure the minimum level is properly regulated remove the control knob and adjust the screws found on the tap as follows 1 tighten to reduce the height of the flame 1 2 slacken to increase the height of the flame 3 With the burners on rotate the buttons ...

Page 14: ...re of the flame and will not affect the operation or performance of the hob General cleaning maintenance The pan supports and burners can be removed to make cleaning easier 1 Hand wash carefully in hot water with a mild detergent making sure that all the ingrained dirt is removed and the openings on the burner are not blocked The internal burner cap D on page 12 is made of brass and is subject to ...

Page 15: ...eck that 1 the bottom of the pan is perfectly flat 2 the pan is centred on the burner 3 the pan supports are correctly positioned with all the rubber feet in place Troubleshooting guide Before contacting our Customer Care Centre please check to see if the problem can be fixed by refering to the troubleshooting guide 1 If the fault persists contact us on 00800 3810 4026 We will ask you for some inf...

Page 16: ...5019 719 01135 Printed in Italy n 02 07 GB ...

Reviews: