background image

KMCE 3610

Instructions for use

5019_721_02002_GB_IFU_OP2  15-06-2007  13:50  Pagina 1

Summary of Contents for KMCE 3610

Page 1: ...KMCE 3610 Instructions for use 5019_721_02002_GB_IFU_OP2 15 06 2007 13 50 Pagina 1 ...

Page 2: ...5019_721_02002_GB_IFU_OP2 15 06 2007 13 50 Pagina 2 ...

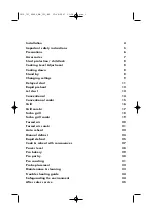
Page 3: ...al 14 Conventional combi 15 Grill 16 Grill combi 17 Turbo grill 18 Turbo grill combi 19 Forced air 20 Forced air combi 21 Auto reheat 22 Manual defrost 24 Rapid defrost 25 Cook reheat with microwaves 27 Power level 28 Pro bakery 29 Pro pastry 30 Pro roasting 31 Probe placement 32 Maintenance cleaning 33 Trouble shooting guide 34 Safeguarding the environment 34 After sales service 35 5019_721_02002...

Page 4: ...if it has been damaged or dropped Do not immerse the mains cord or plug in water Keep the cord away from hot surfaces Electrical shock fi re or other hazards may result AFTER CONNECTING THE OVEN CAN BE OPERATED ONLY if the oven door is firmly closed THE EARTHING OF THIS APPLIANCE is compulsory The manufacturer will accept no responsibility for injury to persons animals or damage to objects arising...

Page 5: ...USE THE MICROWAVE FUNCTION for cooking or reheating whole eggs with or without shell since they may explode even after microwave heating has ended ONLY ALLOW CHILDREN to use the oven without adult supervision after adequate instructions have been given so that the child is able to use the oven in a safe way and understands the hazards of improper use The appliance is not intended for use by young ...

Page 6: ...THE MICROWAVE FUNCTION when cooking or reheating food that contains alcohol AFTER HEATING BABY FOOD or liquids in a baby bottle or in a baby food jar always stir thoroughly and check the temperature before serving This will ensure that the heat is evenly distributed and the risk of scalding or burns can be avoided Ensure the Lid and the Teat is removed before heating TEMPERATURE COOKING THE TEMPER...

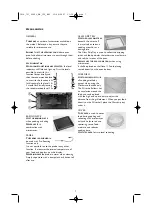
Page 7: ...when cleaning Simply wipe clean with a damp cloth or kitchen roll after use GLASS DRIP TRAY USE THE GLASS DRIP TRAY beneath the wire shelf It may also be used as a cooking utensil or as a baking plate The Glass Drip Tray is used to collect the dripping juices and food particles that otherwise would stain and soil the interior of the oven ALWAYS USE THE GLASS DRIP TRAY when using microwaves It shal...

Page 8: ...d setting This setting normally gives you the best result But if the food you heated became too warm to eat at once you can easily adjust this before you use that function the next time This is done by adjusting the Cooking Level with the adjust knob right after you have pressed the Start button NOTE THE COOKING LEVEL can only be set or altered during the first 20 seconds of operation DONENESS LEV...

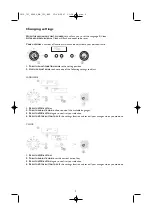
Page 9: ...LANGUAGE 1 PRESS THE OK BUTTON 2 TURN THE ADJUST KNOB to choose one of the available languages 3 PRESS THE OK BUTTON again to confi rm your selection 4 PRESS THE STOP BUTTON TO EXIT the settings function and save all your changes when you are done CLOCK 1 PRESS THE OK BUTTON 2 TURN THE ADJUST KNOB to set the correct time of day 3 PRESS THE OK BUTTON again to confi rm your selection 4 PRESS THE STO...

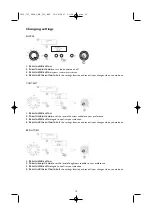
Page 10: ...itable to your preference 3 PRESS THE OK BUTTON again to confi rm your selection 4 PRESS THE STOP BUTTON TO EXIT the settings function and save all your changes when you are done BRIGHTNESS 1 PRESS THE OK BUTTON 2 TURN THE ADJUST KNOB to set the level of brightness suitable to your preference 3 PRESS THE OK BUTTON again to confi rm your selection 4 PRESS THE STOP BUTTON TO EXIT the settings functi...

Page 11: ...THIS FUNCTION when you need a kitchen timer to measure time for various purposes such as cooking eggs or letting the dough rise before baking etc 1 TURN THE MULTIFUNCTION KNOB to the zero position The clock is displayed if it has been set else the display will be blank 2 TURN THE ADJUST KNOB TO SET THE TIME to measure 3 PRESS THE OK BUTTON to activate the timer THE KITCHEN TIMER AUTOMATICALLY STAR...

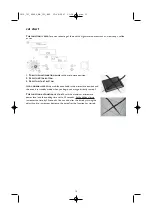
Page 12: ...et the temperature 3 PRESS THE START BUTTON DURING THE HEATING PROCESS the indicator bar rises until the set temperature is reached ONCE THE HEATING PROCESS has been started the temperature can easily be adjusted by turning the adjust knob WHEN THE SET TEMPERATURE IS REACHED The oven then keeps the set temperature for 10 minutes before switching off During this time it is waiting for you to insert...

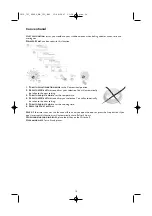
Page 13: ...ob in the microwave position and the oven is in standby mode when you begin you may go directly to step 3 THIS FUNCTION AUTOMATICALLY STARTS with the maximum microwave power level and the cooking time set to 30 seconds Each additional press increases the time by 30 seconds You can also alter the time by turning the adjust knob to increase or decrease the time after the function has started Jet sta...

Page 14: ...et the temperature 4 PRESS THE OK BUTTON to confirm your selection You will automatically be taken to the next setting 5 TURN THE ADJUST KNOB to set the cooking time 6 PRESS THE START BUTTON NOTE If the time is not set this function will run until you open the door or press the Stop button If you don t interrupt this function it will automatically shut off after 4 hours WHEN COOKING FOOD IN DISHES...

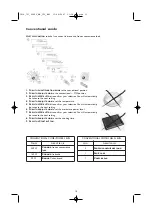
Page 15: ...ill automatically be taken to the next setting 6 TURN THE ADJUST KNOB to set the microwave power level 7 PRESS THE OK BUTTON to confi rm your selection You will automatically be taken to the next setting 8 TURN THE ADJUST KNOB to set the cooking time 9 PRESS THE START BUTTON Conventional combi 15 CONVENTIONAL COMBI POWER LEVEL POWER SUGGESTED USE 350 W COOKING frozen convenience food 160 W COOKING...

Page 16: ...ours DO NOT LEAVE THE OVEN DOOR OPEN for long periods when the Grill is in operation as this will cause a drop in temperature FOR FOOD LIKE cheese toast steaks and sausages Preheat the grill element for 3 mins for best results Place food on the wire shelf and place the wire shelf in the Glass Drip Tray to collect the juices ENSURE THAT THE UTENSILS used are heat resistant and ovenproof before gril...

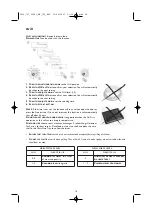
Page 17: ... to set the cooking time 9 PRESS THE START BUTTON DO NOT LEAVE THE OVEN DOOR OPEN for long periods when the Grill is in operation as this will cause a drop in temperature FOR FOOD LIKE chicken pieces fish steaks Preheat the grill element for 3 min for best result Use Wire shelf on Glass Drip Tray ENSURE THAT THE UTENSILS used are heat resistant and ovenproof before use in this function DO NOT USE ...

Page 18: ... rm your selection You will automatically be taken to the next setting 6 TURN THE ADJUST KNOB to set the cooking time 7 PRESS THE START BUTTON NOTE If time is not set this function will run until you open the door or press the Stop button If you don t interrupt this function it will automatically shut off after 4 hours Turbo grill 18 TURBO GRILL POWER LEVEL LEVEL SUGGESTED USE 4 5 COOKING fish ste...

Page 19: ... set the microwave power level 7 PRESS THE OK BUTTON to confi rm your selection You will automatically be taken to the next setting 8 TURN THE ADJUST KNOB to set the cooking time 9 PRESS THE START BUTTON THE MAX POSSIBLE microwave power level when using the Turbo Grill Combi is limited to a factory preset level Turbo grill combi 19 TURBOGRILL COMBI POWER LEVEL POWER SUGGESTED USE 350 W COOKING Veg...

Page 20: ...RESS THE START BUTTON USE THE WIRE SHELF to put the food on to allow the air to circulate properly around the food USE THE BAKING PLATE when baking small items like rolls ONCE THE HEATING PROCESS has been started the cooking time can easily be adjusted by turning the adjust knob Use the back button to return to where you can change end temperature NOTE If the time is not set this function will run...

Page 21: ...lly be taken to the next setting 8 TURN THE ADJUST KNOB to set the cooking time 9 PRESS THE START BUTTON USE THE WIRE SHELF to put the food on to allow the air to circulate properly around the food ONCE THE HEATING PROCESS has been started the cooking time can easily be adjusted by turning the adjust knob Use the back button to return to where you can change power level or end temperature THE MAX ...

Page 22: ... BUTTON to confi rm your selection The oven presents you with the recommended vessel to use 6 PRESS THE OK BUTTON The oven suggests the correct accessory to be used 7 PRESS THE START BUTTON SOME FOOD TYPES REQUIRE the food to be stirred during cooking In these cases the oven will stop and prompt you to perform the action needed Auto reheat 22 IF THE DOOR ISN T OPENED AT THIS TIME WITHIN 2 MINUTES ...

Page 23: ...imes to allow excess pressure to escape during PLASTIC FOIL should be scored or pricked with a fork to relieve the pressure and to prevent bursting as steam builds up during cooking ALWAYS PLACE THE FOOD on the Glass Drip Tray on shelf level 1 Auto reheat 23 RECOMMENDED WEIGHTS DINNER PLATE chilled 250g 500g PREPARE FOOD IN LINE WITH RECOMMENDATIONS ABOVE HEAT UNDER COVER DINNER PLATE frozen 250g ...

Page 24: ... they begin to defrost Individual slices defrost more easily SHIELD AREAS OF FOOD with small pieces of aluminum foil if they start to become warm e g chicken legs and wing tips TURN LARGE JOINTS halfway through the defrosting process BOILED FOOD STEWS AND MEAT SAUCES defrost better if stirred during defrosting time WHEN DEFROSTING it is better to underthaw the food slightly and allow the process t...

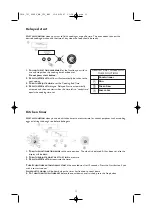
Page 25: ... the weight of the food 5 PRESS THE START BUTTON MIDWAY THROUGH THE DEFROSTING PROCESS the oven stops and prompts you to TURN FOOD Open the door Turn the food Close the door and restart by pressing the Start button AT THE END OF THE DEFROSTING PROCESS the oven automatically switches to manual defrost mode and waits for you to set a time for further defrosting If no further defrosting is required a...

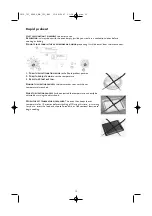
Page 26: ...OOD IS COLDER than deep freeze temperature 18 C choose higher weight of the food Rapid defrost 26 RECOMMENDED WEIGHTS MEAT 100g 2Kg Minced meat cutlets steaks or roasts POULTRY 100g 3Kg Chicken whole pieces or fillets FISH 100g 2Kg Whole steaks or fillets VEGETABLES 100g 2Kg Mixed vegetables peas broccoli etc BREAD 100g 2Kg Loaf buns or rolls FOR FOOD NOT LISTED IN THIS TABLE and if the weight is ...

Page 27: ...CE THE COOKING PROCESS HAS BEEN STARTED The time can easily be increased in 30 second steps by pressing the Start button Each press increases the time by 30 seconds You can also alter the time by turning the adjust knob to increase or decrease the time BY PRESSING THE BUTTON you can switch between cooking time and power level Both can be altered during cooking by turning the adjust knob after sele...

Page 28: ...ntains egg or cream choose a lower power 750 W COOKING OF VEGETABLES poultry etc 650 W COOKING OF fish 500 W MORE CAREFUL COOKING e g high protein sauces cheese and egg dishes and to finish cooking casseroles 350 W SIMMERING STEWS melting butter 160 W DEFROSTING Softening butter cheeses 90 W SOFTENING Ice cream 5019_721_02002_GB_IFU_OP2 15 06 2007 13 50 Pagina 28 ...

Page 29: ... the food before continuing cook 6 INSERT FOOD AND PRESS THE START BUTTON Pro bakery 29 FOOD CLASS UTENSILS SHELF LEVEL OVEN C TIME ADD TOPPING BREAD BAKING PLATE LEVEL 2 170 C 35 MINS MALT BREAD BAKING PLATE LEVEL 2 190 C 30 MINS PAN PIZZA BAKING PLATE LEVEL 2 175 C 15 20 MINS AFTER 15 MINS THIN PIZZA BAKING PLATE LEVEL 2 230 C 10 15 MINS FOCACCIA BAKING PLATE LEVEL 2 185 C 35 40 MINS BREAD STICK...

Page 30: ...heating is complete insert the food before continuing to cook 6 INSERT FOOD AND PRESS THE START BUTTON Pro pastry 30 FOOD CLASS UTENSILS SHELF LEVEL OVEN C TIME CHOUX PASTRY BAKING PLATE LEVEL 2 160 C 30 40 MINS CROISSANTS BAKING PLATE LEVEL 2 140 C 20 30 MINS SPONGE CAKE MOULD WIRE RACK LEVEL 1 150 C 30 40 MINS PLUMCAKE TIN WIRE RACK LEVEL 1 150 C 75 85 MINS SHORT PASTRY TIN WIRE RACK LEVEL 1 160...

Page 31: ...be correctly inserted and connect the probe into the jackplug 7 PRESS THE OK BUTTON the oven automatically starts browning IF NO PROBE IS USED 6 OPEN THE DOOR insert food 7 PRESS THE OK BUTTON the oven automatically starts browning THIS FUNCTION REQUIRES the adding of water during cooking 12 or 20 minutes into the cooking the oven will beep to prompt you to add the water After the beep the display...

Page 32: ... 2 50 250 C 45 90 C 0 4 HOURS CHICKEN WHEN THE PROBE is used to roast chicken the tip should be positioned in the fl eshiest part of the chicken i e on the inside of the thigh just behind the leg It must not touch any bones LAMB WHEN COOKING A LAMB JOINT LEG OF LAMB insert the tip of the probe into the thickest part so that it does not touch the bone PORK WHEN COOKING PORK e g pork shoulder gammon...

Page 33: ... up around the door FOR STUBBORN STAINS boil a cup of water in the oven for 2 or 3 minutes Steam will soften the marks DO NOT USE STEAM CLEANING APPLIANCES when cleaning your appliance ADDING SOME LEMON JUICE to a cup of water placing this on Glass drip tray and boiling for a few minutes can eliminate odors inside the oven THE GRILL ELEMENT does not need cleaning since the intense heat will burn o...

Page 34: ...erial can be 100 recycled as confirmed by the recycling symbol The various pieces of packaging should not be disposed off into the environment but disposed of in compliance with local authority standards Disposal of old appliances The appliances are made with recyclable or re usable material Disposal must be carried out in accordance with local environmental regulations for waste disposal Cut the ...

Page 35: ...ood stuffs and complies with EEC CE Regulation n 1935 2004 It was exclusively designed for use as a cooking appliance Any other use of the appliances e g heating rooms is considered improper and subsequently dangerous It was designed produced and launched onto the market in compliance with safety objectives of the Low Voltage Directive 2006 95 CE which replaces 73 23 CEE and subsequent amendments ...

Page 36: ...5019 721 02002 Printed in Italy n 06 07 GB 5019_721_02002_GB_IFU_OP2 15 06 2007 13 51 Pagina 36 ...

Reviews: