background image

THANK YOU for purchasing this high-quality product. Register your built-in oven at www.kitchenaid.com. In Canada, register your 
built-in oven at www.kitchenaid.ca.

For future reference, please make a note of your product model and serial numbers. They can be found on the label located on the 
bottom edge of the control panel, right hand side.

Model Number ________________________________________

Serial Number________________________________________

Para una versión de estas instrucciones en español, visite www.kitchenaid.com.

Deberá tener a mano el número de modelo y de serie, que están ubicados en el marco del horno, detrás del lado derecho superior de 
la puerta del horno. 

User Guide

Built-In Electric Ovens

TABLE OF CONTENTS

BUILT-IN OVEN SAFETY............................................................. 2

PARTS AND FEATURES ............................................................. 3

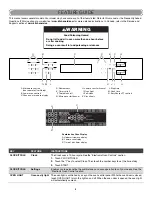
FEATURE GUIDE ......................................................................... 4

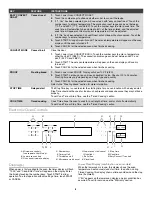
Electronic Oven Controls........................................................... 6
Display(s).................................................................................... 6
Start ........................................................................................... 7
Cancel ........................................................................................ 7
Tones ......................................................................................... 7
Fahrenheit and Celsius .............................................................. 7
Tools .......................................................................................... 7
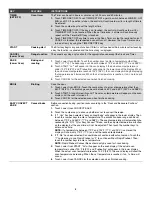
Clock.......................................................................................... 7
Kitchen Timer............................................................................. 8
Control Lock .............................................................................. 8
Oven Temperature Control........................................................ 8
Sabbath Mode ........................................................................... 8

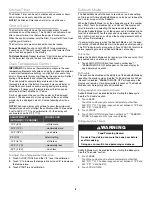
OVEN USE .................................................................................... 9

Aluminum Foil ............................................................................ 9
Oven Racks ............................................................................... 9
Rack And Bakeware Positions .................................................. 9
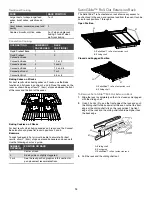
SatinGlide™ Roll-Out Extension Rack.................................... 10
Bakeware ................................................................................. 11
Meat Thermometer .................................................................. 11
Oven Vent(s)............................................................................. 11

Preheating and Oven Temperature ......................................... 11
Baking and Roasting ............................................................... 12
Broiling ..................................................................................... 12
Convection............................................................................... 12
Convection Bake ..................................................................... 12
Convection Roast .................................................................... 12
Convection Broil ...................................................................... 13
Proofing Bread......................................................................... 13
Temperature Probe.................................................................. 13
Timed Cooking ........................................................................ 13

OVEN CARE ............................................................................... 14

High Temp Self-Cleaning Cycle .............................................. 14
General Cleaning ..................................................................... 15
Oven Lights.............................................................................. 16
Oven Door................................................................................ 16

TROUBLESHOOTING................................................................ 17

ASSISTANCE OR SERVICE ...................................................... 18

In the U.S.A.............................................................................. 18
In Canada................................................................................. 18

ACCESSORIES........................................................................... 18

Accessories U.S.A. .................................................................. 18
In Canada................................................................................. 18

WARRANTY................................................................................ 19

W10643472C

Summary of Contents for KOCE500EBL01

Page 1: ...uide Built In Electric Ovens TABLE OF CONTENTS BUILT IN OVEN SAFETY 2 PARTS AND FEATURES 3 FEATURE GUIDE 4 Electronic Oven Controls 6 Display s 6 Start 7 Cancel 7 Tones 7 Fahrenheit and Celsius 7 Tools 7 Clock 7 Kitchen Timer 8 Control Lock 8 Oven Temperature Control 8 Sabbath Mode 8 OVEN USE 9 Aluminum Foil 9 Oven Racks 9 Rack And Bakeware Positions 9 SatinGlide Roll Out Extension Rack 10 Bakewar...

Page 2: ...fire or flame or use dry chemical or foam type extinguisher Use Only Dry Potholders Moist or damp potholders on hot surfaces may result in burns from steam Do not let potholder touch hot heating elements Do not use a towel or other bulky cloth Use Care When Opening Door Let hot air or steam escape before removing or replacing food Do Not Heat Unopened Food Containers Build up of pressure may cause...

Page 3: ... of control panel right hand side C Automatic oven light switch D Oven door lock latch E Oven lights F Temperature probe jack G Oven racks roll out racks available on select models only H Gasket I CleanBake bake element hidden beneath floor panel J Convection element and fan in back panel K Broil elements not shown L Oven vent M Upper microwave oven combination oven models only Parts and Features ...

Page 4: ...play C Time of day timer display FEATURE GUIDE WARNING Food Poisoning Hazard Do not let food sit in oven more than one hour before or after cooking Doing so can result in food poisoning or sickness A B C D E F G H I J K L M N A B C KEY FEATURE INSTRUCTIONS CLOCK TOOLS Clock The Clock uses a 12 hour cycle See the Electronic Oven Controls section 1 Touch CLOCK TOOLS 2 Touch the 1 key to select Clock...

Page 5: ...not to convert the recipe 3 If 1 Yes has been selected easy convect bake will appear in the lower display Then touch the number keys to enter a temperature The convection bake range can be set between 170 F and 550 F 77 C and 288 C The oven temperature will automatically be reduced by 25 F 14 C for EasyConvect Bake and the adjusted temperature will show on the display but the cook time will not be...

Page 6: ...oven display until the oven is turned off 6 Touch CANCEL for the selected oven when finished cooking CONVECT MODE Convect broil Close the door 1 Touch Lower Oven CONVECT BROIL Touch the number keys to enter a temperature other than 550 F 288 C The convection broil range can be set between 450 F and 550 F 232 C and 288 C 2 Touch START The set oven temperature will appear on the oven display until o...

Page 7: ... to toggle tones between on off settings End of Cycle and Reminder Tones The Timed Cooking end of cycle and reminder tones are preset on but can be turned off If all tones have been turned off the end of cycle and reminder tones cannot be independently turned on To Turn Tones Off On Touch CLOCK TOOLS and then 5 to turn On Touch CLOCK TOOLS and then 5 to turn Off NOTE Turning off this reminder tone...

Page 8: ...off A timed Sabbath Mode can also be set to keep the oven on for only part of the Sabbath When the Sabbath Mode is set the allowed keys are the number keys Start Tools to disable only and Cancel The display will scroll information on selecting the desired oven temperature When the Sabbath Mode is set the upper oven is disabled and no function is allowed When the oven door is opened or closed the o...

Page 9: ...osure to the fumes may result in death to certain birds Always move birds to another closed and well ventilated room Aluminum Foil IMPORTANT To avoid permanent damage to the oven bottom finish do not line the oven bottom with any type of foil or liner For best cooking results do not cover entire rack with foil because air must be able to move freely To catch spills place foil on rack below dish Ma...

Page 10: ...ith the sliding shelf 2 Using 2 hands lift up on the front edge of the rack and push the sliding shelf to the back wall of the oven so that the front edge of the sliding shelf sits on the rack guides The front edge of the rack and the sliding shelf should be higher than the back edge 3 Pull the rack and the sliding shelf out FOOD RACK POSITION Large roasts turkeys angel food cakes bundt cakes quic...

Page 11: ... 12 to 17 minutes to reach 350 F 177 C with all of the oven racks provided with your oven inside the oven cavity Higher temperatures will take longer to preheat The preheat cycle rapidly increases the oven temperature The actual oven temperature will go above your set temperature to offset the heat lost when your oven door is opened to insert food This ensures that when you place your food in the ...

Page 12: ... for large turkeys and roasts It is important not to cover foods with lids or aluminum foil so that surface areas remain exposed to the circulating air allowing browning and crisping Keep heat loss to a minimum by opening the oven door only when necessary It is recommended to use the oven light to monitor progress Choose cookie sheets without sides and roasting pans with lower sides to allow air t...

Page 13: ...probe into the food item For meats the probe tip should be located in the center of the thickest part of the meat and not into the fat or touching a bone Place food in oven and connect the temperature probe to the jack Keep probe as far away from heat source as possible Close oven door NOTE The temperature probe must be inserted into the food item before the mode is selected 1 Touch the number key...

Page 14: ...Do not block the oven vent s during the High Temp Self Cleaning cycle Air must be able to move freely Depending on your model see Oven Vent or Oven Vents section Do not clean rub damage or move the oven door gasket The door gasket is essential for a good seal Prepare Oven Remove the broiler pan grid cookware and bakeware and on some models the temperature probe from the oven Remove oven racks to k...

Page 15: ... start locking the door and Locking Door will appear in the lower display Opening the door at this point will cancel the self clean cycle DOOR LOCKED will appear in the lower display once the door is locked When the cycle is complete and the oven cools self clean complete will appear on the oven display and DOOR LOCKED will disappear The door will not unlock until the oven is cool 5 Touch CANCEL o...

Page 16: ...ANT Do not use bulbs rated higher than 40 watts Oven Door IMPORTANT To avoid oven door glass breakage Do not close the oven door if the racks are not fully inserted into the oven cavity or when bakeware extends past the front edge of an oven rack Do not set objects on the glass surface of the oven door Do not hit glass surfaces with bakeware or other objects Do not wipe down glass surfaces until t...

Page 17: ...12 to 17 minutes Higher temperatures will take more time Removing unused oven racks prior to preheating can help reduce preheat time Self Cleaning cycle will not operate Is the oven door open Close the oven door all the way Has the function been entered See High Temp Self Cleaning Cycle section On some models has a delay start Self Clean cycle been set See High Temp Self Cleaning Cycle section Has...

Page 18: ... Canada Features and specifications on our full line of appliances Referrals to local dealers Use and maintenance procedures Accessory and repair parts sales For Further Assistance If you need further assistance you can write to Whirlpool Canada LP with any questions or concerns at Customer eXperience Centre Whirlpool Canada LP 200 6750 Century Ave Mississauga Ontario L5N 0B7 Please include a dayt...

Page 19: ... more comprehensive warranty than the limited warranty that comes with this major appliance you should ask KitchenAid or your retailer about buying an extended warranty LIMITATION OF REMEDIES EXCLUSION OF INCIDENTAL AND CONSEQUENTIAL DAMAGES YOUR SOLE AND EXCLUSIVE REMEDY UNDER THIS LIMITED WARRANTY SHALL BE PRODUCT REPAIR AS PROVIDED HEREIN KITCHENAID SHALL NOT BE LIABLE FOR INCIDENTAL OR CONSEQU...

Page 20: ... 2017 Used under license in Canada All rights reserved Utilisé sous licence au Canada Tous droits réservés 09 17 Printed in U S A Imprimé aux É U W10643472C ...

Reviews: