background image

13

Oven Vent(s)

The oven vent(s) should not be blocked or covered since they 

allow  the inlet of fresh air into the cooling system. Also, the 

bottom vent should not be blocked or covered since it allows 

the inlet of fresh air into the cooling system and the outlet of 

hot air from the cooling system. Blocking or covering vents 

will cause poor air circulation, affecting cooking, cleaning, 

and cooling results.

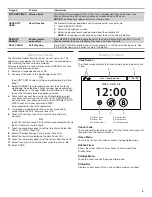
Preheating and Oven Temperature

Preheating

When beginning a Bake or Convect Bake cycle, the oven begins 

preheating after Start is touched. The oven will take approximately 

12 to 17 minutes to reach 350°F (177°C) with all of the oven 

racks provided with your oven inside the oven cavity. Higher 

temperatures will take longer to preheat. Factors that impact 

preheat times include room temperature, oven temperature, and 

the number of racks. Unused oven racks can be removed prior 

to preheating your oven to help reduce preheat time. The preheat 

cycle rapidly increases the oven temperature. The actual oven 

temperature will go above your set temperature to offset the heat 

lost when your oven door is opened to insert food. This ensures 

that when you place your food in the oven, the oven will begin 

at the proper temperature. Insert your food when the preheat 

tone sounds. Do not open the door during preheat until the tone 

sounds.

Oven Temperature

While in use, the oven elements will cycle on and off as needed 

to maintain a consistent temperature. They may run slightly 

hot or cool at any point in time due to this cycling. Opening the 

oven door while in use will release the hot air and cool the oven 

which could impact the cooking time and performance. It is 

recommended to use the oven light to monitor cooking progress.

Baking and Roasting

IMPORTANT:

 The convection fan and convection element may 

operate during the Bake function to enhance performance and 

heat distribution.
During baking or roasting, the bake and broil elements will cycle 

on and off in intervals to maintain the oven temperature. 
If the oven door is opened during baking or roasting, the heating 

elements (bake and broil) will turn off approximately 30 seconds 

after the door is opened. They will turn on again approximately 30 

seconds after the door is closed.

Broiling

Broiling uses direct radiant heat to cook food.
The element cycles on and off in intervals to maintain the oven 

temperature.

IMPORTANT:

 Close the door to ensure proper broiling 

temperature.
If the oven door is opened during broiling, the broil element will 

turn off in approximately 30 seconds. When the oven door is 

closed, the element will come back on approximately 30 seconds 

later.


For best results, use a broiler pan and grid. It is designed to 

drain juices and help avoid spatter and smoke.
If you would like to purchase a Broiler Pan Kit, it may be 

ordered. See the “Accessories” section to order.


For proper draining, do not cover the grid with foil. The bottom 

of the broiler pan may be lined with aluminum foil for easier 

cleaning.


Trim excess fat to reduce spattering. Slit the remaining fat on 

the edges to avoid curling.


Pull out oven rack to stop position before turning or removing 

food. Use tongs to turn food to avoid the loss of juices. Very 

thin cuts of fish, poultry or meat may not need to be turned.


After broiling, remove the pan from the oven when removing 

the food. Drippings will bake on the pan if left in the heated 

oven, making cleaning more difficult.
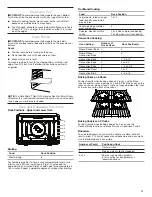
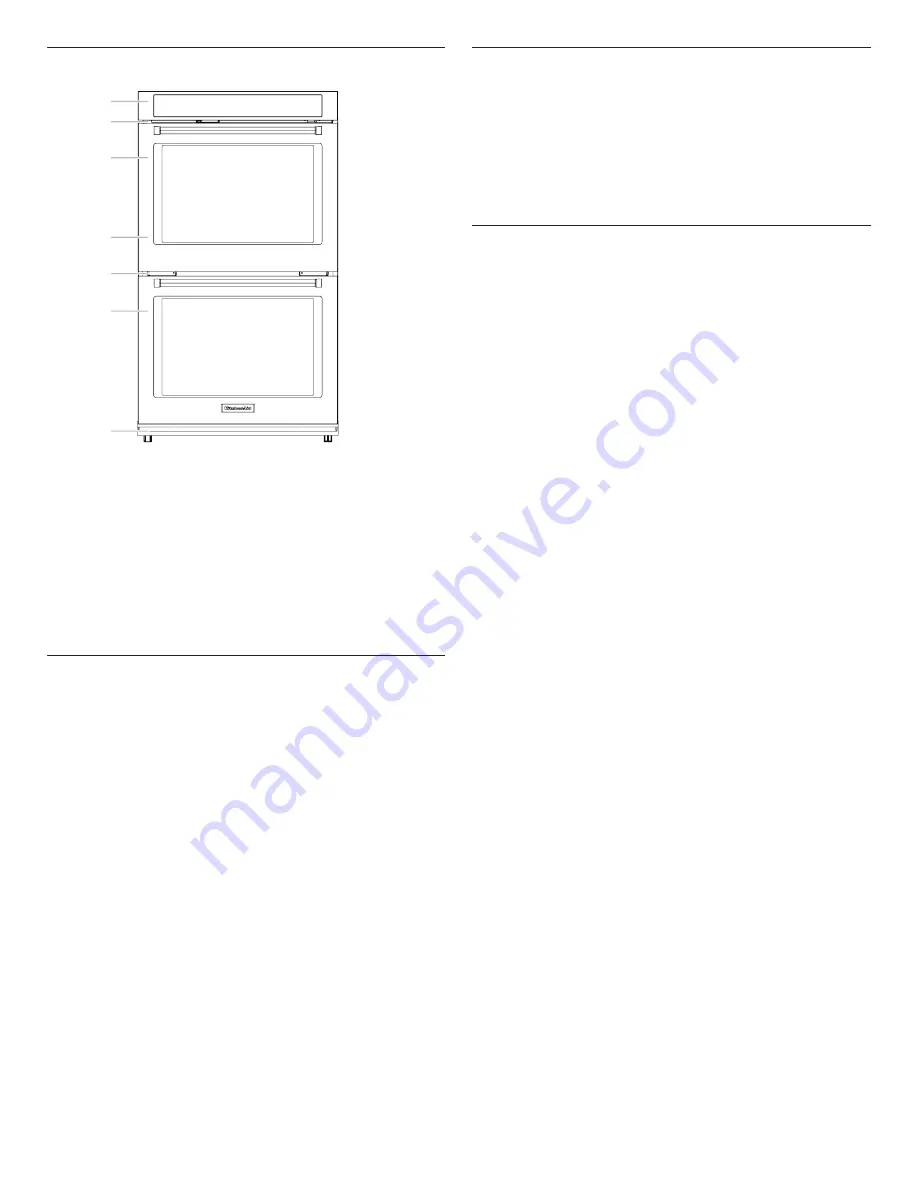
A
B

C

D

E

F

G

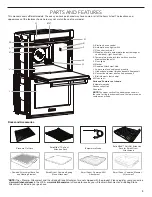
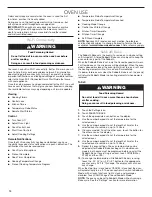
Single and Double Oven

A.  Control panel
B.  Oven vent
C.  Single oven or 

upper double oven

G. Bottom vent

Double Oven

D.  Upper oven
E.  Oven vent
F.  Lower oven
G. Bottom vent

Summary of Contents for KOSE900HBS

Page 1: ...del lado derecho superior de la puerta del horno Table of Contents BUILT IN ELECTRIC OVENS USER INSTRUCTIONS W10903389B BUILT IN OVEN SAFETY 2 PARTS AND FEATURES 3 Control Panel 4 Welcome Guide 5 Display Screens 5 Cooking Modes 7 Kitchen Timer 8 Tones Sounds 8 Control Lock 8 Settings 9 OVEN USE 10 Wi Fi Connectivity 10 Sabbath Bake 10 Aluminum Foil 11 Oven Racks 11 Rack and Bakeware Positions 11 S...

Page 2: ...es Smother fire or flame or use dry chemical or foam type extinguisher Use Only Dry Potholders Moist or damp potholders on hot surfaces may result in burns from steam Do not let potholder touch hot heating elements Do not use a towel or other bulky cloth Use Care When Opening Door Let hot air or steam escape before removing or replacing food Do Not Heat Unopened Food Containers Build up of pressur...

Page 3: ...nel L Broil elements not shown M Oven vent Parts and Features not shown Temperature probe Condensation tray Oven racks NOTE The upper cavity of the double oven shown is the same for single oven models and the lower oven on combo oven models Racks and Accessories Standard Flat Rack SatinGlide Roll out Extension Rack Temperature Probe SatinGlide Roll Out Extension Rack for Smart Oven Attachments Pow...

Page 4: ...ol their respective oven light While the oven door is closed touch UPPER LIGHT or LOWER LIGHT to turn the desired light on and off When the oven door is opened the oven light will automatically come on START Function start The Start keypad begins any oven function If Start is not touched within 5 minutes after touching a keypad the function is canceled and the time of day is displayed CANCEL CANCE...

Page 5: ...ad the KitchenAid app signup and select Add Appliance in the app Follow the instructions in the app to scan the QR code from the appliance screen 4 To manually connect the oven to the KitchenAid app select your home network from the list touch ADD A NETWORK to manually enter your home network or touch CONNECT WITH WPS to connect to your network via WPS If prompted enter your Wi Fi password 5 A mes...

Page 6: ...he function to run When Timer Ends optional Available if a Cook Time is set Touch to change what the oven does when the set cook time ends Hold Temperature The oven temperature stays at the set temperature after the cook time ends Turn Off The oven turns off when the set cook time ends Keep Warm The oven temperature is reduced to 170 F 77 C after the set cook time ends Add Delay optional Available...

Page 7: ...all cuts of meats or poultry Proof Dough that needs to rise Convect Bake Foods with flaky and dry crusts with moist interiors like pastries pies or breads Convect Roast Large foods that should be browned on the outside but moist inside like whole poultry or roasts Convect Broil Tender or uneven cuts of meats or poultry Probe Cook Foods that need to be cooked to a specific internal temperature like...

Page 8: ...en will turn off Tones Sounds Tones are audible signals indicating the following Valid keypad touch Function has been entered Oven is preheated Invalid keypad touch End of a cooking cycle When timer reaches zero Includes using the Kitchen Timer for functions other than cooking Powered attachments connected Powered attachments disconnected Control is locked Control is unlocked Control Lock The Cont...

Page 9: ...ow Off Accessory In Out High Medium default Low Off Keypress High default Medium Low Off Mute Sounds On default Sounds Off Setting Available Selections Temperature Temperature Fahrenheit default Celsius Display Brightness Low Medium High Maximum default Language Language English Français Attachment Registration View Register Powered Attachments Manage Favorites Clear All Favorites Calibrate Instru...

Page 10: ...main on in a bake setting until turned off A timed Sabbath Bake can also be set to keep the oven on for only part of the Sabbath When the Sabbath Bake is set only the Cancel keypads will work For Combo ovens the microwave will be disabled When the oven door is opened or closed the oven light will not turn on or off and the heating elements will not turn on or off immediately If a power failure occ...

Page 11: ...ely 3 minutes Side 2 should cook for approximately 3 to 4 minutes Expect a moderate degree of smoke when broiling Traditional Cooking Food Rack Position Large roasts turkeys angel food bundt cakes quick breads pies 1 or 2 Yeast breads casseroles meat and poultry 2 Cookies biscuits muffins cakes 2 or 3 when single rack baking 2 and 5 when multi rack baking Convection Cooking Oven Setting Number of ...

Page 12: ...he sliding shelves do not place more than 25 lbs 11 4 kg on the SatinGlide roll out extension rack or 35 lbs 15 9 kg on the roll out rack for powered attachments Do not clean the SatinGlide roll out extension racks in a dishwasher It may remove the racks lubricant and affect their ability to slide See the General Cleaning section for more information Bakeware The bakeware material affects cooking ...

Page 13: ...ght to monitor cooking progress Baking and Roasting IMPORTANT The convection fan and convection element may operate during the Bake function to enhance performance and heat distribution During baking or roasting the bake and broil elements will cycle on and off in intervals to maintain the oven temperature If the oven door is opened during baking or roasting the heating elements bake and broil wil...

Page 14: ...of meats and poultry Check the temperature of pork and poultry in 2 or 3 places Proofing Bread Proofing bread prepares dough for baking by activating the yeast Proofing twice is recommended unless the recipe directs otherwise To Proof Before first proofing place dough in a lightly greased bowl and cover loosely with waxed paper or plastic wrap coated with shortening Place on rack 2 See the Rack an...

Page 15: ...lowing the advice in Recipe Guide mode can take the uncertainty out of new recipes Smart Oven Powered Attachments The Powered Attachments are designed to introduce new ways of using your oven See the Cook s Assistant Option section for more information Each attachment fits in to the SatinGlide Roll Out Extension Rack for Smart Oven Attachments and plugs into the hub at the rear of the oven See the...

Page 16: ...emperature after the set cook time ends Turn Off default The oven turns off when the set cook time ends Keep Warm The oven temperature is reduced to 170 F 77 C after the set cook time ends 5 Touch DELAY START and set the time of day the oven should turn on Touch SUMMARY to see when the oven will turn on and off 6 Touch START The timeline will appear in the display and the oven will begin preheatin...

Page 17: ...ry high temperatures burning soil to a powdery ash Use the following chart as a guide to determine the desired cleaning level Cleaning Level Total Cleaning Time includes a 30 minute cool down time Light 4 hours Normal 5 hours Heavy 6 hours Once the oven has completely cooled remove ash with a damp cloth To avoid breaking the glass do not apply a cool damp cloth to the inner door glass before it ha...

Page 18: ...emove racks or they will discolor and become harder to slide If this happens a light coating of vegetable oil applied to the rack guides will help them slide OVEN RACKS Cleaning Method Steel wool pad POWERED ATTACHMENTS To avoid damage to the nonstick surfaces do not use abrasive cleaners steel wool pads gritty washcloths or abrasive paper towels Food spills should be cleaned when the Powered Atta...

Page 19: ... covered with a soft blanket or use the corner posts from your packaging material 2 Fully open the oven door 3 Locate the oven door hinge locks in both corners of the oven door and rotate the hinge locks toward the oven door to the unlocked position If the door hinge lock is not rotated fully see illustration B the door will not remove properly Locked position Grip here to rotate Unlocked position...

Page 20: ... or damage may occur to the door hinge 5 Lower the oven door to the fully open position If the oven door does not open to a full 90 repeat steps 1 through 3 6 Locate the oven door hinge locks in the corners of the oven door and rotate the hinge locks toward the oven cavity to the locked position Unlocked position Locked position 7 After the door hinges have been locked gently swing the door upward...

Page 21: ...ettings section Delay Start is set See the Cook Time section Control is locked Press and hold the Control Lock icon for 3 seconds to unlock Sabbath mode is set See the Sabbath Mode section On double oven models one oven is self cleaning When one oven is self cleaning the other oven cannot be set or turned on Oven temperature too high or too low Oven temperature needs adjustment See Calibrate Oven ...

Page 22: ...25 F 15 C or move rack to a higher position in the oven Lighter browning of food caused by shiny or light colored bakeware Move rack to a lower position in the oven ACCESSORIES For accessories in the U S A you can visit our website at www kitchenaid com or call us at 1 800 422 1230 In Canada visit our website at www kitchenaid ca or call us at 1 800 807 6777 Affresh Stainless Steel Cleaner stainle...

Page 23: ...urchase Proof of original purchase date is required to obtain service under this limited warranty 1 Commercial non residential multiple family use or use inconsistent with published user operator or installation instructions 2 In home instruction on how to use your product 3 Service to correct improper product maintenance or installation installation not in accordance with electrical or plumbing c...

Page 24: ...UTILISATION DU FOUR ENCASTRÉ SÉCURITÉ DU FOUR ENCASTRÉ 25 PIÈCES ET CARACTÉRISTIQUES 27 Tableau de commande 28 Guide de bienvenue 29 Écrans d affichage 29 Modes de cuisson 31 Minuterie de cuisine 32 Tons sons 32 Verrouillage des commandes 32 Réglages 33 UTILISATION AU FOUR 34 Connexion Wi Fi 34 Cuisson au four Sabbat 34 Papier d aluminium 35 Grilles du four 35 Positionnement des grilles et des ust...

Page 25: ...urité importants dans ce manuel et sur votre appareil ménager Ce symbole d alerte de sécurité vous signale les dangers potentiels de décès et de blessures graves Tous les messages de sécurité suivront le symbole d alerte de sécurité et le mot DANGER ou AVERTISSEMENT Ces mots signifient DANGER AVERTISSEMENT Assurez vous de toujours lire tous les messages de sécurité et de vous y conformer à vous et...

Page 26: ...res Ne jamais obstruer les ouvertures des évents Placement des grilles du four Toujours placer les grilles du four à l endroit désiré lorsque le four est froid Si la grille doit être déplacée lorsque le four est chaud ne pas laisser des mitaines de four toucher l élément chauffant dans le four Remisage dans le four Des matériaux inflammables ne doivent pas être remisés dans un four NE PAS TOUCHER ...

Page 27: ... du four K Élément et ventilateur à convection derrière le panneau arrière L Éléments de cuisson au gril non illustrés M Évent du four Pièces et caractéristiques non illustrées Sonde Plateau de condensation Grilles du four REMARQUE La cavité supérieure du four double présenté est identique à la cavité d un four simple et à la cavité inférieure d un ensemble four Grilles et accessoires Grille plate...

Page 28: ...uyer sur UPPER LIGHT lampe supérieure ou LOWERT LIGHT lampe inférieure pour allumer ou éteindre la lampe du four désirée La lampe du four s allume automatiquement à l ouverture de la porte START mise en marche Fonction de mise en marche La touche Start mise en marche met en marche n importe quelle fonction du four Si après avoir appuyé sur une touche on n appuie pas sur Start dans les 5 minutes qu...

Page 29: ...plication mobile Télécharger l application KitchenAid s inscrire et sélectionner Add Appliance ajouter un appareil dans l application Suivre les instructions dans l application pour balayer le code à barres 2D affiché à l écran de l appareil 4 Pour connecter manuellement le four à l application KitchenAid sélectionner le réseau de votre domicile affiché dans la liste appuyer sur ADD A NETWORK ajou...

Page 30: ...facultative Accessible si une minuterie de cuisson est utilisée Permet de modifier le mode de cuisson du four lorsque la minuterie expire Maintenir la température La température du four reste à la température réglée une fois la minuterie expirée Désactivation Le four s éteint lorsque le temps de cuisson expire Maintien au chaud La température du four passe à 170 F 77 C une fois la minuterie de cui...

Page 31: ...c croûte feuilletée et sèche mais dont l intérieur est humide tels les pâtisseries tartes et pains Rôtissage par convection Gros aliments qui devraient être dorés à l extérieur mais tendre à l intérieur comme un poulet entier ou des rôtis Cuisson au gril par convection Pour des morceaux tendres ou irréguliers de viande et de volaille Cuisson avec sonde Aliments qui doivent atteindre une températur...

Page 32: ...eint Tons sons Les signaux sonores avertissent l utilisateur de divers événements Touche numérique valide Saisie d une fonction Four préchauffé Touche numérique invalide Fin d un programme de cuisson Lorsque la minuterie est à zéro Comprend l utilisation de la minuterie de cuisine pour des fonctions autres que la cuisson Accessoire alimenté branché Accessoire alimenté débranché La commande est ver...

Page 33: ... faible arrêt Touches élevé par défaut moyen faible arrêt Sourdine sons activés par défaut désactivés Réglage Sélections accessibles Température Température Fahrenheit par défaut Celsius Affichage Luminosité faible moyenne élevée maximum par défaut Langue Langue anglais français Enregistrement de l accessoire Voir enregistrer accessoires alimentés Gérer les favoris Supprimer tous les favoris Calib...

Page 34: ... être programmé pour garder le four allumé seulement pendant une partie du mode Sabbat Lorsque le mode de cuisson au four Sabbat est activé seules les touches d annulation fonctionnent Pour les fours combinés le four à micro ondes sera désactivé Lorsque la porte du four est ouverte ou fermée la lampe du four ne s allume ou ne s éteint pas et les éléments de chauffage ne s allument ou ne s éteignen...

Page 35: ...gent peut être insérée et enlevée de la même façon qu une grille ordinaire il faut cependant un peu plus de force Positionnement des grilles et des ustensiles de cuisson au four Positions de grille Four supérieur et inférieur Cuisson au gril Aliment Position de grille Pour la plupart des cuissons au gril 6 Pour qu une galette à hamburger soit bien saisie à l extérieur tout en restant bien tendre à...

Page 36: ...de grille 1 Position déployée Position rétractée et emboîtée Enlever la grille coulissante déployante SatinGlide 1 Retirer tous les objets de la grille coulissante déployante avant d enlever la grille 2 Enfoncer la grille complètement en la faisant glisser jusqu à ce qu elle soit rétractée et emboîtée sur le support coulissant 3 À 2 mains soulever l avant de la grille et pousser le support couliss...

Page 37: ... la circulation adéquate de l air et affecte les résultats de cuisson de nettoyage et de refroidissement Préchauffage et température du four Préchauffage Au début d un programme de cuisson au four ou de cuisson au four avec convection le four commence par un préchauffage une fois la touche Start mise en marche enfoncée Le four atteint 350 F 177 C en 12 à 17 minutes environ lorsque toutes les grill...

Page 38: ...ors de la première sélection d un mode de cuisson avec l aide cuisinier l option d aide cuisinier optimisera automatiquement la minuterie et la température de la recette pour procurer le résultat désiré Pour saisir manuellement la minuterie et la température appuyer sur COOK S ASSISTANT aide cuisinier puis sélectionner Manual manuel Le four ne modifiera pas la minuterie ou la température et passer...

Page 39: ...son expire Maintien au chaud La température du four passe à 170 F 77 C une fois la minuterie de cuisson expirée 7 Appuyer sur START mise en marche Lorsque la température de sonde est atteinte l action une fois la minuterie expirée s amorce 8 Appuyer sur la touche CANCEL annulation du four sélectionné ou ouvrir la porte pour effacer l affichage ou arrêter les signaux sonores de rappel 9 Toujours dé...

Page 40: ...uisson Maintenir la température La température du four reste au point réglé une fois la minuterie expirée Désactivation Le four s éteint lorsque le temps de cuisson expire Maintien au chaud La température du four passe à 170 F 77 C une fois la minuterie de cuisson expirée 5 Appuyer sur START mise en marche Le compte à rebours de la durée de cuisson apparaîtra sur l afficheur La minuterie ne commen...

Page 41: ... températures très élevées brûlant les saletés pour les réduire en cendre Utiliser le tableau ci dessous comme guide pour déterminer le niveau de nettoyage désiré Niveau de nettoyage Temps total de nettoyage comprend une période de refroidissement de 30 minutes Léger 4 heures Normal 5 heures Très sale 6 heures Lorsque le four a complètement refroidi retirer la cendre avec un chiffon humide Afin d ...

Page 42: ...tableau Nettoyant affresh pour cuisine et appareils ménagers numéro de pièce W10355010 vendu séparément Voir la section Accessoires pour commander CAVITÉ DU FOUR Ne pas utiliser de nettoyants à four Les éclaboussures alimentaires doivent être nettoyées lorsque le four a refroidi À des températures élevées les aliments réagissent avec la porcelaine Cette réaction peut causer des taches des attaques...

Page 43: ...e pas frapper la vitre avec des ustensiles de cuisson ou d autres objets Ne pas essuyer les vitres avant que le four n ait complètement refroidi Il n est pas suggéré d enlever la porte du four dans le cadre d une utilisation normale Toutefois s il est nécessaire de l enlever s assurer que le four est éteint et froid Ensuite suivre les instructions ci dessous La porte du four est lourde Pour enleve...

Page 44: ...nt engagées au fond des fentes de la cavité du four IMPORTANT Ne pas fermer la porte à cette étape pour ne pas endommager la charnière de la porte 5 Abaisser la porte du four jusqu à ce qu elle soit complètement ouverte Si la porte du four ne s ouvre pas complètement à un angle de 90 répéter les étapes 1 à 3 6 Identifier les loquets de charnière de la porte du four dans les angles de la porte fair...

Page 45: ...andes pendant 3 secondes pour déverrouiller Le mode Sabbat est activé Voir la section Mode Sabbat Sur les modèles à double four l un des fours est en cours d autonettoyage Lorsqu un four effectue un programme d autonettoyage l autre four ne peut être ni réglé ni allumé La température du four est trop élevée ou trop basse Il faut régler la température du four Consulter la section Calibrer le four d...

Page 46: ... ustensiles de cuisson au four plus ternes ou plus foncés Diminuer la température du four de 25 F 15 C ou déplacer la grille plus haut dans le four Brunissage moins prononcé des aliments à cause d ustensiles de cuisson au four brillants ou plus clairs Déplacer la grille à une position moins élevée dans le four ACCESSOIRES Aux É U pour les accessoires consulter notre site Web au www kitchenaid com ...

Page 47: ...ros appareil ménager est utilisé et entretenu conformément aux instructions jointes à ou fournies avec le produit KitchenAid paiera les pièces spécifiées par le fabricant pour la cavité du four et la porte intérieure en acier inoxydable si la pièce rouille de part en part du fait de vices de matériaux et de fabrication VOTRE SEUL ET EXCLUSIF RECOURS DANS LE CADRE DE LA PRÉSENTE GARANTIE LIMITÉE CO...

Page 48: ...e gros appareil ménager autre que les responsabilités énoncées dans la présente garantie Si vous souhaitez une garantie plus étendue ou plus complète que la garantie limitée fournie avec ce gros appareil ménager adressez vous à KitchenAid ou à votre détaillant pour obtenir les modalités d achat d une garantie étendue LIMITATION DES RECOURS EXCLUSION DES DOMMAGES FORTUITS OU INDIRECTS VOTRE SEUL ET...

Reviews: