background image

33

T

ECHNIQUES

OF

A

B

ARIST

A

Continued…

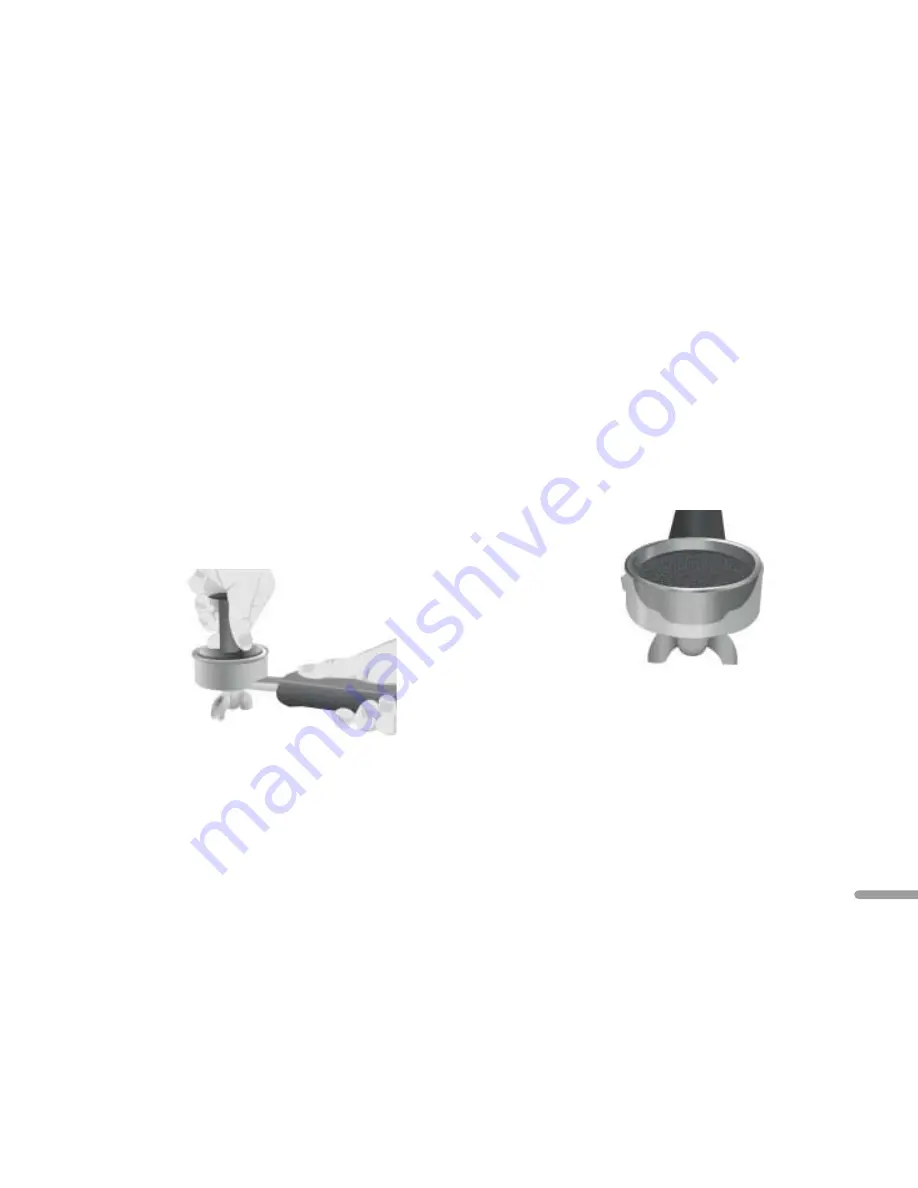
Proper Tamping Technique

1.

The tamper handle should be grasped like a doorknob, with the

base of the handle firmly against the palm. When tamping, try to
keep the tamper, wrist, and elbow in a straight line. 

2.

With the bottom of the portafilter resting on a solid surface,

gently press the tamper into the coffee with the goal of creating
a level surface. Remove the tamper from the filter basket with a
slight twisting motion – this will help prevent the tamper from
pulling up chunks of coffee. 

3.

After removing the tamper, some grinds may stick to the side of

the filter basket. Tap the portafilter gently on the table to jostle
the grinds onto the tamped coffee disc. Do not tap too hard, or
the tamped coffee will dislodge or fracture. 

4.

Apply a second, finishing tamp (also called a polishing tamp). 

Press straight down on the coffee with about 35 pounds of
pressure, then relax the force slightly (to about 20 pounds) and
polish the coffee by turning the tamper completely around twice.

5.

Inspect your tamp. The coffee disc should be smooth and level

with no gaps between the side of the filter basket and the coffee.  

Measuring Tamping Pressure 

20 pounds, 30 pounds – how do you know how much tamping
force you are actually using? Do what the baristas do: use a
bathroom scale! Place a scale on a table or countertop, and tamp
your coffee on top of it. Pretty soon, you will develop a feel for how
much twenty or thirty pounds of force is. 

Summary of Contents for KPES100

Page 1: ...Model KPES100 Espresso Machine GUIDE TO PROFESSIONAL RESULTS P R O L I N E S E R I E S ...

Page 2: ... Registered trademark Trademark of KitchenAid U S A 2003 All rights reserved Specifications subject to change without notice dZw703 FOR THE WAY IT S MADE ...

Page 3: ...ESPRESSO MACHINE Table of Contents 3 Espresso Machine Safety 4 Important Safeguards 5 Proof of Purchase Registration 6 Electrical Requirements 7 Introduction Section Contents P R O L I N E S E R I E S 1 I NTRODUCTION ...

Page 4: ...mands A 3 way solenoid valve instantly vents pressure after brewing preventing a messy spray of coffee grounds when the portafilter is removed Of course a new experience of espresso is also a new experience of convenience Separate stations for brewing and frothing provide an immense workspace Instead of simple indicator lights dial gauges provide a continuous readout of boiler temperatures The fro...

Page 5: ... Replacement Parts 40 Arranging for Service After the Warranty Expires 40 Arranging for Service Outside the 50 United States Puerto Rico 41 INTRODUCTION Introduction 2 Espresso Machine Safety 4 Important Safeguards 5 Proof of Purchase Product Registration 6 Electrical Requirements 7 FEATURES AND OPERATION Espresso Machine Features 10 Preparing the Espresso Machine for Use Attaching the Cup Rail 13...

Page 6: ...nd others All safety messages will follow the safety alert symbol and either the word DANGER or WARNING These words mean You can be killed or seriously injured if you don t immediately follow instructions You can be killed or seriously injured if you don t follow instructions All safety messages will tell you what the potential hazard is tell you how to reduce the chance of injury and tell you wha...

Page 7: ... or after appliance malfunctions or has been damaged in any manner Return the appliance to the nearest authorized service center for examination repair or adjustment IMPORTANT SAFEGUARDS SAVE THESE INSTRUCTIONS 7 The use of accessory attachments not recommended by the appliance manufacturer may result in fire electric shock or personal injury 8 Do not use outdoors 9 Do not let cord hang over edge ...

Page 8: ...ble us to contact you in the unlikely event of a product safety notification and assist us in complying with the provisions of the Consumer Product Safety Act This card does not verify your warranty PROOF OF PURCHASE PRODUCT REGISTRATION Please complete the following for your personal records Model Number KPES100 Serial Number ___________________________________________ Date Purchased_____________...

Page 9: ...n any way A short power supply cord is provided to reduce the risk resulting from becoming entangled in or tripping over a longer cord Do not use an extension cord If the power supply cord is too short have a qualified electrician or serviceman install an outlet near the appliance WARNING Electrical Shock Hazard Plug into a grounded 3 prong outlet Do not remove ground prong Do not use an adapter D...

Page 10: ......

Page 11: ...paring for Use 13 Brewing Espresso 16 Frothing Steaming Milk 19 Preparing Cappuccino 20 Preparing Café Latte 21 Dispensing Hot Water 22 Care Cleaning 23 Troubleshooting 26 Features and Operation Section Contents FEATURES AND OPERATION P R O L I N E S E R I E S ...

Page 12: ... will be illuminated Espresso Button Press the espresso button to activate the water pump for brewing espresso To stop brewing press the espresso button a second time Hot Water Button When the steam dial is open press and hold the hot water button to activate the water pump and dispense hot water from the frothing arm Pump shuts off automatically when the button is released Steam Dial To dispense ...

Page 13: ...p plate Drip Tray Full Indicator The indicator tip rises above the drip plate when the drip tray is nearly full F EATURES AND O PERATION 11 Water Reservoir The removable 2 liter 67 oz water reservoir slides left or right for easy filling and features easy to see max and min fill lines Translucent reservoir shows the water level at a glance Reservoir can be washed in the top rack of a dishwasher Cu...

Page 14: ...or each shot ounce of espresso The shower screen brush will help keep the brew head and shower screen free of grounds Not Shown Dual Boilers Separate boilers eliminate the wait single boiler machines require when switching between frothing and brewing Boiler heating elements never touch water they are located on the outside of the boiler for superb brew temperature consistency and burnout resistan...

Page 15: ...onged period the water reservoir runs dry during use this can damage the espresso machine multiple beverages are steamed without brewing espresso or dispensing hot water 1 Slide the water reservoir left or right to expose the top and fill with fresh cold water to the max fill line NOTE Distilled water or mineral water can damage the espresso machine Do not use either to brew espresso F EATURES AND...

Page 16: ... Hot Water functions will operate 2 Insert the end of the electrical cord without prongs into the cord receptacle in the back of the espresso machine 3 Plug the other end of the cord into a grounded 3 prong outlet PREPARING THE ESPRESSO MACHINE FOR USE WARNING Electrical Shock Hazard Plug into a grounded 3 prong outlet Do not remove ground prong Do not use an adapter Do not use an extension cord F...

Page 17: ...r under the nozzle of the frothing arm 9 Slowly open the Steam Dial by turning it counter clockwise then press and hold the Hot Water Button This activates the water pump and fills the frothing boiler with water After a few seconds water will start flowing from the nozzle 10 When the pitcher is about half full release the Hot Water Button and close the Steam Dial by rotating it clockwise until it ...

Page 18: ...ket for a double shot 2 oz The small capacity basket can be used with paper coffee pods 3 Press the filter basket into the portafilter until it snaps into place Do not fill the portafilter with coffee at this time 4 Position the portafilter underneath the brew head and align the portafilter handle with the arrow located on the left side of brew group housing Raise the portafilter into the brew hea...

Page 19: ...el as possible See Leveling and Tamping on page 32 and 33 for details 9 Sweep any excess grinds from the rim of the portafilter and insert the portafilter into the brew head 10 Place one or two espresso cups on the drip plate under the spouts of the portafilter Press the Espresso Button and espresso will start to flow into cups When the desired amount of espresso has been brewed usually 1 oz using...

Page 20: ... brewing multiple shots 1 Use a towel to clean and dry the filter basket before filling with coffee This will help insure even coffee extraction 2 To maintain the proper brewing temperature it is important to keep the brew group warm so Do not rinse the portafilter with tap water doing so will cool the filter It s best to wipe leftover grounds from the filter with a towel When you re busy with oth...

Page 21: ...e espresso machine on 2 Wait until the espresso machine has reached operating temperature this will take approximately 6 minutes When the frothing boiler temperature gauge needle climbs into the ready zone the espresso machine is ready to froth 3 Fill the frothing pitcher 1 3 full with cold milk 4 With the frothing arm pointed into an empty cup open the Steam Dial for a moment to purge excess wate...

Page 22: ...am Dial by turning it counter clockwise The farther the Steam Dial is rotated the greater the volume of steam that will be released Tilt the pitcher to one side to create a whirling motion in the milk keeping the tip of the frothing nozzle about 1 4 inch below the milk s surface If large bubbles are being created or if the milk spatters the nozzle is being held too high 7 As the froth expands it w...

Page 23: ...unces of syrup the most popular being almond and hazelnut If you use chocolate syrup and garnish the drink with whipped cream and chocolate shavings you ll have that chocolate and coffee lover s dream the Café Mocha To prepare a Café Latte you will need a pitcher larger than the one supplied with the espresso machine A 16 ounce capacity pitcher is perfect Fill the pitcher 1 2 full with cold milk T...

Page 24: ...hed operating temperature this will take about 6 minutes When the frothing boiler temperature gauge needle climbs into the ready zone the espresso machine is ready to dispense hot water 3 With the frothing arm pointed into an empty cup open the Steam Dial by turning it slowly counter clockwise Then press and hold the Hot Water Button to dispense water NOTE Residual frothing steam may exit the nozz...

Page 25: ...e frothing sleeve from the frothing nozzle by pulling it downward The frothing sleeve can be washed in warm soapy water Make sure any openings in the sleeve are free of residue 2 Wipe the frothing arm and nozzle with a clean damp cloth Do not use an abrasive scouring pad 3 Plug into a grounded 3 prong outlet 4 Turn the espresso machine on and let the boilers reach operating temperature Point the f...

Page 26: ...en Once every 75 to 100 shots of espresso the shower screen should be removed from the brew head to clean thoroughly 1 Using a short Phillips screwdriver remove the screw at the center of the shower screen by turning it counter clockwise Once the screw is free the shower screen should drop from the brew head 2 Wash the shower screen in warm soapy water and rinse with clean water 3 Place the shower...

Page 27: ...attach the portafilter and another under the frothing nozzle 4 Press the On Off Power Switch to turn the espresso machine on It is not necessary for the boilers to heat before proceeding to the next step 5 Press the Espresso Button and dispense cleaning agent through brew head for 15 seconds press the Espresso Button again to shut off 6 Open the Steam Dial by turning it counterclockwise then press...

Page 28: ... need to be descaled coffee may be too finely ground coffee may be too firmly tamped If the water pump is noisy the water reservoir may be empty reservoir siphon hoses may be kinked or improperly placed boilers may not be filled If water leaks from the portafilter the portafilter may not be properly attached to the brew head coffee grinds may be clinging to rim of portafilter or brew head gasket t...

Page 29: ...HNIQUES OF A BARISTA What is Espresso 28 Overextraction Underextraction 29 Elements of Great Espresso 29 Espresso Brewing Technique 30 A Glossary of Espresso Drinks 36 Techniques of a Barista Section Contents P R O L I N E S E R I E S ...

Page 30: ...tric water pump Through the decades the elements of espresso brewing were tested and refined to produce the standards we have today one ounce of true espresso comes from exposing 1 4 ounce 7 grams of finely ground and packed coffee to 195 205º F water under 130 lbs 9 bars of pressure In a brief 25 seconds most of the highly flavorful coffee aromas and oils are extracted while the more bitter compo...

Page 31: ...e length of time the water is in contact with the coffee All these factors are either directly or indirectly affected by the barista s technique Before Brewing The Elements of Great Espresso Before the espresso machine is even plugged in you ll need several elements to produce great coffee Fresh Coffee Beans Great coffee can only come from fresh coffee beans properly roasted Many baristas recommen...

Page 32: ...g Temperature Water temperature and temperature consistency have a direct impact on the flavor of espresso Great espresso comes from brewing at an optimum temperature ideally between 195 and 205 degrees Fahrenheit Modern boilers and thermostats excel at producing and maintaining the right temperature but there is a complicating factor that is a major concern for baristas maintaining heat in the br...

Page 33: ... most delicate aromatic compounds in coffee go stale within a few minutes of grinding so grind only as much as you intend to brew immediately Dosing Dosing is the process of measuring ground coffee into the filter basket A single shot of espresso requires 1 4 ounce 7 grams of coffee a double shot twice that If filled level with finely ground coffee the scoop included with the PRO LINE Series Espre...

Page 34: ... in the basket will create a path of least resistance for the brew water After dosing the filter with coffee level the coffee by sweeping a finger back and forth over the filter Do not sweep in one direction only this will cause the coffee to pile up on one side of the basket and produce uneven extraction Try to impart a slight bowl shape to the coffee with the center lower than the sides Make cer...

Page 35: ...ter gently on the table to jostle the grinds onto the tamped coffee disc Do not tap too hard or the tamped coffee will dislodge or fracture 4 Apply a second finishing tamp also called a polishing tamp Press straight down on the coffee with about 35 pounds of pressure then relax the force slightly to about 20 pounds and polish the coffee by turning the tamper completely around twice 5 Inspect your ...

Page 36: ...g when only 11 2 ounces have been extracted What you ve done is restrict the pour to include only the most flavorful and least bitter coffee oils and essences TECHNIQUES OF A BARISTA Extraction Rate Decades of experience have shown that the best espresso whether a single or a double shot takes about 20 25 seconds to brew If your espresso is brewing much faster or slower than 20 25 seconds and your...

Page 37: ...nstead of being deep brown make sure your brew group and boilers are fully heated use a less acidic blend of coffee is whitish with thin brown streaks review your tamping technique the tamped coffee has fractured or a gap has developed between the coffee and the side of the filter basket is thin and fast flowing review your tamping technique the tamp may not be firm enough to provide an even resis...

Page 38: ...tterness For ristretto simply brew about 3 4 oz using the small filter basket or 1 5 oz using the large basket A GLOSSARY OF ESPRESSO DRINKS Americano 6 to 8 ounces of hot water added to a single shot of espresso This makes a superb cup of coffee Café Latte 8 to 10 ounces of steamed milk added to a single shot of espresso Lattes are often flavored with 1 to 2 ounces of syrup Café Mocha A café latt...

Page 39: ...9 Arranging for Hassle Free Replacement 39 Ordering Accessories and Replacement Parts 40 Arranging for Service After the Warranty Expires 40 Arranging for Service Outside the U S Puerto Rico 41 Warranty Information Section Contents WARRANTY AND SERVICE INFORMATION P R O L I N E S E R I E S ...

Page 40: ...sle Free Replacement for details or call the KitchenAid Customer Satisfaction Center toll free at 1 800 541 6390 OR The replacement parts and repair labor costs to correct defects in materials and workmanship Service must be provided by an Authorized KitchenAid Service Center See the KitchenAid PRO LINE Series Espresso Machine Warranty for Puerto Rico for details on how to arrange for service Kitc...

Page 41: ... arrange to deliver an identical or comparable replacement to your door free of charge and arrange to have your failed Espresso Machine returned to us Your replacement unit will also be covered by our two year full warranty Please bring the Espresso Machine or ship it prepaid and insured to the nearest Authorized Service Center Call toll free 1 800 541 6390 Monday through Friday 8 a m to 8 p m Eas...

Page 42: ... WARRANTY EXPIRES For service information call toll free 1 800 541 6390 Monday through Friday 8 a m to 8 p m Eastern Time or Saturday 10 a m to 5 p m or write to Customer Satisfaction Center KitchenAid Portable Appliances P O Box 218 St Joseph MI 49085 0218 Customer Satisfaction Center KitchenAid Portable Appliances P O Box 218 St Joseph MI 49085 0218 WARNING Electrical Shock Hazard Unplug before ...

Page 43: ...I NFORMATION ARRANGING FOR SERVICE OUTSIDE THE 50 UNITED STATES AND PUERTO RICO Consult your local KitchenAid dealer or the store where you purchased your PRO LINE Series Espresso Machine for information on how to obtain service ...

Page 44: ......

Reviews: