KITCHENAID
Stand Mixer Service Manual LIT4177310-C 2005 KitchenAid
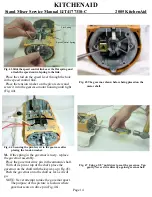
Fig. 88 Slide the bowl support down and off the column to
replace the bowl lift assembly.
G.
To install the new bowl lift arm, drive out the
roll pin (Fig. 89).
With the roll pin out, remove the bowl lift handle
(Fig. 90).
The bowl lift arm can now be removed along with
the bowl lift mechanism.
Fig. 89 Drive out the roll pin to remove the bowl lift arm.
Fig. 90 With the roll pin removed, pull out the handle.
H.
With the bowl lift handle down, push it through
the column, through the new arm and into the
bearing hole in the column.
Place the roll pin in the arm and drive it through
the lift handle until it is almost flush with the arm
(Fig. 91). Be sure the pin is tight.
Check the beater height adjusting screw; replace
if missing (Fig. 91).
Fig. 91 The roll pin is driven in until it is almost flush
with the arm. While the adjusting screw is replaced from
this side
,
it is adjusted from the other.
I.
Slide the new bowl support assembly on the
column (Fig.88).
Place the bowl lift bracket in place and screw in
the two #10-24x1/2” flat head screws (Fig. 87).
These screws must be very tight.
Check the castle nut so that the tension will be
great enough to snap the rod into the arm and hold
it there (Fig. 92).
Fig. 92 Check the castle nut for proper tension on the
bowl lift bracket.
J.
Place the base on the bottom of the column and
screw in the four 5/16”-18x3/4” round head screws
(Fig. 86). Tighten these screws to 70 - 90 in. lbs.
of torque.
Page 26
ROLL PIN
BEATER HEIGHT
ADJUSTING SCREW
HANDLE DOWN
HANDLE UP
BOWL LIFT ARM


