KitchenAid KSM2APC, User Manual
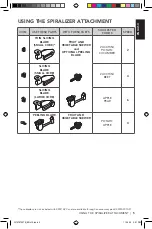
The KitchenAid KSM2APC is a versatile attachment that allows you to effortlessly peel, core, and slice fruits and vegetables. Enhance your culinary prowess with this user-friendly tool. A detailed user manual is available for free download on our website, ensuring you have all the necessary instructions at your fingertips.
Share
Download


Reviews:
No comments
Related manuals for KSM2APC

WP100
Brand: Acer Pages: 2

PD100
Brand: Acer Pages: 4

40640
Brand: Kargo Master Pages: 5

EX-F60 SERIES
Brand: Panasonic Pages: 2

EX-F70 SERIES
Brand: Panasonic Pages: 10

KX-TD816
Brand: Panasonic Pages: 14

CX-400 Series
Brand: Panasonic Pages: 30

DocuPrint N24
Brand: Xerox Pages: 10

aSENSE RL
Brand: aci Pages: 4

HIGH BAY Series
Brand: RAB Pages: 2

RC 9320 F
Brand: CDA Pages: 52

STARSHOOT 52173
Brand: Orion Pages: 8

Allen-Bradley 42GLP-9000-QD
Brand: Rockwell Automation Pages: 10

PROFESSIONAL SPRWC140D1SS
Brand: Silhouette Pages: 42

CH-BC-GH34
Brand: Camtree Pages: 3

95904
Brand: U.S. General Pages: 4

PSEN cs1.1p
Brand: Pilz Pages: 8

Scarlett 18i8
Brand: Focusrite Pages: 29


