background image

ENGLISH

CARE AND CLEANING  |

  9

CARE AND CLEANING

CLEANING THE SCALE ATTACHMENT AND ACCESSORIES

1  

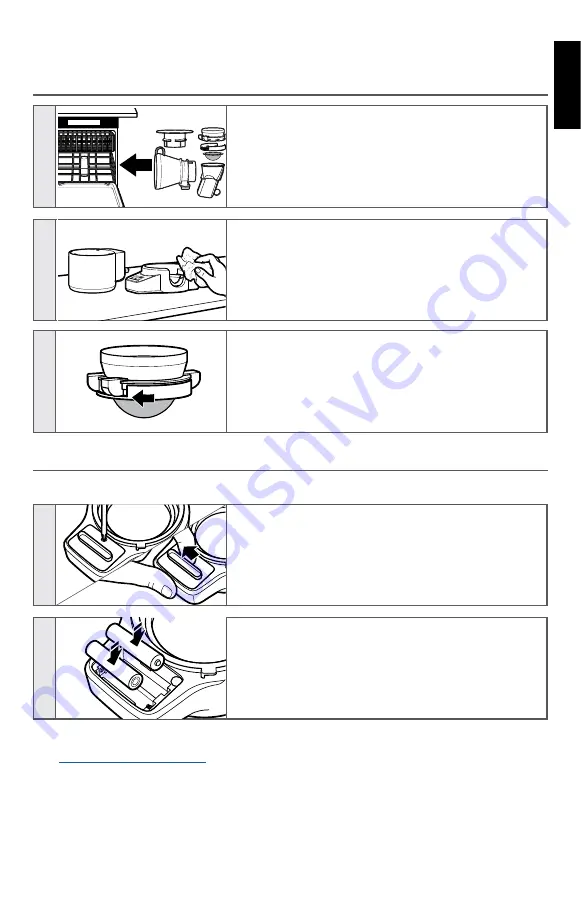
The following parts are dishwasher-safe, top rack only: 

ingredient hopper, sifter assembly, swivel chute, and 

scale plate. 

TIP: 

When placing the ingredient hopper on the rack, 

be sure it is lying on its side with the ingredient valve 

facing down.

2  

Do not immerse the scale or sifter housing in water 

or other liquid. Wipe clean with a warm, damp cloth, 

and dry thoroughly with a soft cloth before re-use or 

storing.

3  

To disassemble the sifter assembly:

 Turn the collar to 

the left to loosen and release the screen for cleaning, 

if desired.

REPLACING THE BATTERIES

The digital scale of your Scale attachment is powered by 2 AAA batteries (included).

1  

Flip the digital scale over, and use a Phillips-head 

screwdriver to remove the screw on the compartment 

cover. Lift the compartment cover as shown.

2  

Replace the 2 AAA batteries in the compartment. 

Make sure to replace the screw when reattaching the 

compartment cover.

FOR DETAILED INFORMATION ON CLEANING THE SCALE ATTACHMENT

Visit 

kitchenaid.com/quickstart

 for additional instructions with videos, inspiring recipes, and 

tips on how to clean your Scale attachment.

Summary of Contents for KSMSFTA

Page 1: ...KSMSFTA ...

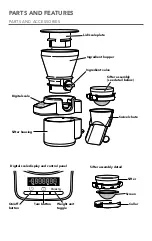
Page 2: ...per Swivel chute On off button Weight unit toggle Tare button Sifter Screen Collar Sifter assembly see detail below Sifter housing Lid scale plate Digital scale Digital scale display and control panel Sifter assembly detail Ingredient valve lb oz g g oz lb ...

Page 3: ...n responsible for their safety Close supervision is necessary when any appliance is used by or near children Children should be supervised to ensure that they do not play with the appliance 3 Turn the Stand Mixer OFF and detach Sifter Scale attachment from the Stand Mixer after each use of the attachment and before cleaning Make sure motor stops completely before disassembling 4 Avoid contacting m...

Page 4: ...ur 2 9 g 8 6 g 137 g Cake Flour 2 9 g 8 6 g 137 g Whole Grain Flour 2 5 g 7 5 g 120 g Baking Powder Sodium Aluminum Sulfate 4 6 g 13 8 g 221 g Baking Soda 4 6 g 13 8 g 221 g Salt Table 6 1 g 18 3 g 292 g Brown Sugar Packed 4 6 g 13 8 g 220 g Granulated Sugar 4 2 g 12 5 g 200 g Powdered Sugar 2 5 g 7 5 g 120 g FOR DETAILED INFORMATION ON USING THE SIFTER SCALE ATTACHMENT Visit kitchenaid com quicks...

Page 5: ...owl or a separate container To weigh and feed ingredients into bowl without sifting Use the attachment without the sifter when weighing and feeding larger ingredients such as whole oats that do not need to be sifted To add those ingredients slowly you can limit the flow by using the ingredient valve To use as a countertop scale Set the scale on your countertop or table and place the lid scale plat...

Page 6: ... sifter housing Once the shaft is inserted all the way press down on the sifter opposite of the shaft to click it into place 3 To install the scale Place the scale on top of the sifter housing with the digital scale display facing away from the Stand Mixer and slightly left of center Twist the scale counterclockwise until it locks into place 4 To install the ingredient hopper Align the ingredient ...

Page 7: ... 3 Add your ingredients to the ingredient hopper until you reach the target weight TIP Make sure your dry ingredients have no large or hard clumps before feeding them through the sifter As with any sifter large or hard clumps may not be broken up during the sifting process 4 0 Stir 2 4 6 8 10 Turn on the Stand Mixer to the desired speed then open the ingredient valve The ingredients will be sifted...

Page 8: ...t be broken up during the sifting process The ingredient hopper does not lock into place If using a tilt head Stand Mixer with the sifter attached be sure to remove the ingredient hopper before lifting the mixer head to avoid the ingredient hopper tipping or falling off of the sifter You may wish to place the lid scale plate on top of the hopper to reduce dust when sifting FOR DETAILED INFORMATION...

Page 9: ... To disassemble the sifter assembly Turn the collar to the left to loosen and release the screen for cleaning if desired REPLACING THE BATTERIES The digital scale of your Sifter Scale attachment is powered by 2 AAA batteries included 1 Flip the digital scale over and use a Phillips head screwdriver to remove the screw on the compartment cover Lift the compartment cover as shown 2 Replace the 2 AAA...

Page 10: ...hipping or handling costs to deliver your Sifter Scale attachment to an Authorized Service Center D Replacement parts or repair labor costs for Sifter Scale attachments operated outside the 50 United States District of Columbia Puerto Rico and Canada DISCLAIMER OF IMPLIED WARRANTIES LIMITATION OF REMEDIES IMPLIED WARRANTIES INCLUDING TO THE EXTENT APPLICABLE WARRANTIES OF MERCHANTABILITY OR FITNES...

Page 11: ...fident the quality of our products meets the exacting standards of the KitchenAid brand that if your Sifter Scale attachment should fail within the first year of ownership we will replace your Sifter Scale attachment with an identical or comparable replacement Your replacement unit will also be covered by our one year limited warranty If your Sifter Scale attachment should fail within the first ye...

Page 12: ... transfer the warranty along with the guaranteed product during its validity period In this case the Guarantor will only recognize the new Beneficiary for the remainder of the validity period The validity of the Warranty granted through this document is subject to the guaranteed product being used exclusively for domestic purposes in accordance with the other conditions established in this Certifi...

Page 13: ... check repair requested by the Beneficiary Holder within the validity period of this Warranty and not arising from failures in the product s quality and suitability conditions under the terms and scope of the Warranty shall be performed at the Beneficiary Holder s expense In this sense services such as preventive maintenance additional and or similar installations as well as all services generated...

Page 14: ...n Call us Monday to Friday from 9 00 a m to 6 00 p m and Saturdays from 9 00 a m to 1 00 p m E mail servicioalcliente whirlpool com Website www kitchenaid com pe Guarantor Whirlpool Corporation Address Carr 177 Km 8 1 Bayamón PR 00959 In San Juan City 1 787 999 7400 Hours of operation Call us Monday to Friday from 8 00 a m to 5 00 p m E mail serviciook whirlpool com Website www kitchenaid com Plea...

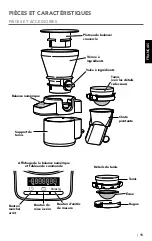
Page 15: ...te Bouton marche arrêt Bouton d unités de mesure Bouton de mise à zéro Tamis Écran Bague Tamis voir les détails ci dessous Support de tamis Plateau de balance couvercle Balance numérique Affichage de la balance numérique et tableau de commande Détails du tamis Valve à ingrédients lb oz g g oz lb ...

Page 16: ...e connaissances à moins qu elles ne soient placées sous supervision ou qu elles aient reçu des instructions concernant l utilisation de l appareil par une personne responsable de leur sécurité Une surveillance attentive s impose lorsqu un appareil ménager est utilisé par ou à proximité d enfants Les enfants doivent être placés sous surveillance afin de s assurer qu ils ne jouent pas avec l apparei...

Page 17: ...ium 4 6 g 13 8 g 221 g Sel de table 6 1 g 18 3 g 292 g Cassonade tassée 4 6 g 13 8 g 220 g Sucre cristallisé 4 2 g 12 5 g 200 g Sucre glace 2 5 g 7 5 g 120 g POUR OBTENIR DES INFORMATIONS DÉTAILLÉES SUR L UTILISATION DU TAMIS AVEC BALANCE Visiter le kitchenaid com quickstart pour des instructions supplémentaires avec des vidéos des recettes qui inspirent et des conseils sur la façon d utiliser le ...

Page 18: ...ser l ensemble sans le tamis pour peser et intégrer de gros ingrédients comme des avoine de grains entiers qui n ont pas besoin d être tamisés Pour ajouter doucement ces ingrédients utiliser la valve à ingrédients pour les intégrer doucement Pour une utilisation comme balance de comptoir Placer la balance sur le comptoir ou la table et y ajouter le plateau de balance couvercle FIXATION DU SUPPORT ...

Page 19: ...t inséré appuyer sur le tamis à l opposé de l arbre pour le verrouiller en place 3 Installation de la balance Placer la balance sur le dessus du support de tamis en orientant l affichage de la balance numérique à l opposé du batteur sur socle et légèrement à gauche du centre Tourner la balance en sens antihoraire jusqu à ce qu elle se verrouille en place 4 Pour installer la trémie à ingrédients Al...

Page 20: ...que le poids désiré soit atteint CONSEIL S assurer que les ingrédients secs ne comportent pas de grumeaux durs ou de grande taille avant de les intégrer par le tamis Comme pour tous les tamis ce dernier pourrait ne pas être en mesure de défaire les grumeaux durs ou de grande taille pendant le tamisage 4 0 Stir 2 4 6 8 10 Mettre le batteur sur socle en marche à la vitesse désirée puis ouvrir la val...

Page 21: ...ant le tamisage La trémie à ingrédients ne se verrouille pas en place Si le tamis est utilisé avec un batteur sur socle à tête inclinable s assurer d enlever la trémie à ingrédients avant de soulever la tête du batteur pour éviter que la trémie à ingrédients ne se renverse ou tombe du tamis Le plateau de balance couvercle peut être placé sur le dessus de la trémie pour réduire la poussière pendant...

Page 22: ...d utiliser de nouveau ou de ranger 3 Pour désassembler le tamis Tourner la bague vers la gauche pour desserrer et dégager l écran à nettoyer au besoin REMPLACER LES PILES La balance numérique du tamis avec balance est alimentée par 2 piles AAA incluses 1 Retourner la balance numérique et utiliser un tournevis cruciforme pour enlever la vis du couvercle du compartiment Soulever le couvercle du comp...

Page 23: ...pédition ou de manutention pour livrer le tamis avec balance à un centre de dépannage agréé D Les pièces de rechange ou frais de main d œuvre pour le tamis avec balance lorsqu il est utilisé à l extérieur des 50 États des États Unis du district fédéral de Columbia de Porto Rico et du Canada CLAUSE D EXONÉRATION DE RESPONSABILITÉ AU TITRE DES GARANTIES IMPLICITES LIMITATION DES RECOURS LES GARANTIE...

Page 24: ...otre reçu de vente à portée de main au moment de votre appel Une preuve d achat est indispensable pour que votre réclamation puisse être traitée Fournissez votre adresse de livraison complète au représentant pas de boîte postale Après avoir reçu le tamis avec balance de rechange utiliser le carton les matériaux d emballage et l étiquette d expédition prépayée pour emballer le tamis avec balance d ...

Page 25: ...ido apagado Conmutación de unidades de peso Tecla de tara Tamizador Filtro Collar Conjunto de tamizador observe los detalles siguientes Alojamiento del tamizador Placa de tapa pesa Pesa digital Pantalla y panel de control de la pesa digital Detalles del conjunto de tamizado Válvula para ingredientes lb oz g g oz lb ...

Page 26: ...ucidas o con falta de experiencia y conocimiento a menos que lo hagan bajo supervisión o siguiendo las instrucciones relativas al uso del aparato a cargo de una persona responsable por su seguridad Se debe supervisar atentamente cuando cualquier electrodoméstico sea utilizado por niños o cerca de ellos Los niños deben estar bajo supervisión para asegurarse de que no jueguen con el electrodoméstico...

Page 27: ...g 18 3 g 292 g Azúcar morena envasada 4 6 g 13 8 g 220 g Azúcar granulada 4 2 g 12 5 g 200 g Azúcar impalpable 2 5 g 7 5 g 120 g PARA OBTENER INFORMACIÓN DETALLADA SOBRE EL USO DEL ACCESORIO TAMIZADOR PESA Visite kitchenaid com quickstart para ver instrucciones adicionales con videos recetas sabrosas y consejos para usar el accesorio Tamizador Pesa Los valores imperiales aproximados se basan en la...

Page 28: ...entes en un cuenco sin tamizarlos utilice el accesorio sin el tamizador al pesar e introducir ingredientes en piezas más grandes como avena integral que no necesitan tamizado Para añadir esos ingredientes con lentitud puede limitar el flujo mediante la válvula para ingredientes Para su uso como pesa de encimera coloque la pesa en la encimera o la mesa y la placa de tapa tamizador en la parte super...

Page 29: ...ue haya introducido el eje por completo presione el tamizador en posición opuesta a la del eje para encajarlo en su posición 3 Para instalar la pesa coloque la pesa sobre el alojamiento del tamizador con la pesa digital en posición opuesta a la batidora con base y ligeramente descentrada Gire la pesa a la izquierda hasta que encaje en su posición 4 Para instalar la tolva para ingredientes alinee l...

Page 30: ... el peso que desee CONSEJO Cerciórese de que los ingredientes secos no contengan terrones grandes o duros antes de introducirlos en el tamizador Tal como sucede con cualquier otro tamizador es posible que los terrones grandes o duros no se rompan durante el proceso de tamizado 4 0 Stir 2 4 6 8 10 Encienda la batidora con base a la velocidad que desee y a continuación abra la válvula para ingredien...

Page 31: ...no se rompan durante el proceso de tamizado La tolva de ingredientes no se bloquea en su posición Si utiliza una batidora con base de cabezal inclinado con el tamizador conectado cerciórese de retirar la tolva de ingredientes antes de elevar el cabezal de la batidora para que la tolva no vuelque ni caiga del tamizador Si lo desea puede colocar la tapa pesa sobre la tolva para reducir el polvo al t...

Page 32: ... el conjunto del tamizador gire el collar a la izquierda para aflojar y soltar el filtro con el fin de limpiarlo si es necesario REEMPLAZO DE LAS PILAS La pesa digital del accesorio Tamizador Pesa está alimentada por 2 pilas AAA se incluyen 1 Invierta la pesa digital y retire el tornillo de la cubierta del compartimiento con un destornillador Phillips Levante la cubierta del compartimiento como se...

Page 33: ...bido o abuso C Cualquier gasto de envío o manejo para llevar el accesorio Tamizador Pesa a un centro de servicio autorizado D Piezas de repuesto o costos de mano de obra para accesorios Tamizador Pesa operados fuera de los cincuenta estados de Estados Unidos y Distrito de Columbia Puerto Rico y Canadá EXCLUSIÓN DE GARANTÍAS IMPLÍCITAS LIMITACIÓN DE RECURSOS LAS GARANTÍAS IMPLÍCITAS INCLUYENDO EN L...

Page 34: ... Pesa original a nosotros La unidad de reemplazo estará también cubierta por nuestra garantía limitada de un año Si el accesorio Tamizador Pesa fallara durante el primer año de compra simplemente llame a nuestro Centro para la eXperiencia del cliente al 1 800 541 6390 de lunes a viernes Tenga a mano el recibo de compra original cuando llame Se requerirá el comprobante de compra para iniciar un pro...

Page 35: ... que falle en condiciones normales de uso El término de vigencia de la Garantía otorgada a través del presente es de tres 3 años a partir de la fecha de compra original por el consumidor final del producto garantizado Durante dicho período el Garante asegurará la reparación gratuita del producto en los términos indicados precedentemente El Garante se compromete a reparar el producto garantizado en...

Page 36: ...ción técnica revisión reparación solicitada por el Beneficiario Titular dentro del período de vigencia de esta Garantía que no tenga su origen en fallas respecto de las condiciones de calidad e idoneidad del producto de conformidad con los términos y alcances de la Garantía estará a cargo del Beneficiario Titular de la presente En tal sentido servicios tales como mantenimiento preventivo instalaci...

Page 37: ...itamos a chequear los datos del Garante en el sello colocado por el Distribuidor Si tiene alguna consulta respecto de los Distribuidores oficiales o bien sus datos contáctenos a través de los medios señalados a continuación Línea telefónica 5064001423 Línea telefónica gratuita nacional 0800 0571029 Horarios de atención Llámenos de lunes a viernes de 8 00 a m a 6 00 p m y sábados de 8 00 a m a 2 00...

Page 38: ...os del Garante en el sello colocado por el Distribuidor Si tiene alguna consulta respecto de los Distribuidores oficiales o bien sus datos contáctenos a través de los medios señalados a continuación Línea Gratuita Nacional 01 8007510135 Horario de atención llámenos de lunes a viernes de 8 00 am a 5 00 pm E mail serviciook whirlpool com Sitio web www kitchenaid com do REPÚBLICA DOMINICANA Por favor...

Page 39: ......

Page 40: ...sous licence au Canada 2018 Todos los derechos reservados KITCHENAID y el diseño de la batidora con base son marcas registradas en EE UU y en otras partes Usada en Canadá bajo licencia DISCOVER MORE DÉCOUVREZ PLUS DESCUBRA MÁS KITCHENAID COM QUICKSTART PRODUCT QUESTIONS OR RETURNS QUESTIONS SUR LE PRODUIT OU LES RETOURS PREGUNTAS SOBRE EL PRODUCTO O DEVOLUCIÓNES USA 1 800 541 6390 KitchenAid com C...

Reviews: