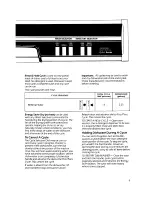
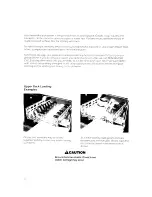
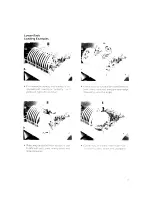
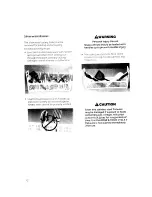
background image

Summary of Contents for KUDI220T

Page 1: ...tche d Built In Dishwasher With Quiet Scrub TM System Models KUDI22OT KUDI220W KUDI22GT USE and CARE GUIDE KUDI22OT KUDI22OW ILLUSTRATED KUDI22GT NOT ILLUSTRATED ...

Page 2: ...in Air Gap 15 Sure ScrubTM Wash System 16 17 Problem Cause Solution Chart 18 19 Removing Spots And Film 19 Changing Front Panels 20 22 Optional Front Panels 22 If You Need Service Or Assistance 23 Warranty Back Cover 1989 KitchenAid Inc It isyour responsibility to be sure your dishwasher Isinstalled by a qualified installer Has been installed where it is protected from the elements Has been instal...

Page 3: ...y after use Element must cool at least 20 minutes to avoid injury DO NOT operate your dishwasher unless all enclosure panels are properly in place 13 14 15 DO NOT tamper with controls DO NOT abuse sit on or stand on the door or dish rack of the dishwasher To reduce the risk of injury do not allow children to play in or on a dishwasher If hot water has not been used recently usually two weeks or lo...

Page 4: ...e down the following information You will need it if your dishwasher ever requires service Model Number Serial Number Date Purchased Date Installed Dealer s Name Address Phone Model and Serial Numbers are located on a label at the left side of the door opening Important Facts KitchenAid dishwashers operate on 115volts 60 hertz A C house current They cannot be converted to operate on 220 volts 50 o...

Page 5: ...utlery Silverware Basket 4 Automatic RinseAgent Dispenser 5 Detergent Dispenser 6 Overflow Protection Float 7 4 Way Hydro Sweep with Jet Spray 8 Self Cleaning Filter 9 Removable Coarse Strainer 10 Heating Element 11 FIo Thru TM Drying Fan 12 Quiet Scrub TM Sound Absorbing Insulation ...

Page 6: ... water should be at least 120 F 49 C as it enters the dishwasher To check the temperature use the faucet closest to your dishwasher 1 Set the faucet control for the hottest water possible Run water into a glass set in the sink for at least one minute allowing it to overflow 2 Place a candy or meat thermometer in the glass and read it at the maximum setting 3 If the temperature is too low raise the...

Page 7: ...ded crystal may etch with repeated washings Gold colored flatware will discolor Milk glass will yellow with repeated dishwasher washing Handles of some knives are attached to the blade with adhesives which may loosen if dishwasher washed High water temperatures and detergent may discolor or pit finish Material Disposable Plastics Plastics Stainless Steel Sterling Silver or Silverplate Tin Wooden W...

Page 8: ...ormal Wash Cycle is used to wash and dry daily loads with moderate amounts of food soil There are two wash periods and two rinses followed by a heated dry period CYCLE SEQUENCE IO _O _O OI O WASH _ O I_ TOTAL CYCLE TIME minutesJ 78 5 WATER USED gallons 10 75 Light China Wash Cycle is used to wash and dry daily loads with light amounts of food soil This cycle uses lesswater and time than the Normal...

Page 9: ...ter is present in the dishwasher turn the dial slowly to the drain portion of the wash or rinse You will hear water draining when you have advanced to the proper location Let the dishwasher drain completely Lift the door handle and advance the dial to the Pots Pans Cycle This cancels the cycle If water is absent from the dishwasher lift door handle to stop dishwasher action Relatch door and advanc...

Page 10: ...o dry over a period of time If you do not plar_ to wash your dishes fairly soor_ after use run RINSE HOLD CYCLE to keep them moist until you are ready to run the nextwast_ cycle Never prewash dishes with a hand dishwashing detergent It _i i cat_se sudsing in the dishwasher and result Jn poor cleaning and or spotting _nd filmir_ g on the d_shware Upper Rack Loading Examples Glasses and stemware may...

Page 11: ... on rpgi_t side as shown Cereai i _oup bo_ _ h may be loaded front to bad _ide to s_de and along the outer edge dependinq t_pon the shape Plates may be loaded front to back or side to side with Dots F_ans m_x_nc bow sand large cookware G asse_ mav he loaded _nthe lower rad a_ _r_ c_ w_th p ates howls and sal cepans 11 ...

Page 12: ...tensils should be loaded with handles up to prevent possible injury The cutlery section in the front of the basket _sfor long handled utensils and KnlveJ long Load forks and spoons with handles up and down so they do not nest together Nested items cannot be properly washed CAUTION Silver and stainless steel flatware may be damaged if exposed to foods containing salt vinegar milk prod ucts or fruit...

Page 13: ...y Hazard Dishwasher detergents and rinse agents can be harmful if taken inter nally Store these products out of children s reach ALWAYS use at least one tablespoon of automatic dishwashing detergent in Main Wash compartment because there are ingredients in detergent to help protect your dinnerware The amount of detergent needed depends on the amount of food soil on the dishes and the hardness of w...

Page 14: ... few months Be sure to replace the cap after filling the reservoir A small amount of rinse agent is automatically released during the final rinse Liquid rinse agents such as JET DRY are available in your local supermarket General Cleaning The porcelain enamel interior of your dishwasher will seldom need cleaning However if mineral deposits from hard water accumulate clean the interior with a mild ...

Page 15: ...valve Turn on the electricity and the water supply Close and latch the door Select the LIGHT CHINA WASH CYCLE and let the machine complete its cycle Check connections to make sure they are water tight and do not leak Some state or local plumbing codes require the addition of a drain air gap between a built in dishwasher and the home drain system This device protects your dishwasher against water b...

Page 16: ...o the dishwasher The 4 Way Hydro Sweep Wash Arm the removable filter and the coarse strainer may be removed and cleaned if necessary If food A E D The removable filter continuously filters the wash water and traps the food particles that have been removed from the dishes on the outside of the filter These trapped food particles are removed from the filter by the jet spray action of water from the ...

Page 17: ... thedishwasher fromoverflowing The floatmust beinplace forthedishwasher to operate Important A small amount ofwateralways remains inthebottom ofthedishwasher un dertheultrafine filter tokeep theseal moist F G The coarse strainer may be removed if necessary To remove lift strainer out by squeezing center section F and remove To replace squeeze center section so clips snap into square notch Possible...

Page 18: ... and nine water jets located on underside of wash arm See page 16 Check to make sure openings are not blocked Hard water or high mineralcontentin water Water temperature is too low Use of incorrect detergents Incorrect amount of detergent Use of ineffective detergents Insufficient fill caused by low water pressure Dishes do not drain properly Plastics A water chemical reaction with certain types o...

Page 19: ...Filter Filter is not placed in Make sure Removable Filter is seated properly under wash arm Needs Frequent dishwasher correctly See page 17 Cleaning Spray nozzle on wash arm is blocked Dishes not scraped before loading Remove lower wash arm see page 16 and turn upside down On under side of each tube is an indentation In one of these indentations is a nozzle hole which cleans filter Check to make s...

Page 20: ...electrical shock or personal injury OPTION A Upper Panel 1 Disconnect electrical power supply 2 Pull door open and on either side of the dishwasher door remove the three screws A from the trim B Remove the loosened piece of trim 3 Slide the color panel out Handle carefully so the panel will not be scratched or bent Turn the panel to the desired color Place the color panel in position then push the...

Page 21: ...ide the color panel out Handle carefully so the panel will not be scratched or bent Turn the panel to the desired color Place the color panel in position then push the filler panel in behind it 6 Replacethe trim strip and the three screws With hands placed at sides of panel assembly slide the top edge of the panel up into position under the control panel seeillustration to the right 8 Hold the pan...

Page 22: ...hen push the filler panel in place 6 Replace the trim and screws I 7 Taking the assembled lower panel slide the panel up onto the dishwasher front so that the side flanges G fit up behind the support strip H If this is done improperly the lower panel will be loose and may fall off the dishwasher 1 Wood and Decorative Panels The stainless front trim will accommodate a custom wood front or a decorat...

Page 23: ...tchenAid servicer If you must call or write please provide Model Number Serial Number Date of Purchase and a complete description of the problem Write to Customer Relations Department KitchenAid Inc P O Box 558 St Joseph M149085 0558 If you are not satisfied with the action taken contact the Major Appliance Consumer Action Panel MACAP MACAP is a group of independent consumer experts that voices co...

Page 24: ...r workmanship Service calls to 1 Correct the installation of the dishwasher 2 Instruct you how to use the dishwasher 3 Replace house fuses or correct house wiring 4 Correct house plumbing B Repairs when dishwasher is used in other than normal home use C Damage resulting from accident alteration misuse abuse improper installation or installation not in accordance with local electrical and plumbing ...

Reviews: