background image

14

KITCHENAID

®

 ICE MAKER WARRANTY

LIMITED WARRANTY

For one year from the date of purchase, when this major appliance is operated and maintained according to instructions attached to or 
furnished with the product, KitchenAid brand of Whirlpool Corporation or Whirlpool Canada LP (hereafter “KitchenAid”) will pay for 
factory specified parts and repair labor to correct defects in materials or workmanship that existed when this major appliance was 
purchased. Service must be provided by a KitchenAid designated service company. YOUR SOLE AND EXCLUSIVE REMEDY UNDER 
THIS LIMITED WARRANTY SHALL BE PRODUCT REPAIR AS PROVIDED HEREIN. This limited warranty is valid only in the United 
States or Canada and applies only when the major appliance is used in the country in which it was purchased. Proof of original 
purchase date is required to obtain service under this limited warranty.

SECOND THROUGH FIFTH YEAR LIMITED WARRANTY ON SEALED REFRIGERATION SYSTEM

In the second through the fifth year from the date of purchase, when this major appliance is operated and maintained according to 
instructions attached to or furnished with the product, KitchenAid will pay for factory specified parts for the following components to 
correct defects in materials or workmanship in the sealed refrigeration system that existed when this major appliance was purchased: 
compressor, evaporator, condenser, dryer/strainer, and connecting tubing.

ITEMS EXCLUDED FROM WARRANTY

This limited warranty does not cover:
1. 
Replacement parts or repair labor if this major appliance is used for other than normal, single-family household use or when it is 

used in a manner that is inconsistent to published user or operator instructions and/or installation instructions.

2. Service calls to correct the installation of your major appliance, to instruct you on how to use your major appliance, to replace or 

repair house fuses, or to correct house wiring or plumbing.

3. Service calls to repair or replace appliance light bulbs, air filters or water filters. Consumable parts are excluded from warranty 

coverage.

4. Damage resulting from accident, alteration, misuse, abuse, fire, flood, acts of God, improper installation, installation not in 

accordance with electrical or plumbing codes, or use of products not approved by KitchenAid.

5. Cosmetic damage, including scratches, dents, chips or other damage to the finish of your major appliance, unless such damage 

results from defects in materials or workmanship and is reported to KitchenAid within 30 days from the date of purchase.

6. Any food or medicine loss due to refrigerator or freezer product failures.
7. Pickup and delivery. This major appliance is intended to be repaired in your home.
8. Repairs to parts or systems resulting from unauthorized modifications made to the appliance.
9. Expenses for travel and transportation for product service if your major appliance is located in a remote area where service by an 

authorized KitchenAid servicer is not available.

10. The removal and reinstallation of your major appliance if it is installed in an inaccessible location or is not installed in accordance 

with KitchenAid's published installation instructions.

11. Replacement parts or repair labor on major appliances with original model/serial numbers that have been removed, altered or 

cannot be easily determined.

DISCLAIMER OF IMPLIED WARRANTIES

IMPLIED WARRANTIES, INCLUDING ANY IMPLIED WARRANTY OF MERCHANTABILITY OR IMPLIED WARRANTY OF FITNESS FOR 
A PARTICULAR PURPOSE, ARE LIMITED TO ONE YEAR OR THE SHORTEST PERIOD ALLOWED BY LAW. Some states and provinces 
do not allow limitations on the duration of implied warranties of merchantability or fitness, so this limitation may not apply to you. This 
warranty gives you specific legal rights, and you also may have other rights that vary from state to state or province to province.

LIMITATION OF REMEDIES; EXCLUSION OF INCIDENTAL AND CONSEQUENTIAL DAMAGES

YOUR SOLE AND EXCLUSIVE REMEDY UNDER THIS LIMITED WARRANTY SHALL BE PRODUCT REPAIR AS PROVIDED HEREIN. 
KITCHENAID SHALL NOT BE LIABLE FOR INCIDENTAL OR CONSEQUENTIAL DAMAGES. Some states and provinces do not allow 
the exclusion or limitation of incidental or consequential damages, so these limitations and exclusions may not apply to you. This 
warranty gives you specific legal rights, and you also may have other rights that vary from state to state or province to province.

If outside the 50 United States and Canada, contact your authorized KitchenAid dealer to determine if another warranty applies.
If you think you need repair service, first see the “Troubleshooting” section of the Use & Care Guide. If you are unable to resolve the 
problem after checking “Troubleshooting,” additional help can be found by checking the “Assistance or Service” section or by calling 
KitchenAid. In the U.S.A., call 1-800-422-1230. In Canada, call 1-800-807-6777.

5/08

Keep this book and your sales slip together for future 
reference. You must provide proof of purchase or installation 
date for in-warranty service.

Write down the following information about your major appliance 
to better help you obtain assistance or service if you ever need it. 
You will need to know your complete model number and serial 
number. You can find this information on the model and serial 
number label located on the product.

Dealer name____________________________________________________

Address ________________________________________________________

Phone number __________________________________________________

Model number __________________________________________________

Serial number __________________________________________________

Purchase date __________________________________________________

Summary of Contents for KUIC15PLXS

Page 1: ...w kitchenaid com In Canada for assistance installation and service call 1 800 807 6777 or visit our website at www KitchenAid ca MACHINE ÀGLAÇONS Guided utilisationetd entretien Au Canada pour assistance installation ou service composez le 1 800 807 6777 ou visitez notre site Web à www KitchenAid ca Table of Contents Table des matières 2 W10340960A ...

Page 2: ...ES MATIÈRES SÉCURITÉ DE LA MACHINE À GLAÇONS 15 INSTRUCTIONS D INSTALLATION 15 Déballage de la machine à glaçons 15 Exigences d emplacement 16 Spécifications électriques 16 Spécifications de l alimentation en eau 16 Nivellement 17 Raccordement à la canalisation d eau 17 Raccordement au drain de vidange 18 Porte de la machine à glaçons 19 Sons normaux 21 UTILISATION DE LA MACHINE À GLAÇONS 21 Fonct...

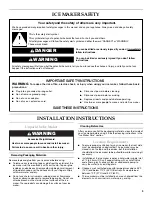
Page 3: ...mperatures above 55 F 13 C and below 110 F 43 C Best results are obtained between 70 F 21 C and 90 F 32 C The ice maker must be installed in an area sheltered from the elements such as wind rain water spray or drip You can be killed or seriously injured if you don t immediately You can be killed or seriously injured if you don t follow All safety messages will tell you what the potential hazard is...

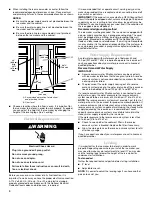
Page 4: ...essure call a licensed qualified plumber Reverse Osmosis Water Supply IMPORTANT Reverse osmosis water filtration systems can be used only with ice maker installations that have a gravity drain A reverse osmosis system is not recommended for ice makers that have a drain pump installed The pressure of the water supply coming out of a reverse osmosis system going to the water inlet valve of the ice m...

Page 5: ...e which reduces water flow and clogs more easily Connecting the Water Line 1 Turn off main water supply Turn on nearest faucet long enough to clear line of water 2 Using a copper supply line with a quarter turn shutoff valve or the equivalent connect the ice maker as shown NOTE To allow sufficient water flow to the ice maker a minimum size copper supply line is recommended 3 Now you are ready to c...

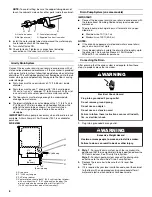
Page 6: ...mp discharge line must terminate at an open sited drain Maximum rise 10 ft 3 1 m Maximum run 100 ft 30 5 m NOTES If the drain hose becomes twisted and water cannot drain your ice maker will not work It may be desirable to insulate the drain line thoroughly up to the drain inlet An Insulation Sleeve kit Part Number W10365792 is available for purchase Connecting the Drain After ensuring that the dra...

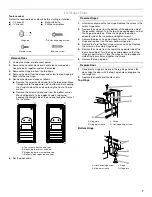
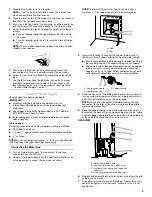
Page 7: ...hinge upside down so that the hinge pin points up Place the hinge on the bottom opposite side of the ice maker and tighten screws 3 Remove the plastic hinge pin sleeve from the old bottom hinge and replace it on the new bottom hinge pin 4 Remove the old bottom hinge screws and hinge Replace the screws in the empty hinge holes 5 Remove the screws from the top of the opposite side of the ice maker c...

Page 8: ...eet slides from the evaporator onto the cutter grid When you first start the ice maker you may hear water running continuously The ice maker is programmed to run a rinse cycle before it begins to make ice ICE MAKER USE HowYour IceMaker Works When you first start your ice maker the water pan will fill and the system will rinse itself before starting to make ice The rinsing process takes about 5 min...

Page 9: ...terior Surfaces Wash the exterior enamel surfaces and gaskets with warm water and mild soap or detergent Wipe and dry Regular use of a good household appliance cleaner and wax will help maintain the finish Do not use abrasive cleaners on enamel surfaces as they may scratch the finish For products with a stainless steel exterior use a clean sponge or soft cloth and a mild detergent in warm water Do...

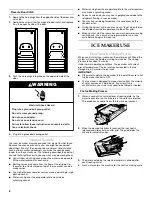
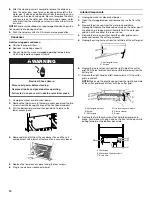
Page 10: ...ct power Interior Components 1 Unplug ice maker or disconnect power 2 Open the storage bin door and remove any ice that is in the bin 3 Remove the drain cap from the water pan and drain thoroughly Replace the drain cap securely on the water pan If the drain cap is loose water will empty from the water pan and you will have either thin ice or no ice 4 Remove the two screws that hold the cutter grid...

Page 11: ...d liquid dish detergent 16 Plug in ice maker or reconnect power 17 After cleaning make sure that all controls are set properly and that no control indicators are flashing Vacationand Moving Care To shut down the ice maker 1 Unplug ice maker or disconnect power 2 Remove all ice from storage bin 3 Shut off the water supply 4 Remove the two screws in the lower access panel and the two screws from the...

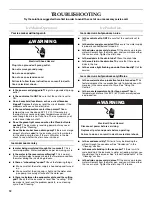
Page 12: ...aker is level and the problem persists run a cleaning cycle See Cleaning IceProduction Ice maker runs but produces no ice Is the control set to ON Be sure that the control is set to ON Is the water supply connected Make sure the water supply is properly connected and turned on Is the drain cap securely in place If the drain cap is loose water will empty from the water pan and you will have either ...

Page 13: ...k right because they are made with the same precision used to build every new KITCHENAID appliance To locate factory specified parts in your area call us or your nearest designated service center In theU S A Call the KitchenAid Customer eXperience Center toll free 1 800 422 1230 Our consultants provide assistance with Features and specifications on our full line of appliances Installation informat...

Page 14: ...authorized modifications made to the appliance 9 Expenses for travel and transportation for product service if your major appliance is located in a remote area where service by an authorized KitchenAid servicer is not available 10 The removal and reinstallation of your major appliance if it is installed in an inaccessible location or is not installed in accordance with KitchenAid s published insta...

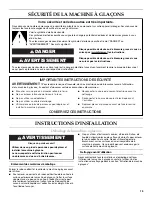
Page 15: ...ous disent comment réduire le risque de blessure et ce qui peut se produire en cas de non respect des instructions Votre sécurité et celle des autres est très importante Nous donnons de nombreux messages de sécurité importants dans ce manuel et sur votre appareil ménager Assurez vous de toujours lire tous les messages de sécurité et de vous y conformer AVERTISSEMENT DANGER Voici le symbole d alert...

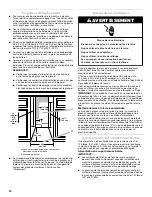
Page 16: ...n circuit spécial à la machine à glaçons Utiliser une prise où l alimentation ne peut pas être coupée à l aide d un commutateur ou d un interrupteur à tirage IMPORTANT Si ce produit est connecté à une prise dotée d un disjoncteur de fuite à la terre un déclenchement intempestif peut se produire et causer une perte de refroidissement La qualité des glaçons peut en être affectée Si un déclenchement ...

Page 17: ...rs le haut sur la partie supérieure avant de la machine à glaçons pour repérer les vis de nivellement qui se trouvent sur le fond avant de la machine à glaçons 4 Au moyen d une clé à molette modifier la hauteur des pieds comme suit Tourner le pied de nivellement vers la droite pour abaisser ce côté de la machine à glaçons Tourner le pied de nivellement vers la gauche pour soulever ce côté de la ma...

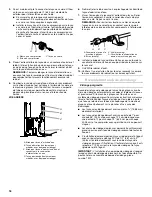
Page 18: ...our réduire la tension sur le raccord 9 OUVRIR le robinet d arrêt 10 Vérifier s il y a des fuites Serrer tous les raccords y compris les raccordements du robinet ou les écrous qui fuient Raccordementaudraindevidange Vidange par gravité Raccorder le tuyau de vidange de la machine à glaçons à votre drain de vidange conformément aux codes et règlements locaux et provinciaux Si la machine à glaçons es...

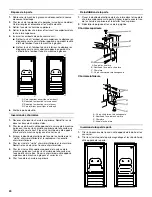
Page 19: ...ain Voir Système avec pompe de vidange 3 Vérifier à nouveau la machine à glaçons pour s assurer qu elle est bien d aplomb Voir la section Nivellement 4 Si le code sanitaire local l exige sceller la caisse sur le plancher à l aide d un produit de calfeutrage approuvé une fois que les raccordements d eau et d électricité ont été faits Portede lamachine àglaçons Outillage nécessaire Rassembler les ou...

Page 20: ... de la vieille charnière inférieure et la replacer sur la nouvelle charnière inférieure 4 Ôter les vis de la vieille charnière inférieure et la charnière Remettre les vis dans les trous de charnière vides 5 Ôter les vis du côté supérieur opposé de la caisse de la machine à glaçons Inverser la charnière de telle sorte que l axe pointe vers le bas Placer la charnière du côté opposé supérieur de la m...

Page 21: ...nt La machine à glaçons est programmée pour effectuer un programme de rinçage avant de commencer à fabriquer de la glace UTILISATION DE LA MACHINE À GLAÇONS Fonctionnementdelamachine àglaçons Lors de la mise en marche initiale de la machine à glaçons le bac d eau se remplira et le système se rincera avant de commencer à fabriquer de la glace Le rinçage prend environ cinq minutes Dans des condition...

Page 22: ...ion Nettoyage ENTRETIEN DE LA MACHINE À GLAÇONS Nettoyage Le système de fabrication des glaçons et le condenseur à air refroidi doivent être nettoyés régulièrement pour que la machine à glaçons puisse fonctionner au maximum de son efficacité et afin d éviter une défaillance prématurée des composants du système Voir les sections Système de la machine à glaçons et Condenseur Surfaces extérieures Lav...

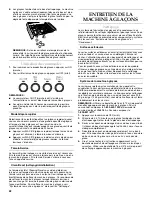
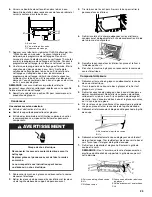
Page 23: ...nférieur 4 Retirer la saleté et la charpie déposées sur les ailettes du condenseur et du logement de l unité de condensation à l aide de la brosse d un aspirateur 5 Remettre le panneau d accès inférieur en place et le fixer à l aide des quatre vis 6 Brancher la machine à glaçons ou reconnecter la source de courant électrique Composants intérieurs 1 Débrancher la machine à glaçons ou déconnecter la...

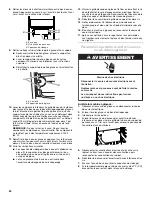
Page 24: ...posage 13 Glisser la grille de coupe en place et la fixer en remettant la vis du côté droit et la cale d espacement en plastique Serrer ensuite la vis du côté gauche Reconnecter les faisceaux de la grille de coupe et du détecteur de niveau de glaçons 14 Réinstaller le couvercle de la grille de coupe et les deux vis 15 Nettoyer doucement le tableau de commande avec un torchon propre et doux de l ea...

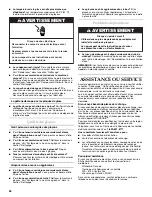
Page 25: ... quelques minutes pour que la pompe de vidange évacue l eau S il y a de l eau stagnante dans le bac vérifier pour voir si le tuyau d évacuation est déformé La machine à glaçons semble bruyante De l eau circule t elle dans la machine à glaçons Ceci est le fonctionnement normal L eau est ajoutée une fois par cycle de fabrication des glaçons L eau dans le réservoir déborde t elle Ceci est normal Ce d...

Page 26: ...ement à la canalisation d eau REMARQUE Les techniciens de service ne peuvent pas réparer les problèmes de plomberie en dehors de la machine à glaçons Appeler un plombier agréé et qualifié ASSISTANCE OU SERVICE Avant de demander une assistance ou un service veuillez vérifier la section Dépannage Cette vérification peut vous faire économiser le coût d une visite de réparation Si vous avez encore bes...

Page 27: ...dommage subi par le fini du gros appareil ménager à moins que ces dommages ne résultent de vices de matériaux ou de fabrication et ne soient signalés à KitchenAid dans les 30 jours suivant la date d achat 6 Toute perte d aliments ou de médicaments due à une défaillance du réfrigérateur ou du congélateur 7 Le ramassage et la livraison Ce gros appareil ménager est conçu pour être réparé à domicile 8...

Page 28: ...oduit Nom du marchand ______________________________________________ Adresse ________________________________________________________ Numéro de téléphone ___________________________________________ Numéro de modèle______________________________________________ Numéro de série ________________________________________________ Date d achat____________________________________________________ W10340960...
Reviews: