


7
■
PROBLEM: Waffl e baker emits smoke and odor the fi rst time it is used.
■
CAUSE: Normal result of manufacturing process. The smoke is harmless and will dissipate.
■
SOLUTION: Discard fi rst waffl es made on each side of clamshell unit.
■
PROBLEM: Excessive steam or condensation on and/or around the base of the unit.
■
CAUSE: Steam is a natural byproduct of baking waffl es. Different recipes create different amounts of steam while baking.
Occasionally the steam will condense and form puddles.
■
SOLUTION: Steam cannot be eliminated.
■
PROBLEM: Sticky or gummy waffl e plates.
■
CAUSE: The waffl e baker plates have a non-stick surface. Coating the plates with oil or cooking spray will eventually cause the
plates to become gummy.
■
SOLUTION: Do not coat or spray the plates with oil. To clean, be sure the waffl e baker is switched off, unplugged and cool. Wipe
the waffl e plates with a clean, damp cloth or paper towels. Suggest that the owner use a little more butter/oil in the recipe to prevent
sticking.
■
PROBLEM: Waffl es are thin or uneven, with gaps and spaces.
■
CAUSE: Uneven coating of waffl e plates with batter.
■
SOLUTION: Always rotate the baking unit after fi lling the waffl e plate with batter. This coats the upper and lower plates with batter
and ensures the fi nest consistency.
■
PROBLEM: Clamshell unit tilts or will not stay horizontal.
■
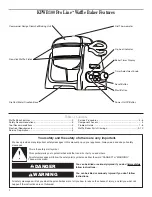
CAUSE: Overspray or worn paint on the axle’s mating surface. Wires may be bunched in cradle base.
■
SOLUTION: Check for overspray paint and remove excess. If there is no overspray or worn paint surfaces, open base and gently
jiggle or reposition wires in cradle arm so they set evenly.
■
PROBLEM: Uneven heat; waffl es are too light or too dark.
■
CAUSE: There are many factors that affect waffl e baking including improper baking time setting, recipe ingredients, batter
temperature and ambient humidity. Mechanically, the cause may be pinched or worn out wires, a defective or worn out thermistor or
defective or worn out heating element. If waffl es are heating or burning on one side, there is 75% probability that the thermistor is
defective or worn out.
■
SOLUTION: First, adjust baking time. If too light, increase the baking time; if too dark, decrease baking time. If the problem persists:
The wires, thermistor and heating elements in the clamshell unit cannot be repaired or replaced. Replace unit according to warranty.
■
PROBLEM: Waffl e baker will not turn on, display remains dark, will not heat.
■
CAUSE: The waffl e baker uses 1400 watts total with all three heating elements (one in each lid and one in the center) when in use.
This wattage level may cause the circuit breaker to trip if other appliances are drawing power from the same circuit (not just the same
outlet).
■
SOLUTION: Be sure that the waffl e baker is plugged into a 3-prong grounded outlet.
Unplug and re-plug back into a live, separate outlet. You cannot have any other appliance drawing from the same circuit. Another
appliance may draw enough power to shut off the waffl e baker but not trip the circuit breaker.
If the baking unit display remains unlit, check the fuse or circuit breaker that the unit is connected to and make sure the circuit is
closed.
Check power PCB board located inside base for damage. Replace damaged power PCB board.
If the unit still does not turn on, check the power on/off button on the control cradle for damage. Look inside cradle to be sure the
button cover lines up with contact on control board. Replace damaged button. If button is not damaged, replace control PCB board.
If waffl e baker still will not turn on, replace the unit according to warranty.
■
PROBLEM: Resets or turns off frequently.
■
CAUSE: Faulty or damaged control PCB board.
■
SOLUTION: Replace control PCB board.
■
PROBLEM: No audible preheat tone or countdown tone.
■
CAUSE: Defective or damaged control PCB board.
■
SOLUTION: If lights work, but tone does not sound, replace control PCB board located in cradle. If lights and tone do not work,
replace power PCB board in base.
■
PROBLEM: Timer does not count down.
■
CAUSE: Defective or damaged control PCB board.
■
SOLUTION: Replace control PCB board located in cradle.
■
PROBLEM: Ready light does not turn on.
■
CAUSE: Defective or damaged LED lens or power PCB board.
■
SOLUTION: If waffl e plates still heat, replace control PCB board. If there is no heat or lights, replace power PCB board.
Problem Guide