//
Use without eyeglasses and equal acuity of both eyes, or with eyeglasses.
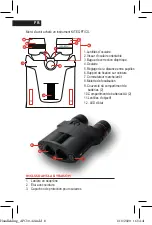
Place the diopter ring (3) in middle neutral position. (allignment of indications in
diopter wheel and rubber)
//
Use without eyeglasses and varying acuity.
Look through the left eyepiece with your left eye and turn the focus wheel (8) to
focus sharply on a selected object. Now look at that same object through the
right ocular with your right eye and again create a sharp image of this object by
turning the diopter ring (3) only. Now the dioptric correction has been set for your
particular visual acuity.
OBSERVATIE
-
A. Look through the binoculars, keeping in mind the above instructions
of first use.
-
B. Depending on the distance of the observed object, adjust focus by
turning the focus wheel (8)
-
C. Activate the stabilisation system by flipping the switch (7) to ON position.
The power indication light (12) turns green.
NOTE ! placing the switch (7) to ON position while no batteries are placed or
batteries are empty, will cause shaky image. This is normal.
AUTO OFF TIMER
No matter the position the instrument is in (active mode or rest/sleep mode),
90 minutes after placing the switch to ON, the instrument will completely switch
OFF again. At this moment the power indicator (12) will go dark.
While the instrument is in OFF mode, the on-off switch (7) might still be in the
ON position.
To re-activate the instrument, turn the on-off switch (7) to OFF and to ON again.
The 90 minute cycle starts again.
LOW BATTERY INDICATOR
When the unit is in active mode and battery levels are good, the power indication
light (12) will be green. When the instrument detects a low battery level, the
power indication light (12) will flash orange untill batteries are replaced. ! Low
battery levels may cause less effective vibration control.
Handleiding_APC30-42.indd 16
Handleiding_APC30-42.indd 16
1/10/2020 16:34:41
1/10/2020 16:34:41


