background image

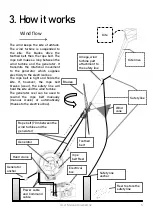
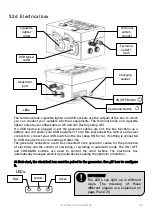
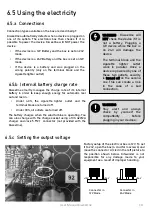
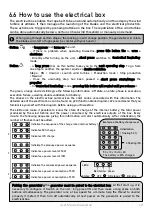
The electrical box enables the rope belt to be unwound automatically and thus deploy the wind 
turbine at altitude. It then manages the launching of the blades and the electrical production. 

These actions are triggered by pressing buttons on the box. The repatriation of the wind turbine 
can be done automatically below a certain critical wind threshold or manually on demand. 


Button       :   

- a long press (3s) turns on the unit.  


-  If  there  is  problem  when  operating  KiweeOne,  press  this  button  10s  to  force  a 


shutdown. 


-  Directly  after  turning  on  the  unit,  a  short  press  switches  to  “Controlled  Rewinding” 


mode. 


Button       : 

-  a  long  press  (3s)  on  this  button  takes  you  to  the  next  operating  step.  To  go  from 


one step to another, the system requires a double validation.  


Steps  :  ON  >  Unwind  >  Launch  wind  turbine  >  Production  mode  >  Stop  production 


> Rewind 


-  Once  the  unwinding  step  has  been  passed,  a  short  press  starts/stops  the 


propeller. 


- In “Controlled Rewinding” mode, pressing this button will rewind until you release it. 


The green, orange and red LEDs give the following information : off state, on state, phase in execution, 

execution failure, awaiting double validation, full battery. 

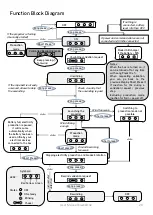
The  sticker  on  the  electrical  box  summarizes  the  color  codes  associated  with  this  information.  The 

detailed use of the electrical box can be found on p20 (function block diagram). We recommend that you 

familiarize yourself with this diagram before using your KiweeOne.  


The  LEDs  also  make  it  possible  to  know  the  state  of  charge  of  the  internal  battery,  the  total  power 

produced  by  the  wind  turbine  and  the  power  consumed  by  the  electrical  outputs  of  the  box.  Every 

minute,  the  following  sequence giving  this  information  will  start  automatically. After  initialization,  the 
number of flashes must be added


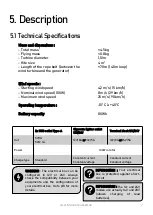
6.6 How to use the electrical box 

User Manual KiweeOne 

19 

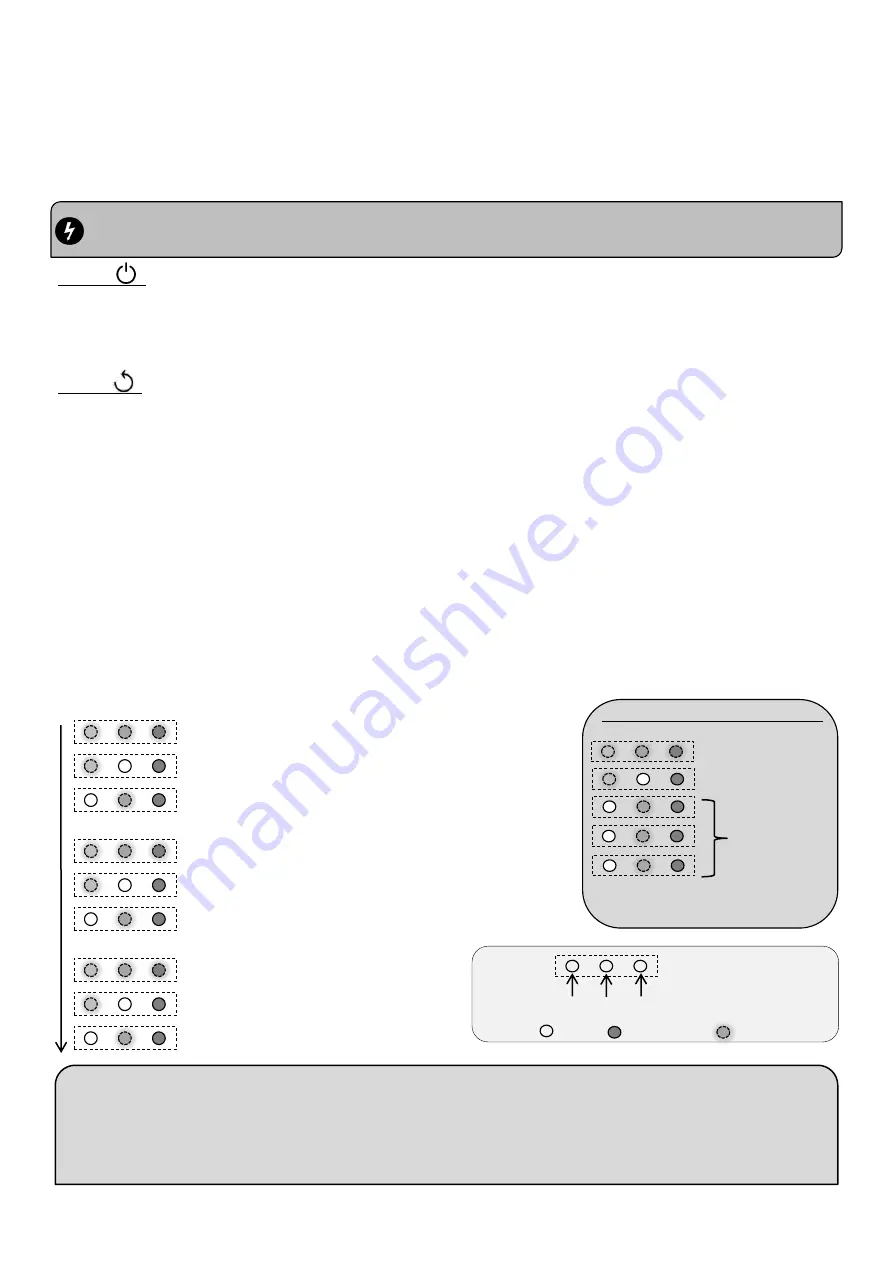
Initialize the sequence of the charge rate (internal battery) 

Indicates 50% charge 

Indicates 10% charge 

Initialize the produced power sequence 

Indicates a power level of 50W 

Indicates a power level of 10W 

Initialize the consumed power sequence 

Indicates a power consumption of 50% 

Indicates a power consumption of 50% 

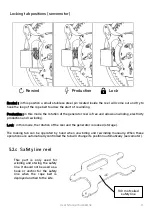
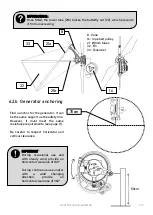
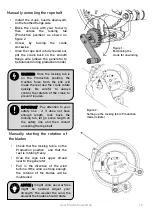
When going through certain stages, the locking pin will change position, the generator will rotate, 

the blades will start at high speed, be careful with your hands !  

Example of battery charge level : 

Initialization 

: 1 Tinkling 50 % 

3 Tinkling 10% 

50 + 10 + 10 +10 = 80 
The battery is 80% charged 

LEDs: 

Green 

Yellow 

Red 

States 

OFF 

ON steady 

Blinking 

Pairing  the  generator 

:  the generator  must  be  paired  to  the  electrical  box.  At  first  start  up,  it  is 

necessary  to  configure  it.  Switch  on  the  unit  : long  press  ON  and  then make  a long  press  on  both 

buttons  simultaneously.  The  generator  runs  at  low  speed  for  a  minute,  help  the  thread  to  unwind 

properly  (1  meter).  It  then  turn  off  automatically.  At  next  power  on  the  generator  is  paired  to  the 

electrical box.  

Summary of Contents for KiweeOne

Page 1: ...KiweeOne User Manual User manual V1 April 2021 KiteWinder 1 all e Jean Rostand 33650 Martillac France Tel 06 03 88 82 52 sales kitewinder fr www kitewinder fr Made in France...

Page 2: ...it is powered Do not operate the KiweeOne if any component is damaged Do not attempt to puncture burn or heat the battery In this manual you will find the following symbols WARNING Indicates a risk of...

Page 3: ...tion p 7 Technical specifications p 7 Structure Components p 8 Using KiweeOne p 11 Kite launch p 11 Assembly p 12 Wind turbine manual launch p 15 Bringing back KiweeOne p 17 Using the electricity p 18...

Page 4: ...functions and operations by carefully reading this user guide For your safety it is very important that you follow all the recommendations Please keep this owner s manual for future reference If the...

Page 5: ...the kite at altitude The wind turbine is suspended to the kite The blades drive the toothed belt then the rope belt The rope belt makes a loop between the wind turbine and the generator It transmits...

Page 6: ...uring electricity production the crank should be placed on the smooth side of the generator as it serves as a balancing mass The rewinding of the rope belt can be done manually with the crank semi aut...

Page 7: ...Cigarette lighter outlet 12V 24V Terminal block 12V 24V Out 5V 1A 5V 2 1A 12V 8A or24V 5A 12V 8A or24V 5A Power 100W in total Charge type Standard Constant current Constant voltage Constant current Co...

Page 8: ...s 8 User Manual KiweeOne 5 2 b Generator Blade Toothed belt Fin Safety pin rope belt pulley Rope guide Vane Main pulley Manual Crank On smooth side for production On toothed side for manual unwind rew...

Page 9: ...s free and allows unwinding electricity production and rewinding Lock in this mode the rotation of the reel and the generator is locked storage The locking tab can be operated by hand when unwinding a...

Page 10: ...and 24V factory setup 12V If a USB device is plugged in but the generator cables are not the box functions as a battery and will power your USB equipment To do this disconnect the control and power co...

Page 11: ...6 1 c Check Make sure the kite is stable In light wind if pull is too weak or it swings from side to side slack off the safety line a bit to bring the kite up in altitude In strong wind if the kite i...

Page 12: ...Be careful to insert the blades in the right direction Refer to the engraving on the aluminum plate Vane fixation Unscrew the butterfly nut 20 Insert the upper tube 21a Insert the vane 8 on the hexag...

Page 13: ...a anchor for the generator It can be the same support as the safety line However it must meet the same resistance requirements see page 11 Be careful to respect horizontal and vertical clearance 6 2...

Page 14: ...locking tab Lock position Remove the safety pin 37 Pass the loop between the guides 12 and behind the rope belt pulley 16 Put back the safety pin 100 16 28 12 Rope guides 16 rope belt pulley 28 Locki...

Page 15: ...istance screw 45 located at the end of the fin 32 in order to guide its trajectory and prevent it from being entangled with the blades 96 45 32 32 Fin 45 Spacing screw 96 Safety line 6 3 Wind turbine...

Page 16: ...some length on the safety line and then restart unreeling the rope belt Manually unreeling the rope belt Install the crank handle downward on the toothed flange side Block the crank with your forearm...

Page 17: ...ack KiweeOne The KiweeOne can be brought back automatically semi automatically or manually Auto and semi auto modes are only possible in moderate wind The automatic mode allows KiweeOne to detect a de...

Page 18: ...charge socket using a 10S 42V 2A charger and Jack 5 5 2 1 connector not provided with the KiweeOne Connection types available on the box are described p7 KiweeOne automatically detects when a device...

Page 19: ...ecommend that you familiarize yourself with this diagram before using your KiweeOne The LEDs also make it possible to know the state of charge of the internal battery the total power produced by the w...

Page 20: ...F Mode USB charger if the battery 50 Notes When the box is turned on it can be turned off at any time with Long Press 10s When requesting validation you can go back to the previous step by Short Press...

Page 21: ...of the KiweeOne If you hear a noise or feel any irregularity in movement the bearing should be replaced The bearings of the toothed pulley and those of the pulley support can be changed If a smooth p...

Page 22: ...llaneous mechanical parts The KiweeOne wind turbine experiences vibrations related to its operating principle Some mechanical parts will then be worn out until they no longer serve their original func...

Page 23: ...ne The kite is not stable in strong winds The geometry of the kite does not allow stability in very powerful wind it is necessary to add a tail Attach the kite storage bag to the back of the kite tail...

Page 24: ...1 17 18 9 3 19 20 21 22 14 35 6 23 24 25 4 26 8 32 34 12 2 36 15 7 13 29 5b 16 5a 10 31 33 30 27 11 28 24 User Manual KiweeOne 9 Part list...

Page 25: ...ooth pulley x2 27 Bearing ZZ 6mm x2 9 Clamping plate for the blades 28 Screw CHC M4x25 x2 10 Pulley Reinforcement plate 29 Grower washer M6 x2 11 Rope guide x2 30 Large washer M6 x2 12 Axle reinforcem...

Page 26: ...Thank you for purchasing KiweeOne airborne wind turbine We hope that you will be completely satisfied with it For any questions about its use please contact us by email or phone...

Reviews:

Related manuals for KiweeOne