background image


15


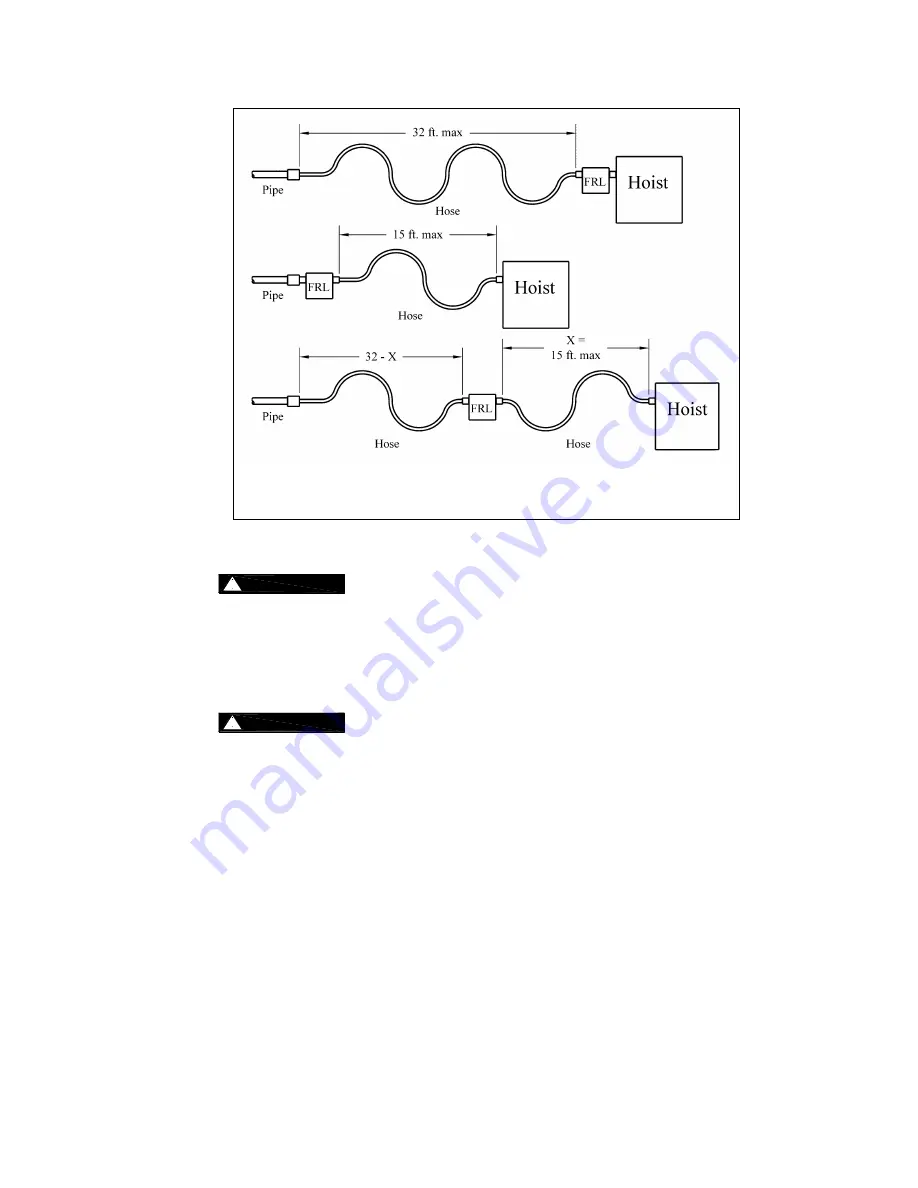
Figure 3-3 

 Typical Arrangements of Filter, Regulator and Lubricator and 

Maximum Air Supply Hose Lengths 


3.6.4 


!

   CAUTION 

 Fittings 

– Important considerations regarding fittings in the hoist's air supply 

include: 


When connecting air supply components, remove all dirt or debris from the connecting surfaces of 
the hoses, pipes, fittings, or threaded fasteners to prevent contaminants from entering the hoist. 


Keep airflow restrictions such as quick disconnect fittings, bends, elbows, and adapters to a 
minimum. 

3.6.5 


!

   CAUTION 

 Before connecting the hoist to its air supply line; perform the proper draining and 

purging procedures to prevent contaminants or moisture from entering the hoist. 

3.7 

Exhaust Control 

3.7.1 

Some hoist applications require the hoist exhaust to be expelled outside the immediate environment.  
To accommodate this need it is possible to extend the hoist exhaust to another area.  Figure 3-4 
describes the method to extend the hoist exhaust.  

Summary of Contents for Harrington TCK Series

Page 1: ...ed Code Number and Serial Number This equipment should not be installed operated or maintained by any person who has not read and understood all the contents of this manual Failure to read and comply with the contents of this manual can result in serious bodily injury or death and or property damage EFFECTIVE April 28 2020 ...

Page 2: ...uirements 3 2 Air Supply Capacity and Regulation 3 3 Lubrication 3 4 Filtration 3 5 Air Dryer 3 6 Piping Hoses and Fittings 3 7 Mounting Location 3 8 Connecting Hoist to Air Supply 3 9 Mounting the Hoist 3 10 Optional Chain Container 3 11 Non Stationary Application 3 12 Preoperational Checks and Trial Operation 4 0 Operation 23 4 1 Introduction 4 2 Shall s and Shall Not s for Operation 4 3 Hoist C...

Page 3: ...teria 6 0 Lubrication 36 6 1 Air Hoist Lubrication 6 2 Load Chain Lubrication 6 3 Hooks and Suspension Components 7 0 Maintenance Handling 38 7 1 Load Limiter 7 2 Brake 7 3 Load Chain 7 4 Pendant 7 5 Load Sheave Inspection 7 6 Storage 7 7 Outdoor Installation 8 0 Troubleshooting 47 9 0 Warranty 49 10 0 Parts List 50 10 1 Main Body 10 2 Cord Control Valve Body 10 3 Pendant Control Valve Body 10 4 P...

Page 4: ...n coupled with a trolley is to be used to traverse these loads on a single girder beam The TCK hoists are not intended to lift greater than rated loads lift support or transport people nor lift loads over people The TCK hoists are intended to be operated by persons who have read and understood the operation section of the TCK owner s manual all warnings and are familiar with the TCK hoist controls...

Page 5: ...orail to comply with applicable crane design and safety standards The crane designer crane manufacturer or user is responsible to furnish these additional items for compliance Refer to ANSI ASME B30 17 Safety Standard for Top Running Single Girder Cranes ANSI ASME B30 2 Safety Standard for Top Running Double Girder Cranes and ANSI ASME B30 11 Safety Standard for Underhung Cranes and Monorails If a...

Page 6: ...ponsibility of the owner user to comply with the applicable ANSI ASME B30 volume that addresses that type of equipment It is the responsibility of the owner user to have all personnel that will install inspect test maintain and operate a hoist read the contents of this manual and applicable portions of ANSI ASME B30 16 Safety Standard for Overhead Hoists and OSHA Regulations If the hoist is instal...

Page 7: ...hoist for pendant control the warning tag is attached to the pendant hose for the pull cord control the warning tag is attached to the up cord order a tag from your dealer and install it See parts list in the parts section of this manual Read and obey all warnings attached to this hoist Tag is not shown actual size front back Figure 1 1 Warning Tag Attached to Hoist ...

Page 8: ...or less Noise Level 84 dba maximum 1 meter when lifting lowering rated load Supply Air 60 to 90 pounds per square inch Air Consumption 30 to 90 cubic feet minute Air Lubrication Requirements Minimum 10 to 15 drops per minute 0 2 0 3 cc min of oil Air Filtration Requirements Maximum 5 micron air filter or finer Load Limiter Adjustable Factory set to 125 of rated capacity ...

Page 9: ... 3 TCK3000P 10 8 6 37 23 18 38 148 141 124 152 12 5 x 1 225 2 3 6 TCK6000P2 8 6 18 12 9 19 148 141 124 152 12 5 x 2 295 4 6 Cord Model 3 TCK3000C 10 8 2 37 23 18 38 148 141 124 152 12 5 x 1 223 2 3 6 TCK6000C2 8 2 18 12 9 19 148 141 124 152 12 5 x 2 293 4 6 2 2 Dimensions Table 2 2 TCK with Pendant Control Dimensions Single Fall Hoist Double Fall Hoist Cap Tons Product Code Headroom C in a in b in...

Page 10: ... in h in i in j in 3 TCK3000C 21 1 22 7 12 4 10 4 12 2 1 3 7 4 4 9 1 3 6 TCK6000C2 30 3 22 7 14 6 10 4 12 2 1 7 9 6 5 0 3 5 Table 2 4 Top and Bottom Hook Dimension Units inch Product Code a b c d e f g h TCK3000 2 0 1 5 1 8 1 3 2 0 2 4 1 3 5 9 TCK6000 2 3 1 6 1 9 1 6 2 6 2 8 1 7 6 8 Refer to Section 5 7 for inspection dimensions and limits ...

Page 11: ...11 2 3 Part Names Figure 2 1 Hoist Part Identification Diagrams TCK3000 Figure 2 2 Hoist Part Identification Diagrams TCK6000 ...

Page 12: ...ng if your system is capable of supplying the required airflow consider the following Capacity of compressor s and tank Other air consuming equipment Flow restrictions such as pipes hoses valves and fittings Inadequate capacity will cause a significant drop in pressure when the hoist is operated and could cause poor performance or failure to operate 3 2 2 Regulation The hoist requires a constant s...

Page 13: ...r is supplied to the hoist If there is moisture in the air supplied to the hoist this moisture will cause corrosion on internal hoist components during periods when the hoist is idle leading to hoist malfunction 3 6 Piping Hoses And Fittings 3 6 1 CAUTION System Configuration The system should be configured as shown in Figure 3 1 Since moisture tends to accumulate in compressed air systems corrosi...

Page 14: ...1 0 inch or larger Inside diameter 0 75 inch or larger 3 6 3 NOTICE Hoses The connection from the air supply system piping to the hoist must be made with a flexible pressure hose Due to normal line losses in air supply lines Do not use hose smaller than specified in Table 3 1 and Limit the length of the hose to that specified in Figure 3 3 If your application exceeds these requirements consult fac...

Page 15: ...nts from entering the hoist Keep airflow restrictions such as quick disconnect fittings bends elbows and adapters to a minimum 3 6 5 CAUTION Before connecting the hoist to its air supply line perform the proper draining and purging procedures to prevent contaminants or moisture from entering the hoist 3 7 Exhaust Control 3 7 1 Some hoist applications require the hoist exhaust to be expelled outsid...

Page 16: ...t and its loads If necessary consult a professional that is qualified to evaluate the adequacy of the suspension location and its supporting structure 3 8 1 For applications requiring a Secondary Support a support attachment location has been provided in the hoist Top Hook Yoke Hoist Body Reference Figure 3 5 Figure 3 4 Extended Hoist Exhaust Installation ...

Page 17: ... air supply hose to the hoist always purge the air hose to clear any debris and water 3 9 4 Apply approximately 10 15 drops 0 2 0 3 cc min of turbine oil see approved lubricant under Section 6 0 Lubricants into the hose before attaching to the hoist 3 9 5 Make connections to air supply reference Figure 3 6 Use a reducing adapter at the hoist valve section for hose sizes larger than 3 4 inch NPT 3 ...

Page 18: ...ntainer 3 11 1 For installation of the optional bag style chain container refer to Figure 3 7 and perform the following Make sure all end stoppers are installed correctly See Figure 3 7 and section 7 3 Torque all fasteners to the values shown Feed the chain into the chain container beginning with the free end Take care to avoid twisting or tangling the chain Do not use the chain container if any p...

Page 19: ...ll required Consult factory for recommended methods 3 12 1 Connections and fittings must be kept clean and care taken to prevent dirt debris and moisture from entering the hoist 3 12 2 Recommended practice for removing the hoist from an installation Run the hoist briefly with well lubricated air Disconnect the air supply line Inject a small quantity approximately 20 drops of oil into the hoist s i...

Page 20: ...hain irregularities before conducting the first hoist operation See Figures 3 8 and 3 9 Figure 3 8 Twist in Load Chain Figure 3 9 Capsized Hook and Chain 3 13 3 WARNING Confirm the adequacy of the rated capacity for all slings chains wire ropes and all other lifting attachments before use Inspect all load suspension members for damage prior to use and replace or repair all damaged parts 3 13 4 WAR...

Page 21: ... 10 in the space provided on the cover of this manual 3 13 8 Ensure that the hoist is properly installed to either a fixed point or trolley whichever applies 3 13 9 If hoist is installed on a trolley ensure that trolley is properly installed on the beam and stops for the trolley are correctly positioned and securely installed on the beam 3 13 10 Ensure that all nuts bolts and split cotter pins are...

Page 22: ...and trolley meets the Inspection Testing and Maintenance requirements of ANSI ASME B30 16 Before operating ensure that nothing will interfere with the full range of the hoist s and trolley s operation 3 13 15 Proceed with trial operation to confirm proper operation Initially operate slowly under no load in both directions Verify controls agree with hoist direction Perform inspections per Section 5...

Page 23: ...ERATION IF SUCH MALFUNCTIONS OCCUR AND TO IMMEDIATELY ADVISE THEIR SUPERVISOR SO CORRECTIVE ACTION CAN BE TAKEN HOIST OPERATORS SHOULD HAVE NORMAL DEPTH PERCEPTION FIELD OF VISION REACTION TIME MANUAL DEXTERITY AND COORDINATION HOIST OPERATORS SHOULD NOT HAVE A HISTORY OF OR BE PRONE TO SEIZURES LOSS OF PHYSICAL CONTROL PHYSICAL DEFECTS OR EMOTIONAL INSTABILITY THAT COULD RESULT IN ACTIONS OF THE ...

Page 24: ...rate unless load is centered under hoist NOT attempt to lengthen the load chain or repair damaged load chain Protect the hoist s load chain from weld splatter or other damaging contaminants NOT operate hoist when it is restricted from forming a straight line from hook to support in the direction of loading NOT use load chain as a sling or wrap load chain around load NOT apply the load to the tip o...

Page 25: ...eplace damaged or worn parts and keep appropriate records of maintenance Use the hoist manufacturer s recommended parts when repairing the unit Lubricate load chain per hoist manufacturer s recommendations NOT use the hoist load limiting or warning device to measure load NOT use limit lever as a routine operating stop It is an emergency device only NOT allow your attention to be diverted from oper...

Page 26: ...When using a hoist with cord control pull down on the appropriate colored cord to raise or lower the hoist White indicates the raise control and red indicates lowering control Release the cords to stop the hoist Refer to Figure 4 2 below Figure 4 2 Cord Control 4 3 4 CAUTION Make sure the motor completely stops before reversing direction ...

Page 27: ...ying the amount of pull on the cord Refer to Figure 4 4 Figure 4 4 Cord Control Speed Adjustment 4 5 Operation of the Load Limiter 4 5 1 If a hoist is used to lift a load that exceeds the hoists rated capacity the load limiter will cause the hoist to automatically stop lifting 4 5 2 If the hoist stops lifting automatically lower and remove the load from the hoist 4 5 3 If the load is at or below t...

Page 28: ...modified hoists shall be inspected by a designated person to ensure compliance with the applicable provisions of this manual 5 2 2 Inspection Classification the inspection procedure for hoists in regular service is divided into two general classifications based upon the intervals at which inspection should be performed The intervals in turn are dependent upon the nature of the critical components ...

Page 29: ... with Table 5 2 Periodic Inspection Evaluation and resolution of the results of PERIODIC Inspections shall be made by a designated person such that the hoist is maintained in safe working condition 5 4 2 For inspections where load suspension parts of the hoist are disassembled a load test per ANSI ASME B30 16 must be performed on the hoist after it is re assembled and prior to its return to servic...

Page 30: ...th ANSI ASME B30 16 these inspections are not intended to involve disassembly of the hoist Rather disassembly for further inspection would be required if frequent or periodic inspection results so indicate Such disassembly and further inspection should only be performed by a qualified person trained in the disassembly and re assembly of the hoist Table 5 3 Hoist Inspection Methods and Criteria Ite...

Page 31: ...bricate or replace as required Hooks Hook Latches Visual Function Latch should not be deformed Attachment of latch to hook should not be loose Latch spring should not be missing and should not be weak Latch movement should not be stiff when depressed and released latch should snap smartly to its closed position Replace Load Chain Surface Condition Visual Should be free of rust nicks gouges dents a...

Page 32: ...an maximum value listed in Table 5 5 Replace Motor Brake Measure Visual Motor brake dimension should be within the allowable limits of Table 5 4 See Section 7 2 for gaining access to motor brake Braking surfaces should be clean free of grease oil and should not be glazed Replace Load Sheave Visual Pockets of Load Sheave should be free of significant wear See Section 7 5 to gain visual access to th...

Page 33: ... Minimum Value for Replacement Inch mm TCK3000 TCK6000 T 0 31 8 W 0 10 2 6 T 0 29 7 3 W 0 11 2 8 Table 5 5 Chain Separator Dimensions Hoists Std Dimension Inch mm Maximum Value for Replacement Inch mm TCK3000 TCK6000 L 1 08 27 5 W 2 01 51 0 L 1 16 29 5 W 2 09 53 0 ...

Page 34: ... U _______________ For K if the measured dimension exceeds 1 05 times the recorded new dimension the hook should be replaced For U if the measured dimension is less than 0 9 times the recorded new dimension the hook should be replaced 2 5 Bottom Hook K ____________ Bottom Hook U ____________ TCK6000 2 6 Top Hook K _______________ Top Hook U _______________ 2 6 Bottom Hook K ____________ Bottom Hoo...

Page 35: ...e P Dimension inch mm d Dimension inch mm Standard Discard Standard Discard TCK3000 TCK6000 7 52 191 7 74 196 7 0 49 12 5 0 44 11 3 Table 5 9 Hook Joint Bolt Dimension Capacity Code Wear Limit Minimum Value for Replacement inch mm TCK6000 0 004 0 1 ...

Page 36: ... general lithium grease NLGI No 0 to the bearing surfaces of the load chain links as indicated by the shaded areas in Figure 6 2 Also apply the grease to the areas of the load chain shaded areas in Figure 6 2 that contact the load sheave Insure that the grease is applied to the contact areas in the load sheave pockets Figure 6 2 Chain Grease Application 6 2 4 Machine or gear oil grade ISO VG 32 56...

Page 37: ...oad chain pocket wheel Load chain Grease or Machine gear oil HHI Chain Grease P N ER1BS1551 NLGI No 0 ISO VG 32 46 68 or equivalent Hook bearings suspension pins Top bottom hook sets Grease National Lubricating Grease 3 or equivalent Gears and Bearings Gear Section Grease Shell Gadus S2 V220 2 Shell Alvania EP Grease R000 R00 R0 1 2 or equivalent ...

Page 38: ...that the load chain is not tensioned d For the adjustment procedure OUT means the counter clockwise CCW direction and IN means the clockwise CW direction e The pressure of the air supply at the hoist s inlet port acceptable range is 60 to 90 PSI affects the performance of your air hoist including the actuation point of the load limiter Therefore ensure that during the adjustment procedure the air ...

Page 39: ...til the load limiter allows lifting 11 Turn the adjustment screw IN turn Then while holding the adjustment screw tighten the lock nut to secure the setting 7 2 Brake 7 2 1 The hoist brake is not adjustable 7 2 2 Inspect the brake disc in accordance with Section 5 7 Table 5 3 and Table 5 4 7 2 3 The following is the hoist brake inspection procedure 1 WARNING HAZARDOUS AIR PRESSURE IS PRESENT IN THE...

Page 40: ...rake Cover Brake Piston and Springs from the Gear Case as shown in Figure 7 4 Figure 7 4 Brake Internals Removal 5 Remove the O ring from the Brake Piston as shown in Figure 7 5 If the Brake Piston has any cracking it must be replaced Figure 7 5 Brake Piston ...

Page 41: ...in and Split Pin connecting the no load end of the chain to the hoist body Keep the Bottom Hook Complete Set Chain Set Pin and Split Pin for reuse on new chain Carefully operate the hoist in the down direction to remove old chain 4 CAUTION When replacing load chain check for wear on mating parts i e Load Sheave Chain Guides Bottom Hook Complete Set and replace parts if necessary If the load chain ...

Page 42: ...free of twists and attach the no load end of the chain to the hoist body with the Flat Washer and Button Head Screw Reinstall the Bottom Hook Complete Set Torque the Button Head Screw to 78 lbf in Refer to Figure 7 8 and Figure 7 9 8 After installation has been completed perform steps outlined in Section 3 13 Pre operational Checks and Trial Operation Figure 7 7 Load Chain Installation Diagram ...

Page 43: ...43 Figure 7 8 Single Fall Chain Connections Figure 7 9 Double Fall Chain Connections ...

Page 44: ...efer to Figure 7 10 for the correct placement of the Hoses 4 Attach the Strain Relief wire S Hook on the Pendant Valve and Manifold Block using the S Hook 5 Slide the Boot in to place over the Hose Fittings at the Manifold Block on the hoist 6 CAUTION Operate hoist and make sure the direction of hook travel agrees with the control levers on the Pendant Valve Figure 7 10 Pendant Hose Connections 7 ...

Page 45: ... 7 Outdoor Installation 7 7 1 For hoist installations that are outdoors the hoist MUST BE covered and protected from the weather at all times 7 7 2 Avoid hoist oxidation by using suitable treatment and lubricating all mechanisms 7 7 3 Possibility of corrosion on components of the hoist increases for installations where salt air and high humidity are present The hoist may require more frequent lubr...

Page 46: ...g environment is defined as one with any or all of the following Explosive gases or vapor Organic solvents or volatile powder Excessive amounts of powder and dust of general substances Excessive amount of acids or salts Refer to Section 2 1 2 for allowable environmental conditions ...

Page 47: ... hoist Lifting speed is slow Low air pressure at hoist inlet port Repair or adjust air supply or filters Check for air line obstruction Air supply hose or piping is too small Replace hose or piping sizes with recommended sizes in Section 3 0 Malfunction of brake Repair at service facility Bending or crimping of pendant control hoses s Correct or repair the bend or crimp in control hose s Lack of s...

Page 48: ...replace pendant control or control hose s Lack of air pressure or partial loss of or leakage in air supply Repair or adjust air supply or filters Hoist continues running after pendant or cord is released Control Valves Inject approx 20 drops of oil into inlet port to lubricate the main spool If spool still sticks repair at service facility Valve in Pendant Handle stuck Repair at service facility H...

Page 49: ...rt or product free of charge and deliver said item F O B Harrington Hoists Inc place of business to customer Customer must obtain a Return Goods Authorization as directed by Harrington or Harrington s published repair center prior to shipping product for warranty evaluation An explanation of the complaint must accompany the product Product must be returned freight prepaid Upon repair the product w...

Page 50: ...eminder Per Sections 3 12 6 and 1 1 to aid in ordering Parts and Product Support record the Hoist code number and serial number in the space provided on the cover of this manual Figure 10 1 TCK Nameplate The parts list is arranged into the following sections Section Page 10 1 Motor Valve Body and Controls 51 10 2 Brake Gears and Load Suspension Components 54 10 3 Chain Container Assembly 57 10 4 H...

Page 51: ...10 1 Motor Valve Body and Controls 51 Figure 10 1 Motor Valve Body and Controls ...

Page 52: ...69 Chain Lever 1 TCK425806110 70 Motor Gasket 1 TCK136102172 71 Silencer M CP 1 TCK425806K0B 72 Bearing 605ZZ 2 9000505 73 Bearing 6010 2 9000510 74 Needle Bearing TA2215Z 2 TCK130132116 Figure Number Name Parts per hoist Part Number 75 Hex Socket Head Cap Bolt M10X 25 4 9091294 76 Set Screw Hex M8X12 2 TCK131708012 77 Hex Socket Cap Screw M6X50 1 9091256 78 Hex Set Screw M5X5 2 90005843 79 Hex Nu...

Page 53: ...ve 2 TCR420218VB0 B Valve Body 1 TCS420226VR0 C Bushing 2 TCS420218VF0 D Lever Pin 1 TCS130402071 E Lever 2 TCS420218VH0 F Spring 2 TCS130802220 G Set Screw Hex Skt M6X6 1 TCS132106006 H O Ring S 3 HS90 2 TCS131109001 J O Ring S 10 2 TCR131103008 K O Ring S 11 2 2 TCS131103009 L Hose Fitting 3 TCS135106302 M Hose Clamp 3 9013155 N S Type Wire 1 TCR130802081 351 Cable Tie Red 4 TCS137502034 352 Cab...

Page 54: ...10 2 Brake Gears and Load Suspension Components 54 Figure 10 2 Brake Gears and Load Suspension Components SHOW BOTH 3000 6000 ...

Page 55: ...earing 6003ZZ 1 9000503 219 Bearing 6003 1 9000103 220 Bearing 6909 2 TCK130113009 221 Bearing 6916 1 TCK130113016 222 Needle Bearing TA1620Z 6 TCK130131621 Figure Number Name Parts per hoist Part Number 223 Needle Bearing TA1616Z 3 TCK130131617 224 Needle Bearing TA1512Z 3 TCK130131513 225 HSHCS M10X25 4 9091294 226 HSHCS M6X30 4 9091252 227 Washer M14 3 TCK131307014 228 O Ring S 7 9 TCR131103005...

Page 56: ...000 2 TCK420890QH0 270 Hex Nut M12 TCK3000 2 9093433 Thrust Bearing 6211ZZ TCK6000 2 9000611 271 Spring Washer M12 TCK3000 2 9012713 Thrust Bearing 51112 TCK6000 1 TCK130121112 272 HSHCS M12X60 TCK6000 2 90912120 273 HSHCS M12X100 TCK6000 1 90912126 274 Spring Washer M12 TCK6000 3 9012713 275 U Nut M12 TCK6000 3 E2D853125 276 Holder Shaft TCK6000 1 TCK425811P60 ...

Page 57: ...10 3 Chain Container Assembly 57 Figure 10 3 Chain Container Assembly Optional Figure Number Name Parts per hoist Part Number 125 Chain Container Assembly 1 TCK42580655C ...

Page 58: ... TCK3000 6000 Valve Maintenance Kit No AH0002020 Figure Number Name Parts per hoist Part Number 022 O Ring S 7 2 TCR131103005 023 O Ring S 20 2 AH131103016 024 O Ring S 30 4 TCR131103024 025 O Ring S 32 4 TCR131103026 026 O Ring AS568 115 2 TCK131117115 027 O Ring AS568 113 HS90 2 TCK131118113 304 O Ring S 25 1 TCK131103020 305 O Ring AS568 134 1 TCK131117134 336 O Ring S 29 1 TCR131103023 TCK3000...

Page 59: ...59 This Page Intentionally Left Blank ...

Page 60: ...Harrington Hoists Inc 401 West End Avenue Manheim PA 17545 www harringtonhoists com Toll Free 800 233 3010 Phone 717 665 2000 Fax 717 665 2861 HARRINGTON HOISTS INC ALL RIGHTS RESERVED TCKOM ...

Reviews: