23
3.10 Optional Chain Container
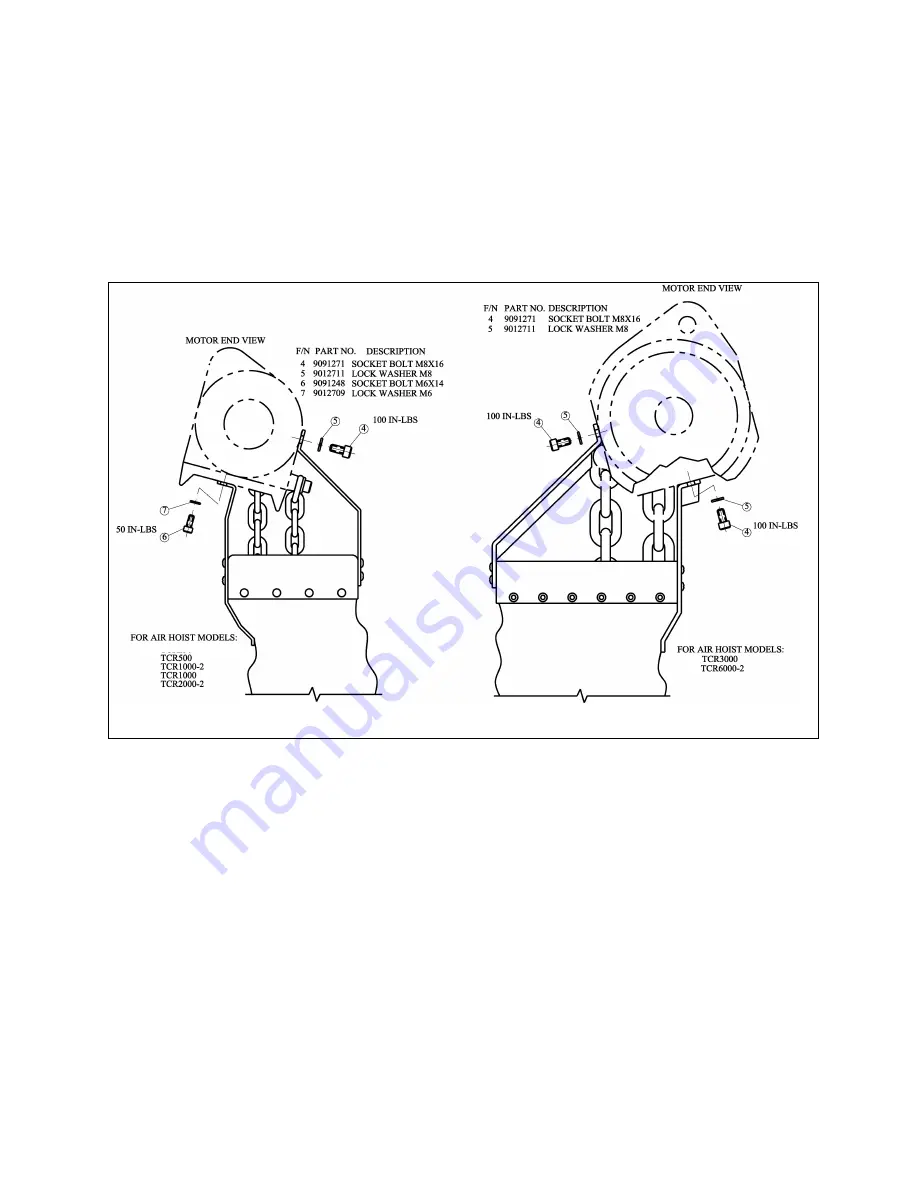
3.10.1 For installation of the optional bag style chain container refer to
Figure 3-5
below and perform the
following:
Make sure all end stoppers and limit locks are installed correctly. See
Sections 3.12
and
7.3
.
Torque all fasteners to the values shown.
Feed the chain into the chain container beginning with the free end. Take care to avoid twisting or
tangling the chain.
Do not use the chain container if any parts are damaged or if any fasteners/hardware are missing.
Figure 3-5
Optional Chain Container Installation
Summary of Contents for TCR Series
Page 12: ...12 Figure 2 3 Dimensions for Manipulator TCR250 Air Hoist inches...
Page 13: ...13 2 3 Part Names Figure 2 4 Hoist Part Identification Diagrams TCR500P 500C 1000P 1000C...
Page 14: ...14 Figure 2 5 Hoist Part Identification Diagrams TCR 1000P2 1000C2 2000P2 2000C2...
Page 16: ...16 Top hook Bottom hook Figure 2 8 Hoist Part Identification Diagrams TCR250C...
Page 17: ...17 Top hook Bottom hook Figure 2 9 Hoist Part Identification Diagrams TCR250P...
Page 18: ...18 Top hook Bottom hook Figure 2 10 Hoist Part Identification Diagrams TCR250M...
Page 51: ...Kito Air Hoists Parts List...
Page 52: ...TCR250 MAIN BODY 52 9 0 Parts List TCR250 Main Body...
Page 54: ...TCR250 VALVE BODY 54 TCR250 Valve Body...
Page 56: ...TCR250 MANIPULATOR CONTROL 56 TCR250M Manipulator Control...
Page 58: ...TCR500 MAIN BODY TCR500 Main Body TCR500 Main Body 58...
Page 60: ...TCR1000 2 Main Body TCR1000 2 Main Body 60...
Page 62: ...TCR1000 Main Body TCR1000 Main Body 62...
Page 64: ...TCR2000 2 Main Body TCR2000 2 Main Body 64...
Page 66: ...TCR3000 Main Body TCR3000 Main Body 66...
Page 68: ...TCR6000 2 Main Body TCR6000 2 Main Body 68...
Page 70: ...Cord Control Valve Body Cord Control Valve Body 70...
Page 72: ...Pendant Control Valve Body 72 Pendant Control Valve Body...


