background image

QA-MRK-FM-08-02 v1 

Instructions for use 
 
Getting started 
 

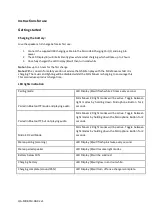
Charging the battery: 

Give the speaker a full charge before its first use: 
 

1.


Connect the supplied USB charging cable into the Micro USB Charging Port (5) and plug into 
power 

2.


The LED Display (8) will intermittently glow white whilst charging which will take up to 2 hours 

3.


Once fully charged the LED Display (8) will then turn solid white 


Note:

 Allow up to 3 hours for the first charge.


Note:


With a concern for safety we do not advise that children play with the Mini Mover whilst it is 

charging. The music and lighting will be disabled whilst the Mini Mover is charging to encourage this. 
This also reduces product charge time. 


LED lights indication


Pairing mode  

LED Display (8) will flash white 2 times every second. 

Paired in Bluetooth® mode and playing audio 

Mini Mover 20 light modes will be active. Toggle between 

light  modes  by  holding  down  Microphone  Button  for  2 

seconds. 

Paired in Bluetooth® but not playing audio 

Mini Mover 20 light modes will be active. Toggle between 

light modes by holding down the Microphone Button for 2 

seconds. 

Micro SD Card Mode 

Mini Mover 20 light modes will be active. Toggle between 

light modes by holding down the Microphone Button for 2 

seconds. 

Stereo pairing (scanning) 

LED Display (8) will flash pink twice every second. 

Stereo paired speaker 

LED Display (8) will resume light modes. 

Battery below 10% 

LED Display (8) will be solid red. 

Charging battery 

LED Display (8) will glow in and out white. 

Charging complete (around 95%) 

LED Display (8) will turn off once charge is complete. 


Summary of Contents for MINI MOVER 20

Page 1: ...touch the device cables plugs or the electrical socket with wet hands or other wet body parts Please don t pull the cable excessively when disconnecting it if the cable is not fixed Please don t bend or damage the cable Please don t drop or cause an impact to the product or the device Please don t place naked flame sources such as lighted candles on the product Please don t allow children under th...

Page 2: ...ns and tightly close the AUX DC IN Micro SD Card cap Exposing the Mini Mover 20 to liquids without doing so may result in permanent damage to the speaker Do not expose the Mini Mover 20 to water while charging This is very dangerous as doing so may result in personal injury and permanent damage to the speaker or power source We do not recommend leaving the Mini Mover 20 outside at night in wet con...

Page 3: ...l microphone so you can sing along to all your favourite songs and sing like the stars To get the best out of your Mini Mover 20 as a mic and to reduce any feedback or muffling that might spoil the sound of your voice we recommend the following 1 Avoid holding the microphone too close to your mouth 2 Do not cover the microphone end of your Mini Mover 20 ...

Page 4: ...arty Speaker USB charge cable User manual Functions 1 Microphone Light Mode Button 2 Volume Next Track Button 3 Volume Previous Track Button 4 Multi function Button 5 Micro USB Port 6 Switch Audio Mode Button 7 Micro SD Card Port 8 LED Display 9 Microphone ...

Page 5: ...time LED lights indication Pairing mode LED Display 8 will flash white 2 times every second Paired in Bluetooth mode and playing audio Mini Mover 20 light modes will be active Toggle between light modes by holding down Microphone Button for 2 seconds Paired in Bluetooth but not playing audio Mini Mover 20 light modes will be active Toggle between light modes by holding down the Microphone Button f...

Page 6: ...ress Multi function Button 4 to turn on both of the Mini Mover 20 speakers that you wish to stereo pair together Both speakers will automatically enter pairing mode The LED Display 8 will indicate this by flashing white 2 Double press the Multi function Button 4 on either of the speakers and it will enter stereo pairing The LED Display 8 will flash pink 3 Once connected in stereo pairing the LED D...

Page 7: ...low Turn On instructions for both speakers Double press Multi function Button 4 on one speaker Microphone Feature On Off Short press Microphone Button 1 Short press Microphone Button 1 Toggle between light modes Hold press Microphone Button 1 for 2 seconds Hold press Microphone Button 1 for 2 seconds Switch audio input mode Short press Switch Button 6 Short press Switch Button 6 Turn On Hold Multi...

Page 8: ...ce complies with Part 15 of the FCC rules Operation is subject to the following two conditions 1 this device may not cause harmful interference and 2 this device must accept any interference received including interference that may cause undesired operation Warning Changes or modifications not expressly approved by the party responsible for compliance could void the user s authority to operate the...

Page 9: ...damage the product Making any attempt to open the product or carry out repair voids any and all warranties We are sorry for any inconvenience caused by minor inconsistencies in these instructions which may occur as a result of product improvement and development BACKCOVER kitsound co uk The Bluetooth word mark and logos are registered trademarks owned by the Bluetooth SIG Inc and any use of such m...

Page 10: ...QA MRK FM 08 02 v1 JB 6788 f REG05 KSMMSP Made in China KitSound is a trademark of Kondor Limited 2019 Christchurch Dorset BH23 4FL UK ...

Reviews: