

REVERSE THE PROCEDURE TO LOWER THE TENT
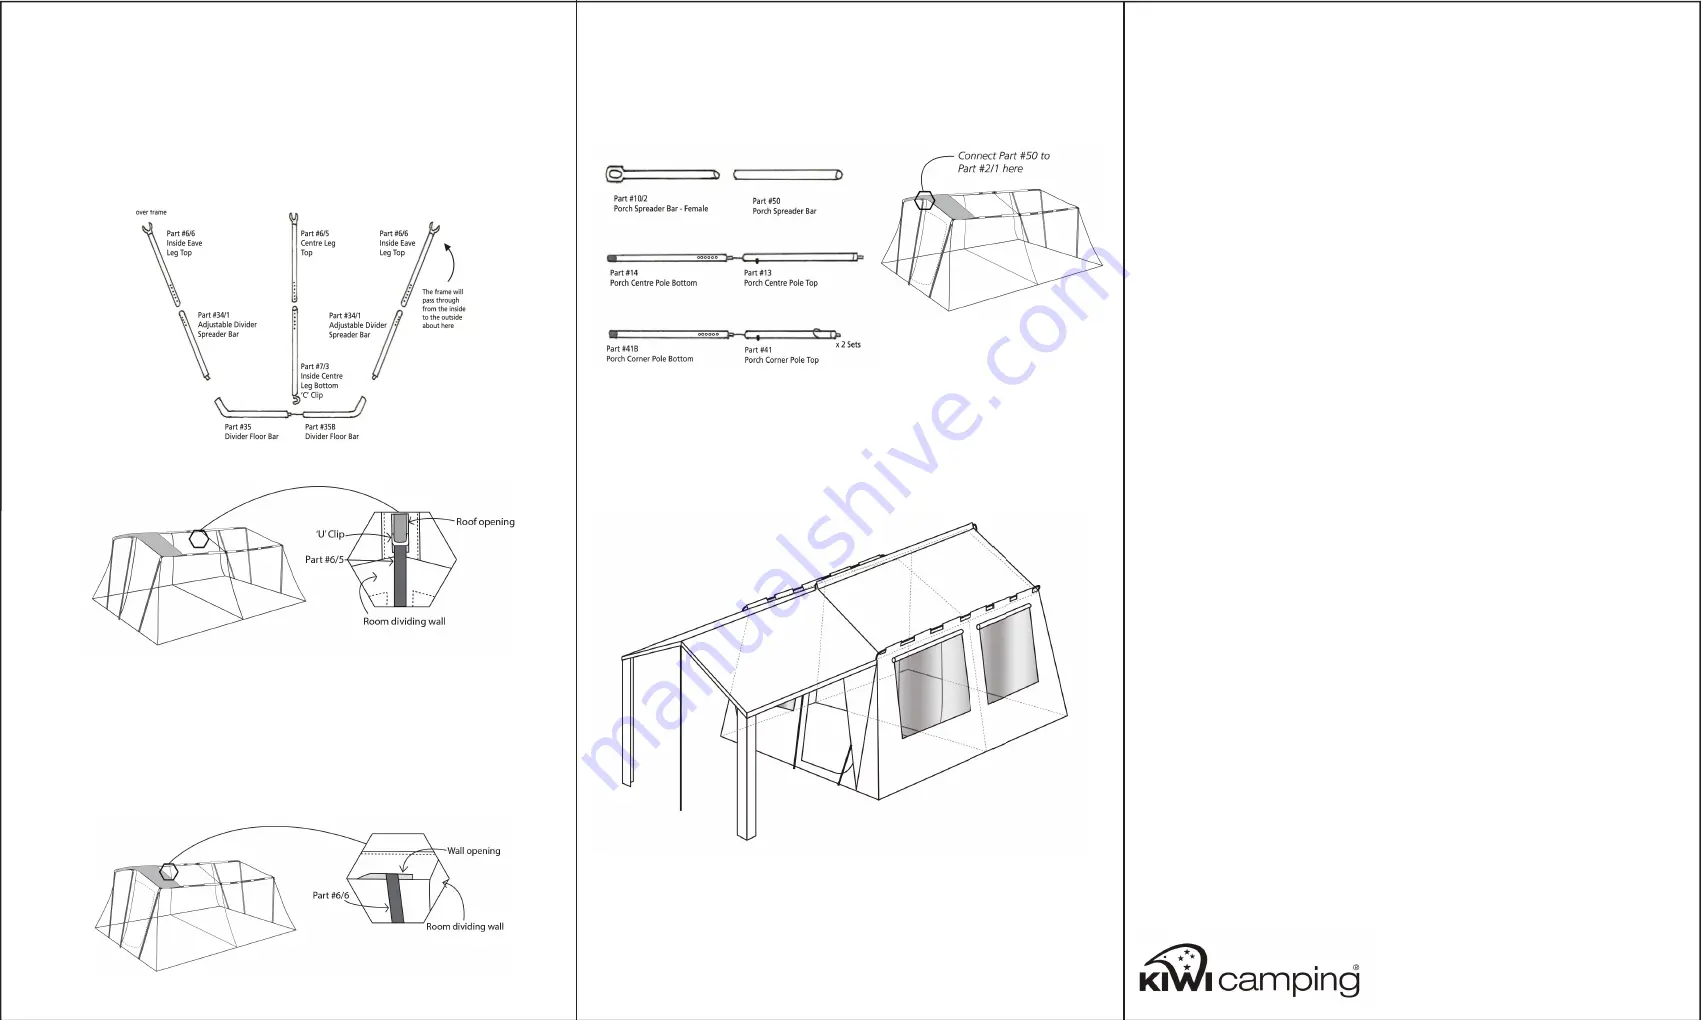
13. Clip the top ‘U’ clip, on the INTERNAL CENTRE RIDGE UPRIGHT pole
(Part #6/5), onto the exterior ridge pole by placing it through the opening
in the fabric roof ridge seam [approx 10cm forward of the room divider
curtain]. Attach Part #7/3 to Part #6/5, attach the ‘C’ clip at the bottom of
the centre pole to Part #35B and adjust, using the dome clips, until the
pole is firmly in place and the ridge line is level when viewing from the
outside.
14. Assemble the porch ridge pole (Part #10/2 and #50) and connect to
the opening in Part #2/1 at the centre of the front of the tent. Carefully,
pull the porch canvas out over the assembly and vertically place the
Porch Centre Pole through the eyelet of Part #10/2 and then the porch
canvas. Then guy rope this directly out.
15. Next, connect together the porch corner poles, Part #41B to #41 and
vertically place one at each corner. Place through the eyelets in each
side of the porch. Securely guy rope these out and peg out the pegging
points on the corner legs.
Support Pole Configuration Diagram:
TENT CARE INSTRUCTIONS
1. Before you use your new tent, fully unpack and pitch it at home. It is important to
familiarise yourself with the set up procedure and the various features.
2. Ensure you thoroughly pre-weather your tent before use to ensure the longest life for
your canvas tent.
3. Select a site that is level, clear of any sharp objects, is dry and will drain well if it rains
and is protected from wind and other elements.
4. For best results, enlist the help of at least one other person to assist in pitching the
tent.
5. Support frames and canvas should be pulled taut, NOT over-stressed.
6. Never pull the pegs out using the canvas. Always use a tent peg remover or claw
hammer.
7. Please note, the warranty on this tent will be deemed void if the product is used for any
purpose other than a temporary shelter.
8. Keep clear of overhead power lines and trees when setting up your tent.
9. Do not leave the tent exposed to direct sunlight for extended periods. UV light is one
of the most damaging elements for your tent.
10. Ensure there is an adequate gap between the fly and inner tent to ensure adequate
ventilation and to prevent condensation build up.
11. Your tent is ventilated for all normal conditions, however condensation may occur
in certain circumstances such as being totally closed off in wet or humid conditions
and steam caused by cooking. If this does occur, thoroughly air the tent at the first
opportunity.
12. Make sure when closing doors that you hold the flaps up to take pressure off the zips.
Ensure that the tent is never over stretched, especially as this may cause problems
with the internal doors. Never store your tent away damp and ensure it is stored in a
well-ventilated area, preferably off the floor. Should mildew spots appear, brush them
off before they become attached. Mildew damage of any kind is not covered by our
guarantee. DO NOT use excess force or other harsh tools to remove soilage from
tent.
13. Like all assets canvas tents require regular care and attention to give the life and
service expected. Regular cleaning with an abundance of clean water and a soft
brush, especially after exposure to salt water will preserve your tent’s life. Do not allow
bird droppings, earth or vegetable matter to remain in contact with the fabric. NEVER
USE SOAPS OR DETERGENTS.
14. Tents are not fire proof, if exposed to flame or high heat sources they can ignite
and burn. Always take care when using spirit or gas appliances such as stoves and
lanterns near your tent.
15. Some of these products contain chemicals, which can destroy your tents proofing and
cause it to leak. Avoid using aerosol sprays and keep petrol, oil, solvents and other
similar fluids away from the fabric. Do not use these inside or around your tent as any
damage caused by these is not covered by our guarantee.
16. Always remember that your tent is made from cloth, and should not be compared with
a house. It is waterproof under normal conditions but in severe weather conditions
some water may penetrate. If you apply water proofing to your tent check that you are
applying the right one for your tent’s canvas type.
17. Make sure your tent is pitched properly and keep a close eye on the weather, as we
have no control over how and where the tent is used or pitched. Extra pegs and ropes
are recommended in stormy conditions. Please note, wind damage is not covered by
our guarantee. Check and adjust guy ropes and pegs daily.
18. Tent fabrics are not 100% colourfast and some fading will occur naturally, however;
this does not affect the performance of the fabric. Do not leave your tent up and
unattended for extended periods of time. Tents are not designed as permanent
dwellings. Tents are guaranteed for normal camping use only.
Distributed by: Aber, Hamilton, NZ
www.kiwicamping.co.nz
3732-11/13
12. Refer to the Support Pole Configuration diagram. Go inside the tent and
find the slot in the top of the wall seam, approximately 10cm in front of the
room dividing wall, and clip Part #6/6 onto the SIDE WALL ASSEMBLY
pole outside, through this opening. Assemble the remaining poles
(Part #34/1, #35 and #35B) as the support pole configuration diagram
shows. Adjust these, using the dome clip buttons until the SIDE WALL
ASSEMBLY poles are not bending when viewing from the outside.
Use the supplied, ‘V’ double guy
ropes on the corner porch poles to
keep them secure and in place.


