background image

17

CLEANING AND MAINTENANCE

*o

ptional

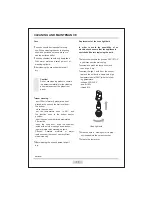
Replacement of the oven light bulb

In order to avoid the possibility

of an

electric shock ensure that the appliance is
switched off before replacing the bulb.

!

Set all control knobs to the position“OFF”/ “STOP”

and disconnect the mains plug,

!

unscrew and wash the lamp cover and

then wipe it dry

.

!

unscrew the light bulb from the socket

,

replace the bulb with a new one-a high
temperature bulb (300

)with the follow-

ing parameters:
-voltage 220~240 V
-power 15 W
-thread E14.

!

Screw the bulb in , making sure it is prop

-

erly inserted into the ceramic socket.

!

Screw in the lamp cover.

Oven light bulb

Oven

!

The oven should be cleaned after every

use. When cleaning the oven the lighting
should be switched on to enable you to
see the surfaces better.

!

The oven chamber should only be washed

With warm water and small amount of
washing-up liquid.

!

After cleaning the oven chamber wipe it

dry.

Caution!

Do not use cleaning products contain-
ing abrasive materials for the cleaning
and maintenance of the glass front
panel.

!

steam cleaning

:

-pour 250ml of water(1 glass)into a bowl
placed in the oven on the first level from
the bottom,
-close the oven door,
-set the temperature

knob to 50

,and

the function

knob to the bottom heater

position,
-heat the oven chamber for approximately
30 minutes,
-open the oven door, wipe the chamber
inside with a cloth or sponge and wash us

-

ing warm water with washing-up liquid.
Caution!

Possible

moisture

or

water

residues under the cooker can result from
steam cleaning.

!

After cleaning the oven chamber wipe it

dry.

Summary of Contents for TANKY OV 60

Page 1: ...INSTRUCTION MANUAL TANKY OV 60 Built in Electric Oven...

Page 2: ...following these instructions carefully you will be able to avoid any problems in using the appliance It is important to keep the instruction manual and store it in a safe place so that it can be consu...

Page 3: ...2 TABLE OF CONTENTS Safety instructions 3 Description of the appliance 8 Installation 10 Operation 12 Cleaning and maintenance 16 Technical data 19...

Page 4: ...ctrical shocks and or other serious injuries or death The appliance becomes hot during operation Take care not to touch the hot parts inside the oven Always keep children away from the cooker While in...

Page 5: ...storing the unit keep it in a dry location free from dust excessive vibration or other factors which may damage the unit Do not operate any oven with a damaged cord or plug or after the heater malfun...

Page 6: ...e and persons with reduced physical sensory or mental capabilities or lack of experience and knowledge if they have been given supervision or instruction concerning use of the appliance in a safe way...

Page 7: ...on energy Only use the oven when cooking larger dishes Meat of up to 1 kg can be prepared more economically in a pan on the cooker hob Make use of residual heat from the oven If the cooking time is gr...

Page 8: ...LIANCE After the implementation of the European Directive 2002 96 EU in the national legal system the following applies Electrical and electronic devices may not be disposed of with domestic waste Con...

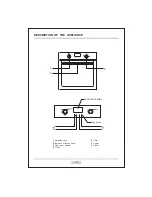
Page 9: ...8 DESCRIPTION OF THE APPLIANCE 1 3 2 1 Selection knob 3 Oven door handle 4 Clock 5 Timer 6 Power 7 Affirm 2 Increase or lessen knob CONTROL PANEL key press 4 5 6 7...

Page 10: ...9 Baking tray Grill grate drying rack SPECIFICATIONS OF THE APPLIANCE optional Rotisserie...

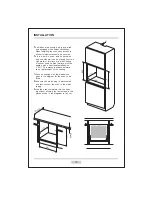
Page 11: ...Coating or veneer used on fited furniture must be applied with a heat resistant adhesive 100 This prevents surface deforma tion or detachment of the coating Make an opening with the dimensions given i...

Page 12: ...train relief clamp Warning Remember to connect the safety circuit to the connection terminal marked with The holder electrictity supply for the must have a oven safety switch which enables the power t...

Page 13: ...washing up liquid on the in the room or open a window Heat the oven to a temperature of 250 for approx 30 min remove any stains and wash carefully the heating zones of the hob should be heated for aro...

Page 14: ...ectricity if the clock is not set up it will not show time and only shows 0 00 1 In standby status push button once the Hour number flicker reminding to start set up 2 Turn knob K2 set up hour 0 23 tu...

Page 15: ...re and working time as below a Turn K K2 turn one scale the temperature will increase or decrease 5 Temperature set up from 50 C C 250 nob b Push button once the Hour flicker then turn K2 to set up ho...

Page 16: ...50 250 50 240 180 240 50 200 50 180 180 240 180 240 180 240 0 01 9 00 4 Checking function 1 In working condition push button can check current time after flicker times it will show original working c...

Page 17: ...by adjusting the cover just push it with your thumb Injuries are pos sible so be careful when using this instru ment keep out of reach of reach of children Appropriate light cleaning or washing produc...

Page 18: ...eaning the oven the lighting should be switched on to enable you to see the surfaces better The oven chamber should only be washed With warm water and small amount of washing up liquid After cleaning...

Page 19: ...nge is correctly placed on the protrusion of the hinge holder After the door is fitted to the oven the safety catch should be carefully lowered down again If the safety catch is not set it may cause d...

Page 20: ...check the following points that are presented in the table PROBLEM REASON ACTION The appliance does not work break in power supply check the household fuse box if there is a blown fuse replace it with...

Reviews: