background image

16

EN

MAINTENANCE

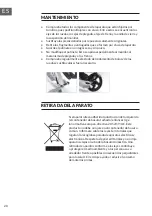
•  Regularly check that the various screwed parts are tight , particulary the 

wheels axeles , the fold axis , the brake shaft, and the head tube locking 
collar and suspension because the

•  self -tightening screws or other attachment may lose their effectiveness.
•  Always replace used parts with original parts.
•  Remove any sharp fragments caused by use.
•  Keep the scoter in a dry ,dust-free place.
• 

Do not modify or transform the scooter , specifically the steering column 

and socket, the stem, 

•  The folding mechanism and back brake .
•  Check the condition of the bearing and wheels regularly , and replae them 

if necessary.

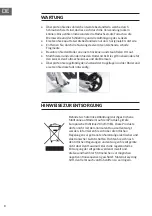
HINTS ON DISPOSAL

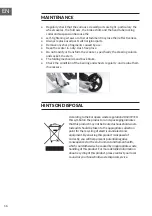
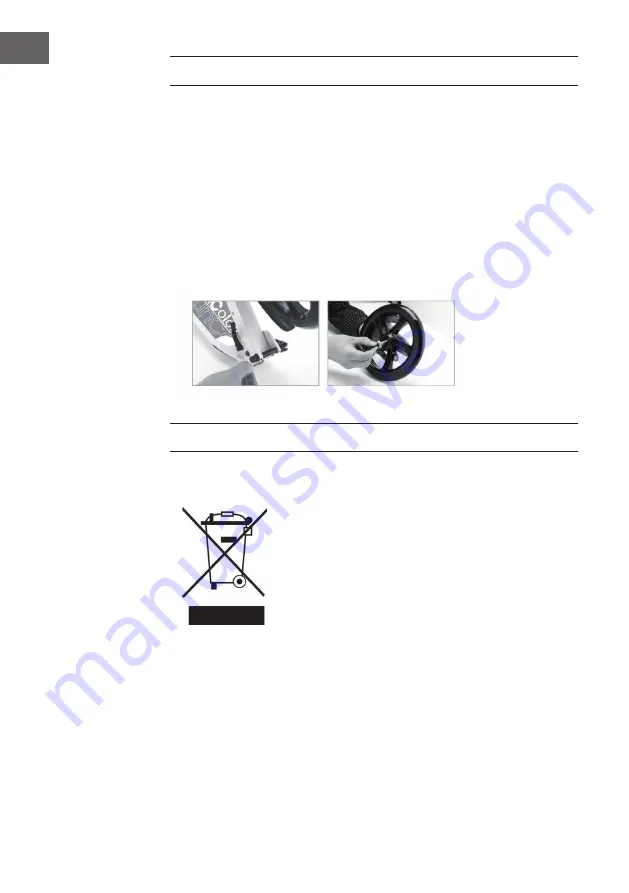
According to the European waste regulation 2012/19/EU 
this symbol on the product or on its packaging indicates 
that this product may not be treated as household waste. 
Instead it should be taken to the appropriate collection 
point for the recycling of electrical and electronic 
equipment. By ensuring this product is disposed of 
correctly, you will help prevent potential negative 
consequences for the environment and human health, 
which could otherwise be caused by inappropriate waste 
handling of this product. For more detailled information 
about recycling of this product, please contact your local 
council or your household waste disposal service.

Summary of Contents for 10032637

Page 1: ...10032637 10034938 10034939 Float Tretroller Kickscooter Ruedas de scooters Trottinette roues Monopattino ruote ...

Page 2: ......

Page 3: ...len ihnen zu Ihrer eigenen Sicherheit Schutzausrüstung wie Helm Ellenbogenschützer Knieschützer und Handschuhe zu tragen Hinweis Das maximale Nutzergewicht beträgt 100 kg 220 Pfund Dieser Roller kann zum selben Zeitpunkt nur von einer Person genutzt werden Beachten Sie die aktuellen Verkehrsregeln Vermeiden Sie stark befahrene Straßen oder dichten Straßenverkehr Vermeiden Sie das Fahren auf rutsch...

Page 4: ...g 2 Schnellspannhebel der Handgriffe 8 Schnellspannhebel des Lenkers 3 Federknopf des Lenkers 9 Lenker 4 Bremse Schutzblech 10 Klappmechanismus 5 Verriegelung für den Klappmechanismus 11 Schnelles Anziehen des Klappmechanismus 6 Federknopf des Handgriffs ...

Page 5: ...ers ob dieser richtig zusammengebaut wurde ein Klicken muss zu hören sein wenn der Lenker in der vertikalen Verriegelungsposition angelangt und dort durch den Faltmechanismus fixiert wird Hinweis Die Bremsen des Rollers können während der Verwendung sehr heiß werden Berühren Sie diese nach der Verwendung nicht A Aufklappen des Lenkers Öffnen Sie den Schnellspannhebel 11 und drücken Sie den Verrieg...

Page 6: ... Rollers den Schnellspannhebel der Handgriff und befolgen Sie die Anweisungen unten bevor Sie alles fest fixieren C Anpassung der Handgriffhöhe Öffnen Sie den Schnellspannhebel des Lenkers 8 und passen Sie die Höhe der Handgriffe so lange an bis Sie ein klickendes Geräusch hören welches anzeigt dass diese in der angegebenen Position fixiert wurden Fixieren Sie anschließend den Schnellspannhebel de...

Page 7: ...ese in die Plastikabdeckung zurück F Zusammenklappen des Lenkers Öffnen Sie den Schnellspannhebel 11 und drücken Sie den Verriegelungshebel 5 nach vorne um den Klappmechanismus 11 zu entsichern Das Entsichern ist einfacher wenn der Lenker 9 nach vorne gedrückt wird Senken Sie den Lenker 9 so lange ab bis Sie die Verriegelungsposition erreichen und ziehen Sie anschließend den Schnellspannhebel 11 f...

Page 8: ...mus und die Bremsen Überprüfen Sie regelmäßig den Zustand der Kugellager und der Räder und ersetzen Sie diese falls notwendig HINWEISE ZUR ENTSORGUNG Befindet sich die linke Abbildung durchgestrichene Mülltonne auf Rädern auf dem Produkt gilt die Europäische Richtlinie 2012 19 EU Diese Produkte dürfen nicht mit dem normalen Hausmüll entsorgt werden Informieren Sie sich über die örtlichen Regelunge...

Page 9: ...33 Bankverbindung Hypo Vereinsbank Konto Nummer 355 986 675 BLZ 100 208 90 IBAN DE91100208900355986675 BIC SWIFT Code HYVEDEMM488 EU Konformitätserklärung Wir die CHAL TEC GmbH Wallstraße 16 10179 Berlin erklären hiermit dass die nachfolgend bezeichneten Geräte Takira Scooter Artikelnr 10032637 10032638 allen folgenden einschlägigen Bestimmungen entsprichen Maschinenrichtlinie 2006 42 EG RoHS Rich...

Page 10: ......

Page 11: ...lace during the initial month take the time to learn the basics of the sport For the safety we advise you to use this appliance with protective equipment helmet elbow pads knee pads and gloves Note The maximum weight of the user is 100 kg 220 Lbs This scooter can only be used by one person at a time Respect the current Highway Code Avoid places with heavy traffic or that are too busy Avoid slipper...

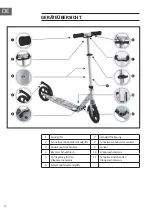
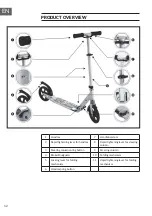
Page 12: ...ening lever for handles 8 Rapid tightening lever for steering column 3 Steering column spring button 9 Steering column 4 Brake Mudguard 10 Folding mechanism 5 Locking lever for folding mechanism 11 Rapid tightening lever for folding mechanism 6 Handle spring button ...

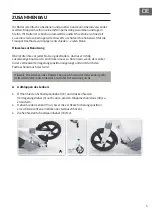
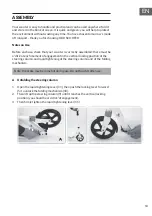
Page 13: ...mbled there must be a click at each moment of engagement in the vertical locking position of the steering column and rapid tightening of the steering column and of the folding mechanism Note the brake may become hot during use Do not touch it after use A Unfolding the steering column 1 Open the rapid tightening lever 11 then push the locking lever forward 5 to unlock the folding mechanism 10 2 The...

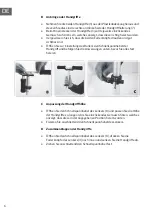
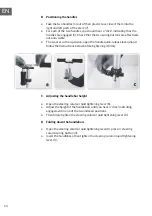
Page 14: ...ick release lever 2 and follow the instructions below before tightening it firmly C Adjusting the handlebar height Open the steering column rapid tightening lever 8 Adjust the height of the handlebars until you hear a click indicating engagement in one of the two indexed positions Then firmly tighten the steering column rapid tightening lever 8 D Folding down the handlebars Open the steering colum...

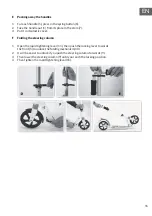
Page 15: ...plastic cover F Folding the steering column 1 Open the rapid tightening lever 11 then push the locking lever towards the front 5 to unlock the folding mechanism 10 2 It will be easier to unlock if you push the steering column forwards 9 3 Then lower the steering column 9 until you reach the locking position 4 Then tighten the rapid tightening lever 11 ...

Page 16: ...ondition of the bearing and wheels regularly and replae them if necessary HINTS ON DISPOSAL According to the European waste regulation 2012 19 EU this symbol on the product or on its packaging indicates that this product may not be treated as household waste Instead it should be taken to the appropriate collection point for the recycling of electrical and electronic equipment By ensuring this prod...

Page 17: ...cidenti gravi soprattutto durante i primi mesi di utilizzo Per ragioni di sicurezza si consiglia di indossare un attrezzatura di protezione come casco gomitiere ginocchiere e guanti Nota il peso massimo dell utente deve essere di 100 kg 220 libbre Questo monopattino può essere utilizzato solo da una persona alla volta Rispettare le norme di circolazione vigenti Evitare strade trafficate o traffico...

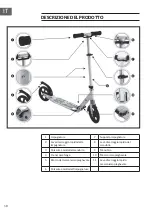
Page 18: ...erraggio rapido delle impugnature 8 Leva di serraggio rapido del manubrio 3 Pulsante a molla del manubrio 9 Manubrio 4 Freno parafango 10 Meccanismo pieghevole 5 Blocco del meccanismo pieghevole 11 Leva di serraggio rapido meccanismo pieghevole 6 Pulsante a molla dell impugnatura ...

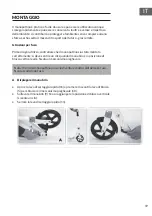
Page 19: ... controllare che il monopattino sia stato montato correttamente si deve sentire un clic quando il manubrio è in posizione di blocco verticale ed è fissato al meccanismo pieghevole Nota i freni del monopattino possono diventare molto caldi durante l uso Non toccarli dopo l uso A Dispiegare il manubrio Aprire la leva di serraggio rapido 11 e premere in avanti la leva di blocco 5 per sbloccare il mec...

Page 20: ...leva di serraggio rapido dell impugnatura e seguire le istruzioni riportate di seguito prima di fissare saldamente i componenti C Regolare l altezza del manubrio Aprire la leva di serraggio rapido del manubrio 8 e regolare l altezza fino a quando non si sente un clic che indica il corretto posizionamento Infine fissare la leva di serraggio rapido del manubrio D Piegare le impugnature Aprire la lev...

Page 21: ...anubrio 7 Infine reinserire le impugnature nel coperchio di plastica F Piegare il manubrio Aprire la leva di serraggio rapido 11 e premere in avanti la leva di blocco 5 per sbloccare il meccanismo pieghevole 11 Lo sblocco è più semplice se si preme in avanti il manubrio 9 Abbassare il manubrio 9 fino a raggiungere la posizione di blocco Infine serrare la leva di serraggio rapido 11 ...

Page 22: ...ubrio il meccanismo pieghevole e i freni Controllare regolarmente lo stato dei cuscinetti a sfere e delle ruote e sostituirli se necessario SMALTIMENTO Se sul prodotto è presente la figura a sinistra il cassonetto dei rifiuti mobile sbarrato si applica la direttiva europea 2012 19 UE Questi prodotti non possono essere smaltiti con i rifiuti normali Informarsi sulle disposizioni vigenti in merito a...

Page 23: ...raves en los primeros meses de uso Le recomendamos por su propia seguridad utilizar protecciones como casco coderas rodilleras y guantes Nota El peso máximo del usuario no debe superar los 100 kg aprox 220 libras Este patinete puede utilizarse solamente por una persona de cada vez Siga las reglas de circulación vigentes Evite calles muy transitadas o con mucho tráfico rodado Evite circular por sup...

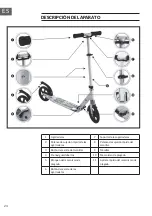
Page 24: ...de sujeción rápida de las agarraderas 8 Palanca de sujeción rápida del manillar 3 Botón de resorte del manillar 9 Manillar 4 Frenos guardabarros 10 Mecanismo de plegado 5 Bloqueo del mecanismo de plegado 11 Apriete rápido del mecanismo de plegado 6 Botón de resorte de las agarraderas ...

Page 25: ...e compruebe que esté bien montado debe escuchar un clic cuando el manillar se coloca en posición de bloqueo vertical y otro cuando se fija el mecanismo de plegado Nota Los frenos del patinete pueden alcanzar temperaturas elevadas durante su uso No los toque después de su uso A Desplegado del manillar Abra la palanca rápida de sujeción 11 y presione la palanca de bloqueo 5 hacia adelante para desbl...

Page 26: ...e sujeción de la empuñadura y siga las instrucciones que aparecen a continuación antes de fijar todo C Ajuste de la altura de las empuñaduras Abra la palanca rápida de sujeción del manillar 8 y ajuste la altura de las empuñaduras hasta que escuche un sonido de clic el cual indica que se han fijado en la posición correcta A continuación fije la palanca rápida de sujeción del manillar D Plegado de l...

Page 27: ...ar 7 devolviéndolas a la cubierta de plástico F Plegado del manillar Abra la palanca rápida de sujeción 11 y presione la palanca de bloqueo 5 hacia adelante para activar el mecanismo de plegado 11 El desbloqueo es más sencillo si el manillar 9 se presiona hacia adelante Baje el manillar 9 hasta que llegue a la posición de cierre y a continuación asegure la palanca rápida de sujeción 11 ...

Page 28: ...egularmente el estado del rodamiento de bolas y de las ruedas y sustitúyalos si fuera necesario RETIRADA DEL APARATO Si el aparato lleva adherida la ilustración de la izquierda el contenedor de basura tachado entonces rige la normativa europea directiva 2012 19 UE Este producto no debe arrojarse a un contenedor de basura común Infórmese sobre las leyes territoriales que regulan la recogida separad...

Page 29: ...u premier mois d utilisation Nous vous recommandons de porter un équipement de protection tel qu un casque des coudières des genouillères et des gants pour votre propre sécurité Remarque le poids maximal de l utilisateur est de 100 kg 220 livres Cette trottinette ne peut être utilisée que par une personne à la fois Respectez les règles de circulation en vigueur Évitez les routes encombrées ou la c...

Page 30: ...Levier de serrage rapide des poignées 8 Levier de serrage rapide du guidon 3 Bouton à ressort du guidon 9 Guidon 4 Frein plaque de protection 10 Mécanisme pliant 5 Verrouillage du mécanisme pliant 11 Serrage rapide du mécanisme pliant 6 Bouton ressort des poignées ...

Page 31: ...fiez qu il est correctement assemblé vous devez entendre un clic lorsque le guidon arrive en position de verrouillage vertical et est bloqué par le mécanisme de pliage Remarque Les freins du scooter peuvent devenir très chauds pendant l utilisation Ne les touchez pas après utilisation A Déployer le guidon Ouvrez le levier de blocage rapide 11 et poussez le levier de verrouillage 5 vers l avant pou...

Page 32: ...blocage rapide sur la poignée et suivez les instructions ci dessous avant de serrer l ensemble C Ajustement de la hauteur des poignées Ouvrez le levier de déblocage rapide du guidon 8 et réglez la hauteur des poignées jusqu à ce que vous entendiez un clic indiquant qu elles ont été réparées dans la position spécifiée Ensuite fixez le levier de déblocage rapide du guidon D Pliage des poignées Ouvre...

Page 33: ...idon 7 et replacez les dans le cache en plastique F Pliage du guidon Ouvrez le levier de déverrouillage rapide 11 et poussez le levier de verrouillage 5 vers l avant pour libérer le mécanisme de pliage 11 Le déverrouillage est plus aisé lorsque le guidon 9 est poussé vers l avant Abaissez le guidon 9 jusqu à la position de verrouillage puis serrez le levier de déblocage rapide 11 ...

Page 34: ...et les freins Vérifiez régulièrement l état des roulements à billes et des roues et remplacez les si nécessaire CONSEILS POUR LE RECYCLAGE Le pictogramme ci contre apposé sur le produit signifie que la directive européenne 2012 19 UE s applique poubelle à roues barrée d une croix Ces produits ne peuvent être jetés dans les poubelles domestiques courantes Renseignez vous concernant les règles appli...

Page 35: ......

Page 36: ......

Reviews: