12
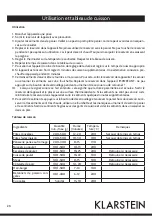
Tips for Cooking
• Smaller ingredients usually require a slightly shorter preparation time than larger ingredients.
• A larger amount of ingredients only requires a slightly longer preparation time, a smaller amount of ingre-
dients only requires a slightly shorter preparation time.
• Shaking smaller ingredients halfway through the preparation time optimises the end result and can help
prevent unevenly fried ingredients.
• Add some oil to fresh potatoes for a crispy result. Fry your ingredients in the airfryer within a few minutes
after you added the oil.
• Do not prepare extremely greasy ingredients such as sausages in the airfryer.
• Snacks that can be prepared in an oven can also be prepared in the airfryer.
• The optimal amount for preparing crispy fries is 500 grams.
• Use pre-made dough to prepare filled snacks quickly and easily. Pre-made dough also requires a shorter
preparation time than home-made dough.
• You can also use the airfryer to reheat ingredients. To reheat ingredients, set the temperature to 150°C for
up to 10 minutes.
Cleaning and Care
Clean the appliance after every use. The tank, baking tray , basket and the inside of the appliance have a
non-stick coating. Do not use metal kitchen utensils or abrasive cleaning materials to clean them, as this may
damage the non-stick coating.
1.
Remove the mains plug from the wall socket and let the appliance cool down. Note: Remove the tank to
let the airfryer cool down more quickly.
2. Wipe the outside of the appliance with a moist cloth.
3. Clean the tank, basket with hot water, some washing-up liquid and a non-abrasive sponge. You can use
a degreasing liquid to remove any remaining dirt. Note: The tank and basket are dishwasher-proof. Tip: If
dirt is stuck to the basket, or the bottom of the tank, fill the tank with hot water with some washing-up
liquid. Put the basket in the tank and let the tank and the basket soak for approximately 10 minutes.
4. Clean the inside of the appliance with hot water and a non-abrasive sponge.
5. Clean the heating element with a cleaning brush to remove any food residues.
6. Make sure all parts are clean and dry.
7. Push the cord into the cord storage compartment. Fix the cord by inserting it into the cord fixing slot.
Hints on Disposal
According to the European waste regulation 2002/96/EG this symbol on the product
or on its packaging indicates that this product may not be treated as household waste.
Instead it should be taken to the appropriate collection point for the recycling of electrical
and electronic equipment. By ensuring this product is disposed of correctly, you will help
prevent potential negative consequences for the environment and human health, which
could otherwise be caused by inappropriate waste handling of this product. For more de-
tailled information about recycling of this product, please contact your local council or your
household waste disposial service.


