background image

58

IT

Disattivare il timer in un giorno specifico della settimana

Se non si desidera attivare il timer in un particolare giorno della settimana, premere il 
tasto TIMER quattro volte per saltare quel giorno.

Esempio

: non si intende impostare il timer per martedì. Al termine dell‘impostazione 

del timer per lunedì, è possibile effettuare l‘impostazione per martedì. [ON] e [MON] 

scompaiono dal display e il display indica [ON] e [TUE]. Allo stesso tempo le prime 
due cifre iniziano a lampeggiare sul display. NON usare i tasti [+] e [-], bensì premere 
4 volte il tasto TIMER. In questo modo si salta automaticamente questo giorno ed è 
possibile impostare il tempo desiderato per mercoledì. Per saltare mercoledì o altri 
giorni, seguire la stessa procedura.

Nota: in caso di conflitto tra le impostazioni del timer settimanale e giornaliero, verrà 
selezionata l‘impostazione salvata per prima.

Blocco bambini

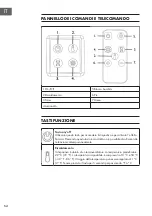
Il blocco bambini può essere attivato e disattivato SOLO tramite il telecomando. 

Tenendo premuto il blocco bambini per 5 secondi, questo si attiva e tutti i tasti sul 
pannello dei comandi e sul telecomando vengono bloccati. Tenere premuto il tasto per 
5 secondi per sbloccare i tasti.

Controllo della temperatura e impostazioni per il risparmio energetico

•  Se il dispositivo rileva una divergenza di 0 - 3 °C tra la temperatura impostata e 

la temperatura ambiente effettiva (ad esempio impostazione 18 °C, temperatura 

ambiente compresa tra 16 e 18 °C), il dispositivo riscalda ad una potenza di 

1000 W.

•  Se il dispositivo rileva una divergenza superiore a 3 °C tra la temperatura 

impostata e la temperatura ambiente effettiva (ad es. impostazione 18 °C, 

temperatura ambiente inferiore a 16 °C), il dispositivo riscalda ad una potenza di 

2000 W. 

•  Se la temperatura ambiente rilevata dal dispositivo è superiore di almeno 

1 °C alla temperatura impostata dall‘utente (ad es. impostazione 18 °C, 
temperatura ambiente 19 °C o superiore), la funzione di riscaldamento si spegne 

automaticamente dopo 10 secondi.

•  Se si preme il tasto di spegnimento sul pannello dei comandi, alla riaccensione la 

funzione di controllo della temperatura attiverà l‘ultima funzione impostata.

Summary of Contents for 10032527

Page 1: ...Note This product is only suitable for well insulated spaces or occasional use Nota Este producto está indicado únicamente en lugares abrigados o para una utilización punctual Remarque Ce produit ne peut être utilisé que dans des locaux bien isolés ou de manière occasionnelle Advertencia Questo prodotto è adatto solo per spazi ben isolati o uso occasionale ...

Page 2: ......

Page 3: ...herheitshinweise 5 Bedienfeld und Fernbedienung 6 Tastenfunktionen 6 Displayanzeigen 7 Inbetriebnahme und Bedienung 8 Reinigung und Wartung 12 Hinweise zur Entsorgung 13 Rahmeninstallation 14 TECHNISCHE DATEN Artikelnummer 10032527 10032528 Stromversorgung 220 240 V 50 60 Hz KONFORMITÄTSERKLÄRUNG Hersteller Chal Tec GmbH Wallstraße 16 10179 Berlin Deutschland Dieses Produkt entspricht den folgende...

Page 4: ...r elmax 1 904 kW Art der Wärmeleistung Raumtemperaturkontrolle Bei Mindestwärmeleistung Ventilator Motor elmin 0 977 kW Einstufige Wärmeleistung keine Raumtemperaturkontrolle nein Im Bereitschaftszustand elSB 0 0 W Zwei oder mehr manuell einstellbare Stufen keine Raumtemperaturkontrolle nein Raumtemperaturkontrolle mit mechanischem Thermostat nein Mit elektronischer Raumtemperaturkontrolle nein Mi...

Page 5: ...oder Läufern Achten Sie darauf dass das Netzkabel nicht über scharfe Ecken oder heiße Oberflächen verläuft Decken Sie den Kamin nicht ab um Überhitzen zu vermieden Benutzen Sie das Gerät nicht mit einem externen Timer einer ferngesteuerten Steckdose oder einem anderen Gerät das den Kamin automatisch ein und ausschaltet Tauchen Sie das Gerät nicht in Wasser oder andere Flüssigkeiten Benutzen Sie da...

Page 6: ... Ein Zustand können durch Drücken dieser Taste alle Funktionen gleichzeitig ausgeschaltet werden Heizung Das Gerät verfügt über einen Heizlüfter Die voreingestellte Temperatur beträgt 22 C 72 F Die einstellbare Temperatur liegt zwischen 10 C und 50 C 30 F 86 F Der Temperaturbereich kann jeweils um 1 C 2 F angepasst werden Halten Sie die Taste 5 Sekunden lang gedrückt um die Anzeige von F auf C zu ...

Page 7: ...nung angepasst werden Halten Sie diese Taste für 5 Sekunden gedrückt um alle Tasten auf dem Bedienfeld und der Fernbedienung zu sperren oder wieder zu entsperren Plus Erhöhen einer Funktion Drücken Sie die Taste für 3 Sekunden um den Wochentimer zu öffnen Es besteht keine Notwendigkeit den wöchentlichen Timer zurückzusetzen dieser stellt automatisch die zuletzt eingestellte Zeit ein Minus Verringe...

Page 8: ...ausgeschaltet und an eine Steckdose angeschlossen sein 1 Drücken und halten Sie die TIMER Taste für 5 Sekunden bis die Ziffern zu blinken beginnen und stellen Sie über die Tasten und den aktuellen Wochentag ein 1 Montag 2 Dienstag 3 Mittwoch 4 Donnerstag 5 Freitag 6 Samstag 7 Sonntag 2 Drücken und halten Sie die TIMER Taste ein zweites Mal wird die vordere Ziffer zu blinken beginnen Über die Taste...

Page 9: ...n Sie über die Tasten und beginnend bei Montag die gewünschte Timerzeit einstellen Auf dem Bildschirm erscheinen ON und MON zur selben Zeit Stellen Sie zunächst die Stunde die ersten beiden Ziffern auf dem Bildschirm über die Tasten und ein 2 Drücken Sie erneut die TIMER Taste auf der Fernbedienung um die Minuten einstellen Nutzen Sie hierfür die Tasten und Bei jedem Tastendruck wird die Zeit um 1...

Page 10: ...rsicherung Die Kindersicherung kann NUR über die Fernbedienung aktiviert und deaktiviert werden Wenn Sie die Kindersicherungs Taste für 5 Sekunden gedrückt halten wird die Kindersicherung aktiviert und alle Tasten des Bedienfelds und der Fernbedienung werden gesperrt Wenn Sie die Taste erneut für 5 Sekunden drücken werden alle Tasten wieder entsperrt Temperaturkontrolle und Energiespareinstellunge...

Page 11: ... das Kühlgerät nicht deaktiviert wird zeigt der Bildschirm weiterhin E8 an In diesem Fall müssen Sie das Gerät ausschalten und den Netzstecker aus der Steckdose ziehen Batterien der Fernbedienung wechseln Das Gerät ist mit einer Multifunktionsfernbedienung ausgestattet Vor der Verwendung der Fernbedienung müssen alle Pastikeinlagen entfernt werden 1 Lokalisieren Sie das Batteriefach und ziehen Sie...

Page 12: ...n Sie zunächst die Sicherung und die Wandsteckdose überprüfen Wenden Sie sich an den Kundendienst oder eine in ähnlicher Weise qualifizierte Person wenn das Problem weiterhin besteht Hinweis Der visuelle Effekt bleibt auch nach dem Aktiveren des Überhitzungsschutzes aktiv Lediglich der Motor des Gebläses stellt den Betrieb ein REINIGUNG UND WARTUNG Hinweis Schalten Sie das Gerät immer aus und zieh...

Page 13: ...formieren Sie sich über die örtlichen Regelungen zur getrennten Sammlung elektrischer und elektronischer Gerätschaften Richten Sie sich nach den örtlichen Regelungen und entsorgen Sie Altgeräte nicht über den Hausmüll Durch die regelkonforme Entsorgung der Altgeräte werden Umwelt und die Gesundheit ihrer Mitmenschen vor möglichen negativen Konsequenzen geschützt Materialrecycling hilft den Verbrau...

Page 14: ...14 DE RAHMENINSTALLATION FÜR 10032527 1 2 ...

Page 15: ...y CONTENT Product Data Sheet 16 Safety Instructions 17 Control Panel and Remote Control 18 Key Functions 18 Display Symbols 19 Use and Operation 20 Cleaning and Maintenance 24 Hints on Disposal 25 Frame Installation 25 TECHNICAL DATA Item number 10032527 10032528 Power supply 220 240 V 50 60 Hz DECLARATION OF CONFORMITY Producer Chal Tec GmbH Wallstraße 16 10179 Berlin Germany This product is conf...

Page 16: ... elmax 1 904 kW Type of heat output room temperature control At minimum heat output fan motor elmin 0 977 kW single stage heat output and no room temperature control no In standby mode elSB 0 0 W Two or more manual stages no room temperature control no with mechanic thermostat room temperature control no with electronic room temperature control no electronic room temperature control plus day timer...

Page 17: ...void overheating do not cover the heater Do not use this heater with a programmer timer separate remote control system or any other device that switches the heater on automatically since a fire risk exists if the heater is covered or positioned incorrectly Never immerse the product in water or any other liquid for any reasons Do not use this heater in the immediate surroundings of a bath a shower ...

Page 18: ...t in a standby mode but also you can see the flame effect through the screen This will turn off all functions at once Heater The fireplace contains a fan forced heater The default setting temperature is 72 F 22 C The thermostat setting range is 50 86 F or 10 30 C The thermostat is adjustable by 2 F or 1 C increments To change between F and C press and hold the Heater button for 5 seconds ...

Page 19: ...om remote control only Holding the child safety lock button for 5 seconds disables or enables all functions on the control panel and remote control Plus Function increase of any function button Hold down key for three seconds open the weekly timmer function No need to reset the weekly timer it will recover the last time set Minus Function decrease of any function button Hold down key for three sec...

Page 20: ...t the power must be on at the socket 1 Press and hold the TIMER button for 5 seconds the digit of the tube flashes then press and button to set the day of the week 1 Monday 2 Tuesday 3 Wednesday 4 Thursday 5 Friday 6 Saturday 7 Sunday 2 Press TIMER button a second time the first digit of the digital tube will flash then press and button to set the hour 10 00 for example 3 Press TIMER button a thir...

Page 21: ...N and MON will be flashing at the same time Firstly set the hour the first two digital of the tube showing hours you can press and button to set the hour 2 Press TIMER button the second time to set minutes Ten minutes is consider to be a unit and you could press and button to adjust minutes from 10 20 50 00 minutes 3 Press TIMER button the for the third time you can set the power off working time ...

Page 22: ...sday set Note The same day timing and weekly timing conflict according to the principle of first switch to the first set all settings need memory function Child lock The child safety lock is adjustable from remote control only Holding the child safety lock button for 5 seconds disables or enables all functions on the control panel and remote control Temperature control energy saving features When ...

Page 23: ...will not disappear if you turn off the heating by the control panel or remote control even when window is not closed You will need to turn the appliance off at the wall and unplug from the power supply Changing the batteries of the remote control The fire is supplied with an IR multifunction remote Before the remote will operate the plastic insulating sheet needs to be removed 1 Locate and remove ...

Page 24: ...s been followed correctly and the appliance still fails to function check the fuse in the wall outlet If this is not the cause call an electrician or maintenance engineer Note The visual effect will remain operational if the cutout is activated only the fan heater is prevented from working CLEANING AND MAINTENANCE Note always disconnect the appliance at the supply outlet socket before undertaking ...

Page 25: ...appropriate collection point for the recycling of electrical and electronic equipment By ensuring this product is disposed of correctly you will help prevent potential negative consequences for the environment and human health which could otherwise be caused by inappropriate waste handling of this product For more detailed information about recycling of this product please contact your local counc...

Page 26: ...26 EN FRAME INSTALLATION FOR 10032527 1 2 ...

Page 27: ...roducto 28 Indicaciones de seguridad 29 Panel de control y mando a distancia 30 Funciones de los botones 30 Indicadores del display 31 Puesta en marcha y uso 32 Limpieza y mantenimiento 36 Indicaciones para la retirada del aparato 37 Montaje del marco 38 DATOS TÉCNICOS Número de artículo 10032527 10032528 Suministro eléctrico 220 240 V 50 60 Hz DECLARACIÓN DE CONFORMIDAD Fabricante Chal Tec GmbH W...

Page 28: ...el ventilador elmax 1 904 kW Tipo de potencia térmica control de temperatura ambiente Con potencia térmica mínima Motor del ventilador elmin 0 977 kW Potencia térmica de un solo nivel sín control de temperatura ambiente no En modo de espera elSB 0 0 W Dos o más niveles regulables manualmente sín control de temperatura ambiente no Control de temperatura ambiente con termostato mecánico no Con contr...

Page 29: ...siones No coloque el cable de alimentación bajo alfombras Asegúrese de que el cable de alimentación no entre en contacto con superficies calientes ni cantos afilados No cubra la chimenea para evitar un sobrecalentamiento No conecte el aparato a tomas de corriente manejadas por control remoto ni con temporizador ni otro aparato que encienda o apague automáticamente la chimenea No sumerja el aparato...

Page 30: ...tos de llamas Con el aparato encendido puede apagar todas la funciones simultáneamente con este botón Calefacción El aparato dispone de un calefactor La temperatura predeterminada es de 22 C 72 F La temperatura puede ajustarse entre 10 C y 50 C 30 F 86 F El rango de temperatura puede ajustarse en intervalos de 1 C 2 F Mantenga el botón pulsado durante 5 segundos para cambiar la unidad de temperatu...

Page 31: ...enga pulsado el botón durante 5 segundos para bloquear o volver a desbloquear todos los botones del panel de control y del mando a distancia Más Aumentar una función Pulse el botón durante 3 segundos para abrir el temporizador semanal No hay necesidad de restablecer el temporizador semanal este ajusta automáticamente el último tiempo seleccionado Menos Reducir una función Pulse el botón durante 3 ...

Page 32: ...ato debe estar apagado y conectado a una toma de corriente 1 Mantenga pulsado el botón del temporizador durante 5 segundos hasta que los dígitos comiencen a parpadear y ajuste el día de la semana actual mediante los botones y 1 Lunes 2 Martes 3 Miércoles 4 Jueves 5 Viernes 6 Sábado 7 Domingo 2 Mantenga pulsado el botón del temporizador una segunda vez para que el primer dígito comience a parpadear...

Page 33: ...el mando a distancia puede ajustar la hora del temporizador comenzando desde el lunes con los botones y En el monitor aparecen ON y MON al mismo tiempo Ajuste a continuación las horas los primeros dígitos en el monitor mediante los botones y 2 Pulse de nuevo el botón del temporizador en el mando a distancia para ajustar los minutos Utilice para ello los botones y Cada vez que pulse el botón el tie...

Page 34: ...para niños SOLO puede activarse y desactivarse a través del mando a distancia Si mantiene pulsado el botón del bloqueo para niños durante 5 segundos este se activa y todos los botones del mando a distancia y del panel de control se bloquean Si vuelve a pausar de nuevo el botón durante 5 segundos todos los botones se desbloquean Control de temperatura y ajustes de ahorro de energía Si se detecta un...

Page 35: ...o todavía no ha cerrado la ventana o desactivado el enfriador el monitor continúa mostrando E8 En este caso deberá apagar el aparato y desconectar el enchufe de la toma de corriente Cambiar pilas del mando a distancia El aparato está equipado con un mando a distancia multifunción Antes de utilizarlo debe retirar las láminas plásticas 1 Localice el compartimento para las pilas y extráigalo 2 presio...

Page 36: ...ble y la toma de corriente Contacte con el servicio de atención al cliente o con una persona igualmente cualificada si el problema persiste Advertencia El efecto visual permanece activado también tras activar la protección contra el sobrecalentamiento Únicamente el motor del ventilador detiene el funcionamiento LIMPIEZA Y MANTENIMIENTO Advertencia Apague el aparato y desconecte el enchufe antes de...

Page 37: ...fórmese sobre las leyes territoriales que regulan la recogida separada de aparatos eléctricos y electrónicos Respete las leyes territoriales y no arroje aparatos viejos al cubo de la basura doméstica Una retirada de aparatos conforme a las leyes contribuye a proteger el medio ambiente y a las personas a su alrededor frente a posibles consecuencias perjudiciales para la salud El reciclaje ayuda a r...

Page 38: ...38 ES MONTAJE DEL MARCO POR 10032527 1 2 ...

Page 39: ...MMAIRE Fiche de données produit 40 Consignes de sécurité 41 Panneau de commande et télécommande 42 Fonctions principales 42 Affichages a l écran 43 Mise en service et fonctionnement 44 Nettoyage et maintenance 48 Conseils pour le recyclage 49 Installation du cadre 50 FICHE TECHNIQUE Numéro d article 10032527 10032528 Alimentation 220 240 V 50 60 Hz DÉCLARATION DE CONFORMITÉ Fabricant Chal Tec GmbH...

Page 40: ...ur de ventilateur elmax 1 904 kW Type de chauffage contrôle de la température de la pièce A puissance calorifique minimale moteur de ventilateur elmin 0 977 kW Chauffage à une seule vitesse pas de contrôle de la température ambiante non En mode veille elSB 0 0 W Deux vitesses ou plus réglables manuellement pas de contrôle de la température ambiante non Contrôle de la température ambiante par therm...

Page 41: ...oquettes Assurez vous que le câble d alimentation ne passe pas sur des recoins pointus ou des surfaces chaudes Ne recouvrez pas la cheminée pour éviter la surchauffe N utilisez pas l appareil avec une minuterie externe une prise de courant télécommandée ou un autre appareil qui allume et éteint automatiquement le poêle Ne plongez pas l appareil dans l eau ou d autres liquides N utilisez pas l appa...

Page 42: ...la simulation de flammes Lorsque l appareil est allumé cette touche permet d arrêter toutes les fonctions en même temps Chauffage L appareil est équipé d un chauffage soufflant La température est réglée par défaut sur 22 C 72 F La plage de températures réglables est comprise entre 10 C et 50 C 30 F 86 F La température se modifie par cran de 1 C 2 F maintenez la touche 5 secondes pour basculer l af...

Page 43: ...qu avec la télécommande Maintenez cette touche pendant 5 secondes pour verrouiller ou déverrouiller toutes les touches du panneau de commande ou de la télécommande Plus Pour augmenter une fonction Maintenez cette touche pendant 3 secondes pour ouvrir le minuteur hebdomadaire Il n est pas nécessaire de réinitialiser le minuteur hebdomadaire celui ci utilisant automatiquement la dernière valeur enre...

Page 44: ...se de courant 1 Appuyez sur le bouton TIMER et maintenez le pendant 5 secondes jusqu à ce que les chiffres commencent à clignoter puis utilisez les boutons et pour régler le jour de la semaine en cours 1 lundi 2 mardi 3 mercredi 4 jeudi 5 vendredi 6 samedi 7 dimanche 2 Appuyez et maintenez le bouton TIMER une seconde fois le chiffre avant commencera à clignoter Vous pouvez maintenant régler l heur...

Page 45: ...TIMER de la télécommande vous pouvez régler l heure de la minuterie souhaitée à l aide des boutons et à partir de lundi L écran affichera ON et MON en même temps Réglez d abord l heure les deux premiers chiffres sur l écran à l aide des boutons et 2 Appuyez à nouveau sur le bouton TIMER de la télécommande pour régler les minutes Utilisez les touches et pour ce faire Chaque pression sur le bouton a...

Page 46: ...E par la télécommande Si vous maintenez enfoncé le bouton de sécurité enfants pendant 5 secondes la sécurité enfants est activée et tous les boutons du panneau de commande et de la télécommande sont verrouillés Si vous appuyez à nouveau sur le bouton pendant 5 secondes tous les boutons sont déverrouillés Contrôle de la température et économies d énergie Lorsque l appareil détecte un écart de 0 3 C...

Page 47: ...fenêtre n est toujours pas fermée ou que le climatiseur n est pas désactivé l écran continuera à afficher E8 Dans ce cas mettez l appareil hors tension et débranchez la fiche d alimentation de la prise de courant Changement des piles de la télécommande L appareil est équipé d une télécommande multifonction Avant d utiliser la télécommande retirez toutes les pastilles de plastique 1 Localisez le co...

Page 48: ...e service clientèle ou une personne de qualification équivalente si le problème persiste Remarque L effet visuel reste actif même après l activation de la protection contre la surchauffe Seul le moteur du ventilateur arrête de fonctionner NETTOYAGE ET MAINTENANCE Remarque Eteignez toujours l appareil et débranchez le câble secteur avant de nettoyer ou d entretenir l appareil À part le dépoussiérag...

Page 49: ...ègles appliquées pour la collecte d appareils électriques et électroniques Conformez vous aux réglementations locales et ne jetez pas vos anciens produits avec les ordures ménagères Le respect des règles de recyclage des vieux produits aide à la protection de l environnement et de la santé de votre entourage contre les conséquences négatives possibles Le recyclage des matériaux aide à réduire l ut...

Page 50: ...50 FR INSTALLATION DU CADRE POUR 10032527 1 2 ...

Page 51: ...CE Scheda informativa del prodotto 52 Avvertenze di sicurezza 53 Pannello dei comandi e telecomando 54 Tasti funzione 54 Spie sul display 55 Messa in funzione e utilizzo 56 Pulizia e manutenzione 60 Smaltimento 61 Installazione telaio 62 DATI TECNICI Articolo numero 10032527 10032528 Alimentazione 220 240 V 50 60 Hz DICHIARAZIONE DI CONFORMITÀ Produttore Chal Tec GmbH Wallstraße 16 10179 Berlino G...

Page 52: ...tore elmax 1 904 kW Tipo di potenza termica controllo della temperatura ambiente Per la potenza termica minima Motore del ventilatore elmin 0 977 kW Potenza termica di un solo livello senza controllo della temperatura ambiente no In modalità di attesa elSB 0 0 W Due o più livelli impostabili manualmente senza controllo della temperatura ambiente no Con controllo della temperatura ambiente tramite ...

Page 53: ...cato su spigoli vivi o superfici calde Non coprire il dispositivo per evitare il pericolo di surriscaldamento Non utilizzare il dispositivo con un timer esterno una presa con telecomando o un altro apparecchio che accende e spenge automaticamente il dispositivo Non immergere il dispositivo in acqua o in altri liquidi Non utilizzare il dispositivo vicino a vasche da bagno docce o piscine Non utiliz...

Page 54: ...attivare l effetto fiamma Premendo questo tasto in modalità on è possibile disattivare tutte le funzioni contemporaneamente Riscaldamento Il dispositivo è dotato di un termoventilatore La temperatura predefinita è 22 C 72 F La temperatura impostabile è compresa tra 10 C e 50 C 30 F 86 F Il raggio della temperatura può essere regolato di 1 C 2 F Tenere premuto il tasto per 5 secondi per passare da ...

Page 55: ...olo tramite il telecomando Tenere premuto il tasto per 5 secondi per bloccare o sbloccare tutti i tasti sul pannello dei comandi e sul telecomando Più Aumentare il valore Tenere premuto il tasto per 3 secondi per aprire il timer settimanale Non è necessario resettare il timer settimanale questo si riavvia automaticamente dall ultimo tempo impostato Meno Diminuire il valore Tenere premuto il tasto ...

Page 56: ...ttuale il dispositivo deve essere spento e collegato ad una presa 1 Tenere premuto il tasto TIMER per 5 secondi fino a quando le cifre iniziano a lampeggiare e utilizzare i tasti e per impostare il giorno della settimana 1 lunedì 2 martedì 3 mercoledì 4 giovedì 5 venerdì 6 sabato 7 domenica 2 Tenere premuto il tasto TIMER una seconda volta la prima cifra inizia a lampeggiare Ora è possibile impost...

Page 57: ... 1 Premendo il tasto TIMER sul telecomando è possibile impostare il tempo desiderato usando i tasti e a partire da lunedì Il display indica ON e MON contemporaneamente Per prima cosa impostare l ora le prime due cifre sul display usando i tasti e 2 Premere di nuovo il tasto TIMER sul telecomando per impostare i minuti utilizzando i tasti e Ad ogni pressione del tasto il tempo aumenta o diminuisce ...

Page 58: ...ndo Tenendo premuto il blocco bambini per 5 secondi questo si attiva e tutti i tasti sul pannello dei comandi e sul telecomando vengono bloccati Tenere premuto il tasto per 5 secondi per sbloccare i tasti Controllo della temperatura e impostazioni per il risparmio energetico Se il dispositivo rileva una divergenza di 0 3 C tra la temperatura impostata e la temperatura ambiente effettiva ad esempio...

Page 59: ...più Se si spegne la funzione di riscaldamento del dispositivo ma la finestra non è chiusa o l apparecchio di refrigerazione non è spento il display continua a indicare E8 In questo caso spegnere il dispositivo e staccare la spina dalla presa Cambiare le pile del telecomando Il dispositivo è dotato di un telecomando multifunzione Prima di utilizzare il telecomando rimuovere completamente l imballag...

Page 60: ...are per prima cosa il fusibile e la presa Contattare il servizio clienti o un tecnico qualificato se il problema persiste Nota l effetto visivo rimane attivo anche dopo l attivazione della protezione anti surriscaldamento Solo il termoventilatore si arresta PULIZIA E MANUTENZIONE Nota spegnere sempre il dispositivo e staccare la spina prima di pulire o riparare il dispositivo Ad eccezione della ne...

Page 61: ...normali Informarsi sulle disposizioni vigenti in merito alla raccolta separata di dispositivi elettrici ed elettronici Non smaltire i vecchi dispositivi con i rifiuti domestici Grazie al corretto smaltimento dei vecchi dispositivi si proteggono il pianeta e la salute delle persone da possibili conseguenze negative Il riciclo di materiali aiuta a ridurre il consumo di materie prime Il prodotto cont...

Page 62: ...62 IT INSTALLAZIONE TELAIO PER 10032527 1 2 ...

Page 63: ......

Page 64: ......

Reviews: