background image

24

EN

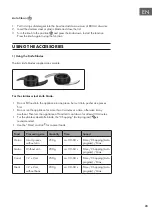
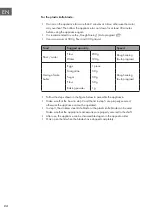
For the plastic knife blade:

• 

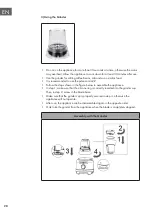
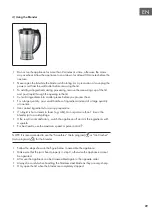
Do not run the appliance for more than 2 minutes at a time, otherwise the motor 

may overheat. Then allow the appliance to cool down for at least 30 minutes 
before using the appliance again.

•  It is recommended to use the „Dough Mixing“ (Auto program) 

 .

• 

Use a maximum of 500 g flour and 300 g liquid.

Food

Suggest quantity

Speed

Flour / water

Flour

200 g

Dough mixing
(Auto program)

Water

120 g

Mixing of cake 
batter

Eggs 

1 piece

Dough mixing
(Auto program)

Margarine

50 g

Sugar

50 g

Flour

50 g

Baking powder

1 g

• 

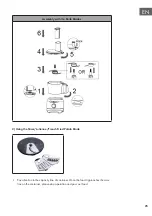
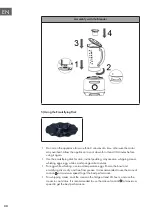
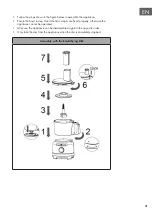
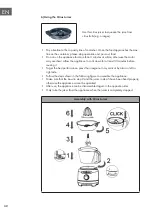
Follow the steps shown in the figure below to assemble the appliance.

•  Make sure that the bowl in step 2 and the lid in step 5 are properly secured, 

otherwise the appliance cannot be operated.

•  In step 3, the stainless steel knife blade or the plastic knife blade can be used. 

Make sure that the appropriate accessories are properly secured to the shaft.

•  After use, the appliance can be disassembled again in the opposite order.
•  Only open the lid when the blades have stopped completely.

Summary of Contents for 10035486

Page 1: ...10035486 10035487 10035488 Luca K chenmaschine Food Processor Robot de cocina Robot de cuisine Robot da cucina...

Page 2: ......

Page 3: ...m Zugriff auf die aktuellste Bedienungsanleitung und weitere Informationen rund um das Produkt zu erhalten INHALTSVERZEICHNIS TECHNISCHE DATEN Artikelnummer 10035486 10035487 10035488 Stromversorgung...

Page 4: ...uf dass Kinder nicht mit dem Ger t spielen Stellen Sie das Ger t so nah wie m glich an die Steckdose damit Sie den Stecker bei Bedarf schnell und leicht herausziehen k nnen berpr fen Sie das Netzkabel...

Page 5: ...D BEDIENUNG Vor dem Gebrauch Stellen Sie vor der Inbetriebnahme des Ger ts sicher dass die auf dem Typenschild des Ger ts angegebene Spannung mit der Steckdosenspannung bereinstimmt Entfernen Sie vor...

Page 6: ...Sie den Drehregler in die Position Wenn Sie den Drehregler einmal dr cken wird die Funktion gestartet Wenn Sie den Drehregler erneut dr cken wird die Funktion gestoppt 2 Diese Funktion eignet sich f...

Page 7: ...hl oder das Kunststoffmesser ein und verschlie en Sie den Deckel 3 Bringen Sie den Drehregler in die Position und dr cken Sie diesen einmal um die Funktion zu starten Wenn Sie den Drehregler erneut dr...

Page 8: ...ischen zu verwenden Verwenden Sie maximal 500 g Mehl und 300 g Fl ssigkeit Lebensmittel Empfohlene Menge Funktion Mehl Wasser Mehl 200 g Automatik Programm Teig mischen Wasser 120 g Zutaten f r Teig m...

Page 9: ...ienne Pommes Frites Kartoffel Klinge Achten Sie auf die Maximal Markierung des Beh lters Stoppen Sie den Betrieb des Ger ts sobald die im Beh lter befindlichen Lebensmittel die Maximal Markierung bers...

Page 10: ...g ca 1 min Stufe 1 Stufe 1 N A Rote Beete ohne Schale 500 g ca 1 min Stufe 1 Stufe 1 N A Hinweis Befolgen Sie die in der obigen Tabelle genannten Geschwindigkeits empfehlungen um mit dem Ger t die be...

Page 11: ...11 DE Zusammenbau mit Julienne Klinge Hobel Klinge Pommes Frites Klinge Montage Demontage ODER ODER Einsetzen Nach unten dr cken Nach unten dr cken...

Page 12: ...der nachfolgenden Abbildung dargestellten Schritte um das Ger t zusammenzubauen Achten Sie darauf dass in Schritt 1 der Silikonring richtig in die Mahltasse eingesetzt wird Drehen Sie anschlie end in...

Page 13: ...ne verwendete Fl ssigkeit hei ist oder zu sch umen neigt beispielsweise Milch sch tten Sie nicht mehr als einen Liter in den Beh lter um ein berlaufen zu vermeiden Sollten Sie mit dem Ergebnis nicht z...

Page 14: ...ei und f r Biskuitmischungen Zum Schlagen von Eiwei sind Eier mit Raumtemperatur zu verwenden Stellen Sie sicher dass die Sch ssel und der Emulgator trocken und fettfrei sind Es wird empfohlen die man...

Page 15: ...ssel in Schritt 2 und der Deckel in Schritt 6 richtig fixiert werden da sich das Ger t ansonsten nicht bedienen l sst Nach der Verwendung kann das Ger t in der entgegengesetzten Reihenfolge wieder au...

Page 16: ...inuten lang abk hlen bevor Sie es wiederverwenden Pressen Sie Orangen nicht nur senkrecht in der Mitte aus sondern auch auf der linken und rechten Seite Befolgen Sie die in der nachfolgenden Abbildung...

Page 17: ...en FEHLERSUCHE UND FEHLERBEHEBUNG Problem M gliche L sung Das Ger t funktioniert nicht An der Sch ssel dem Mixer befindet sich eine Sicherheitsverriegelung Bitte stellen Sie sicher dass Sch ssel und V...

Page 18: ...ebensmitteln Reinigen Sie die Gummistandf e des Ger ts und stellen Sie sicher dass die maximale F llmenge des Ger ts nicht berschritten wird HINWEISE ZUR ENTSORGUNG Befindet sich die linke Abbildung d...

Page 19: ...ions and improper use Scan the QR code to get access to the latest user manual and more product information CONTENT TECHNICAL DATA Item number 10035486 10035487 10035488 Power supply 220 240 V 50 60 H...

Page 20: ...isks Ensure that children do not play with the device Place the device as close as possible to the power source so that you can pull the plug quickly and easily if necessary Check the power cord regul...

Page 21: ...NG AND OPERATION Before Use Before connecting to the power recheck the type of supply and the mains voltage match with the details given on the rating label on the appliance Using for the first time r...

Page 22: ...le for the blender Smoothies 1 Move the knob to the position and press the knob down to start the function Press the knob again to stop the function 2 This function is suitable for the blender Dough m...

Page 23: ...ece but cut it into pusher size pieces first Do not run the appliance for more than 3 minutes at a time otherwise it may overheat Then turn the appliance off and let it cool down for at least 30 minut...

Page 24: ...ter 120 g Mixing of cake batter Eggs 1 piece Dough mixing Auto program Margarine 50 g Sugar 50 g Flour 50 g Baking powder 1 g Follow the steps shown in the figure below to assemble the appliance Make...

Page 25: ...th the Knife Blades 2 Using the Slicer Julienne French Fried Potato Blade Pay attention to the capacity line of container Once the food approaches the max line on the container please stop operation a...

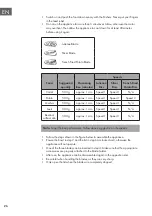
Page 26: ...peed 2 Zucchini 500 g approx 1 min Speed 1 Speed 1 N A Leek 500 g approx 1 min Speed 1 Speed 1 N A Beetroot without skin 500 g approx 1 min Speed 1 Speed 1 N A Note To get the best performance follow...

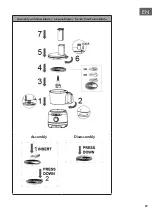
Page 27: ...27 EN Assembly with Slicer Blade Julienne Blade French Fried Potato Blade Assembly Disassembly...

Page 28: ...lse control Follow the steps shown in the figure below to assemble the appliance In step 1 make sure that the silicone ring is correctly inserted into the grinder cup Then in step 2 screw in the blade...

Page 29: ...antity at one time Use cooked ingredients for a soup preparation If a liquid is hot or tends to foam e g milk do not put more than 1 liter in the blender jar to avoid spillage If the result is not sat...

Page 30: ...pudding mayonnaise whipping cream whisking eggs egg whites and sponge cake mixtures For egg white whisking use room temperature eggs Ensure the bowl and emulsifying disc is dry and free from grease I...

Page 31: ...he bowl in step 2 and the lid in step 6 are fixed properly otherwise the appliance cannot be operated After use the appliance can be disassembled again in the opposite order Only take the disc from th...

Page 32: ...low the appliance to cool down for at least 30 minutes before reusing it To get the best performance press the orange not only vertical by also on left or right side Follow the steps shown in the foll...

Page 33: ...olution The appliance does not work There is a safety interlock switch on processing bowl blender Please ensure bowl and lock are securely locked into position If the motor still will not start check...

Page 34: ...NTS ON DISPOSAL According to the European waste regulation 2012 19 EU this symbol on the product or on its packaging indicates that this product may not be treated as household waste Instead it should...

Page 35: ...n de l appareil Scannez le QR Code pour obtenir la derni re version du mode d emploi ainsi que d autres informations concernant le produit SOMMAIRE FICHE TECHNIQUE Num ro d article 10035486 10035487 1...

Page 36: ...es risques associ s Assurez vous que les enfants ne jouent pas avec l appareil Placez l appareil aussi pr s que possible de la prise afin de pouvoir la d brancher rapidement et facilement si n cessair...

Page 37: ...EN MARCHE ET UTILISATION Avant l utilisation Avant la mise en service de l appareil assurez vous que la tension indiqu e sur la plaque signal tique de l appareil correspond la tension de la prise Avan...

Page 38: ...Appuyez une fois sur la molette pour d marrer la fonction Appuyez une nouvelle fois sur la molette pour arr ter la fonction 2 Cette fonction s utilise avec le m langeur Smoothies 1 Mettez la molette...

Page 39: ...en plastique et fermez le couvercle 3 Mettez la commande en position et appuyez une fois dessus pour d marrer la fonction Appuyez nouveau sur la molette de commande pour arr ter la fonction UTILISATIO...

Page 40: ...and d utiliser le programme automatique M langer la p te Utilisez au maximum 500 g de farine et 300 g de liquide Aliment Quantit recommand e Fonction Farine Eau Farine 200 g Programme automatique M la...

Page 41: ...lisation de la lame mincer julienne et frites Faites attention au marquage maximum du conteneur Arr tez le fonctionnement de l appareil d s que les aliments dans le r cipient d passent la marque maxim...

Page 42: ...esse 1 N A Poireau 500 g env 1 min vitesse 1 vitesse 1 N A Rote Beete ohne Schale 500 g ca 1 min Stufe 1 Stufe 1 N A Note Suivez les recommandations de vitesse dans le tableau ci dessus pour obtenir l...

Page 43: ...43 FR Assemblage D sassemblage OU OU Installer Appuyer Appuyer...

Page 44: ...ulsion P avec le moulin Suivez les tapes de l illustration ci dessous pour assembler l appareil Assurez vous que la bague en silicone est correctement ins r e dans le bol de broyage l tape 1 Vissez en...

Page 45: ...ts d j cuits pour pr parer une soupe Si un liquide utilis est chaud ou a tendance mousser par exemple du lait ne versez pas plus d un litre dans le r cipient pour viter tout d bordement Si vous n tes...

Page 46: ...cr me des blancs d ufs fouett s et des m langes pour g noise Utilisez des ufs temp rature ambiante pour battre les blancs d ufs Assurez vous que le bol et l mulsifiant sont secs et exempts de graisse...

Page 47: ...que le bol de l tape 2 et le couvercle de l tape 6 sont correctement fix s sinon l appareil ne fonctionnera pas Apr s utilisation l appareil peut tre d mont dans l ordre inverse Ne retirez pas le disq...

Page 48: ...ssez l appareil refroidir pendant au moins 30 minutes avant de l utiliser nouveau Pressez les oranges verticalement au milieu mais aussi gauche et droite Suivez les tapes de l illustration ci dessous...

Page 49: ...es de l appareil s cher compl tement avant de le remonter IDENTIFICATION ET R SOLUTION DES PROBL MES Probl me Solution possible L appareil ne fonctionne pas Un verrou de s curit se trouve sur le bol m...

Page 50: ...ments pendant le traitement des aliments Nettoyez les pieds en caoutchouc de l appareil et assurez vous que la quantit de remplissage maximale de l appareil n est pas d pass e INFORMATIONS SUR LE RECY...

Page 51: ...indebido Escanee el siguiente c digo QR para acceder al ltimo manual de usuario y otra informaci n sobre el producto CONTENIDO DATOS T CNICOS N mero de art culo 10035486 10035487 10035488 Fuente de al...

Page 52: ...ue los ni os no jueguen con el aparato Coloque el aparato lo m s cerca posible de la toma de corriente para que el enchufe pueda ser sacado r pida y f cilmente si es necesario Revise el cable de alime...

Page 53: ...TA EN MARCHA Y USO Antes del uso Antes de poner en funcionamiento el aparato aseg rese de que el voltaje indicado en la placa de identificaci n del aparato corresponde al voltaje del enchufe Antes de...

Page 54: ...esorios Hielo triturado 1 Mueva el mando a la posici n Presionando la perilla una vez se iniciar la funci n Si presiona la perilla de nuevo la funci n se detendr 2 Esta funci n es adecuada para batir...

Page 55: ...de acero inoxidable o de pl stico y cierre la tapa 3 Coloque el mando de control en posici n y presi nelo una vez para iniciar la funci n Presione la perilla de nuevo para detener la funci n USO DE A...

Page 56: ...o Se recomienda utilizar el programa autom tico Amasar Utilice un m ximo de 500 g de harina y 300 g de l quido Alimentos Cantidad recomendada Funci n Harina Agua Harina 200 g Amasar programa autom tic...

Page 57: ...la cuchilla de patatas cortadas julienne patatas fritas Preste atenci n a la marcaci n m xima del contenedor Detenga el funcionamiento del aparato tan pronto como los alimentos en el recipiente supere...

Page 58: ...l 1 Nivel 1 Calabac n 500 g 1 min aprox Nivel 1 Nivel 1 No Puerro 500 g 1 min aprox Nivel 1 Nivel 1 No Remolacha sin piel 500 g 1 min aprox Nivel 1 Nivel 1 No Nota Siga las recomendaciones de velocida...

Page 59: ...59 ES Montaje con hoja de juliana hoja de rebanadora hoja de papas fritas Montaje Desmontar OU OU Insertar Presionar hacia abajo Presionar hacia abajo...

Page 60: ...molinillo Siga los pasos de la siguiente ilustraci n para montar el aparato Aseg rate de que el anillo de silicona est correctamente insertado en el cuenco de molienda en el paso 1 Luego atornilla la...

Page 61: ...cocidos para hacer sopa Si el l quido utilizado est caliente o tiene tendencia a formar espuma por ejemplo la leche no vierta m s de un litro en el recipiente para evitar que se desborde Si no est sat...

Page 62: ...mayonesa crema claras de huevo batidas y mezclas de esponja Usar huevos a temperatura ambiente para batir las claras de los huevos Aseg rate de que el taz n y el emulsionante est n secos y libres de...

Page 63: ...de que el bol en el paso 2 y la tapa en el paso 6 est n bien asegurados de lo contrario el aparato no funcionar Despu s de su uso el aparato puede ser desmontado en el orden inverso No retire el disc...

Page 64: ...o se enfr e durante al menos 30 minutos antes de volver a utilizarlo Exprima las naranjas no s lo verticalmente en el centro sino tambi n en los lados izquierdo y derecho Siga los pasos que se muestra...

Page 65: ...mente antes de volver a montarlos SOLUCI N DE PROBLEMAS Problema Posible soluci n El dispositivo no funciona Hay un cierre de seguridad en el recipiente Por favor aseg rese de que el bol y el cierre e...

Page 66: ...nte el procesamiento de alimentos Limpie las patas de goma del aparato y aseg rese de que no se exceda la capacidad m xima RETIRADA DEL APARATO Si la ilustraci n de la izquierda cubo de basura con rue...

Page 67: ...sicurezza e da un uso improprio del dispositivo Scansionare il codice QR seguente per accedere al manuale d uso pi attuale e per ricevere informazioni sul prodotto INDICE DATI TECNICI Numero articolo...

Page 68: ...ini non giochino con il dispositivo Posizionare il dispositivo il pi vicino possibile a una presa elettrica in modo da poter staccare immediatamente la spina in caso di necessit Controllare regolarmen...

Page 69: ...A IN FUNZIONE E UTILIZZO Prima dell uso Prima di mettere in funzione l apparecchio assicurarsi che la tensione indicata sulla targhetta dell apparecchio corrisponda alla tensione della presa di corren...

Page 70: ...zata per tutti gli accessori Tritaghiaccio 1 Mettere la manopola in posizione Se si preme la manopola una volta si attiva la funzione e se la si preme di nuovo la si arresta 2 Questa funzione adatta p...

Page 71: ...nare la lama di acciaio inox o di plastica e chiudere il coperchio 3 Mettere la manopola in posizione Se si preme la manopola una volta si attiva la funzione e se la si preme di nuovo la si arresta UT...

Page 72: ...iglia di utilizzare il programma automatico Impastare Utilizzare un massimo di 500 g di farina e 300 g di liquido Alimento Quantit consigliata Funzione Farina Acqua Farina 200 g Programma automatico I...

Page 73: ...alla Julienne la lama per patatine fritte Fare attenzione all indicazione di riempimento massimo del contenitore Fermare il dispositivo non appena gli alimenti all interno del contenitore superano l i...

Page 74: ...1 Livello 1 n d Porro 500 g Circa 1 minuto Livello 1 Livello 1 n d Barbabietola sbucciata 500 g Circa 1 minuto Livello 1 Livello 1 n d Nota seguire le velocit consigliate nella tabella precedente per...

Page 75: ...75 IT Assemblaggio con lama per taglio alla Julienne mandolina lama per patatine fritte Montaggio Smontaggio O O Inserire Premere verso il basso Premere verso il basso...

Page 76: ...icati nell immagine seguente per assemblare il dispositivo Assicurarsi che nel passaggio 1 l anello in silicone sia inserito correttamente nella tazza della macina Ruotare poi verso l interno la base...

Page 77: ...zare alimenti precotti per preparare zuppe Se un liquido in utilizzo bollente o tende a fare schiuma ad es il latte non aggiungerne pi di 1 litro nel dispositivo per evitare che trabocchi Se non siete...

Page 78: ...aionese panna albumi d uovo a frusta e miscele di spugna Utilizzare uova a temperatura ambiente per sbattere gli albumi Assicurarsi che la ciotola e l emulsionante siano asciutti e privi di grassi Si...

Page 79: ...iano fissati correttamente altrimenti non possibile utilizzare il dispositivo Dopo l uso il dispositivo pu essere smontato seguendo al contrario la procedura di assemblaggio Togliere l emulsionatore s...

Page 80: ...surriscaldarsi Lasciare raffreddare il dispositivo per almeno 30 minuti prima dell utilizzo successivo Spremere le arance non solo in verticale dal centro ma anche dal lato destro e sinistro Seguire...

Page 81: ...EMI Problema Soluzione possibile Il dispositivo non funziona Su contenitore mixer c un blocco di sicurezza Assicurarsi che blocco e contenitore siano incastrati correttamente Se il motore non funziona...

Page 82: ...la capacit massima non venga superata SMALTIMENTO Se sul prodotto presente la figura a sinistra il bidone dei rifiuti con le ruote si applica la direttiva europea 2012 19 UE Questi prodotti non posson...

Page 83: ......

Page 84: ......

Reviews: