background image

22

EN

MAINTENANCE AND MODIFICATIONS

Defrosting

Your wine cellar is designed with “Auto-cycle” defrost system. During “Off-cycle” the 
refrigerated surfaces of the wine cellar defrost automatically. Defrost water from the wine 
cellar storage compartment drains automatically and part of it goes into a drainage 
container, which is located at the back of the wine cellar next to the compressor. The 
heat is transferred from the compressor and evaporates any condensation that has 
collected in the pan. Part of the remaining water is collected within the wine cellar for 
humidity purposes. This system enables the creation of the correct humidity level inside 
your wine cellar required by the natural cork to maintain a long lasting seal.

Notes: The water collected by condensation, is therefore recycled. Under extremely 

dry environmental conditions, you may have to add some water into the water 
container provided with your wine cellar.

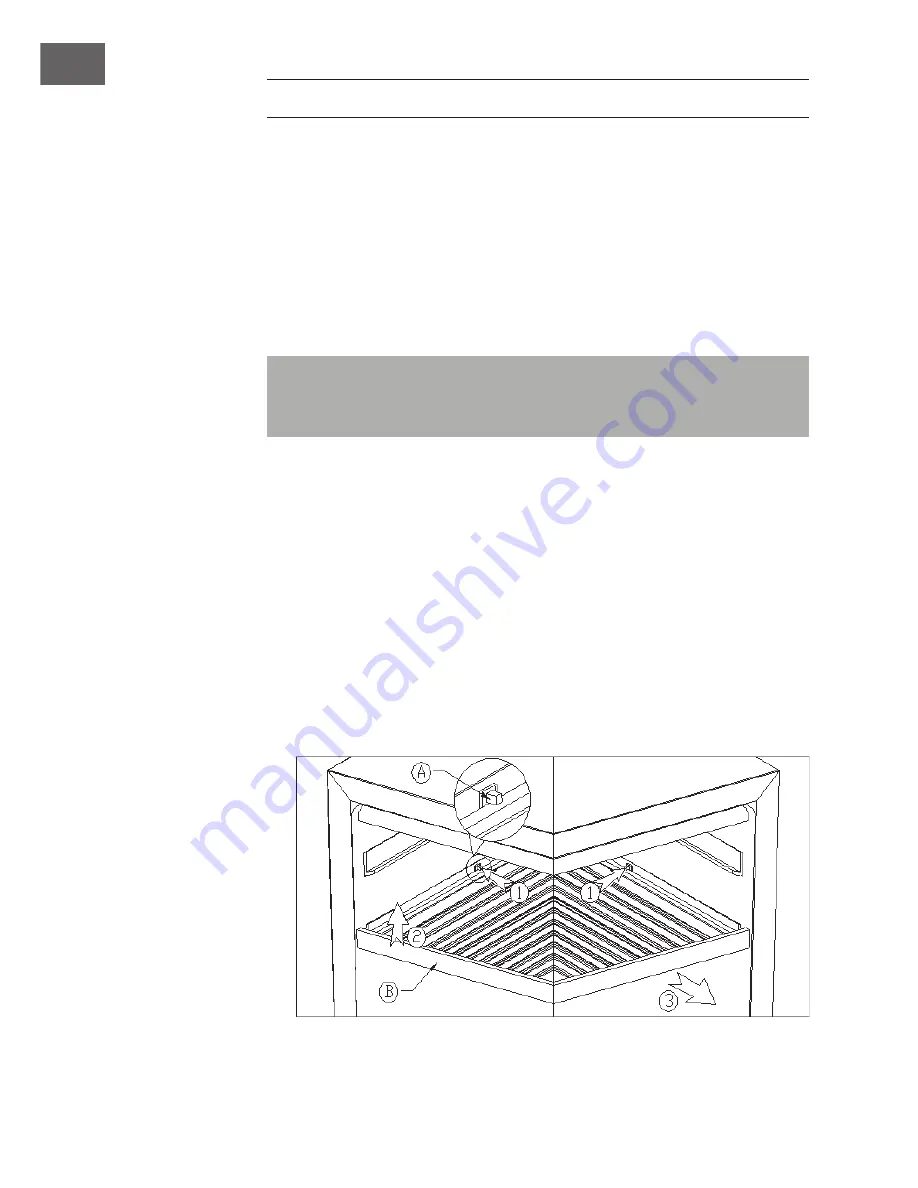
Adjusting & removing the shelves

For easy access to the storage content, you must pull the shelves approximately 1/3 of 

its depth out of the rail compartment.  These wine cabinets, however, are designed with 
a notch on each side of the shelf tracks to prevent bottles from falling. When removing 
any of these shelves out of the rail compartment, tilt the shelf as per the diagram and 
simply pull out, or push in the shelf until it sits on the support brackets securely. 

Common wooden shelf:

According to right instruction drawing to press one side of shelf limit pin (1), extract 
and remove the shelf from the other side of support bracket (2), then take off the 
shelf following the arrow mark (3). 

2  Shelf installation will be opposite with shelf taking. 

Summary of Contents for Barossa 77 Duo

Page 1: ...10032963 Barossa 77 Duo Weinkühlschrank Wine Cooler Vinoteca Cave à vin Frigorifero per vino ...

Page 2: ......

Page 3: ...formationen rund um das Produkt zu erhalten INHALTSVERZEICHNIS Sicherheitshinweise 4 Installation 6 Inbetriebnahme 7 Display und Tastenfunktionen 9 Wartung und Modifikationen 1 1 Fehlersuche und Fehlerbehebung 12 Hinweise zur Entsorgung 13 TECHNISCHE DATEN Artikelnummer 10032963 Stromversorgung 220 240 V 50 60 Hz KONFORMITÄTSERKLÄRUNG Hersteller Chal Tec GmbH Wallstraße 16 10179 Berlin Deutschland...

Page 4: ...mit nassen Händen an Verwenden Sie nach Möglichkeit kein Verlängerungskabel Falls Sie doch eines verwenden achten Sie darauf dass der Amperewerte des angeschlossenen Geräts den maximalen Amperewert des Netzkabels nicht überschreitet Lassen Sie um das Gerät herum mindestens 5 cm Platz zu den Seiten und 10 cm Platz nach hinten damit die Luft ausreichend zirkulieren kann Stellen Sie keine heißen Lebe...

Page 5: ...utlichen Temperaturanstieg in den Fächern des Gerätes führen Reinigen Sie regelmäßig Oberflächen die mit Lebensmitteln in Berührung kommen können Reinigen Sie Regelmäßig den Wasserablauf Sollte das Gerät einen Wassertank enhalten reinigen Sie ihn wenn das Gerät 48 Stunden lang nicht benutzt wurde Spülen Sie den Tank wenn 5 Tage lang kein Wasser entnommen wurde Lagern Sie rohes Fleisch und Fisch in...

Page 6: ...n fern von Mikrowellen sein da deren Interferenzen einen negativen Einfluss auf das Gerät haben könnten Ferner sollte die Umgebungstemperatur im Raum weder sehr kalt noch sehr warm sein Kälte und Wärme können sich möglicherweise negativ auf die Funktion auswirken so dass die gewünschte Innentemperatur nicht erreicht wird Aufstellung Entfernen Sie das komplette Verpackungsmaterial aus und um den Kü...

Page 7: ...e Kontraktion und Expansion des Kühlmittels im Kühlprozess Lüftergeräusche Entstehen durch die Luftzirkulation im Gerät Beladung Sie können die Weinflaschen in Einzel oder Doppelreihen in den Kühlschrank legen Falls sie nicht genug Flaschen haben um das Gerät komplett zu befüllen verteilen Sie die Flaschen so dass sich nicht alle Flaschen oben oder unten im Gerät befinden Falls Sie etwas größere F...

Page 8: ...C für Weißwein und 18 C für Rotwein Temperatureinstellungen Hinweis Die LED zeigt standardmäßig die aktuelle Innentemperatur an Die elektrische Platine aller Modelle verfügt über eine Speicherfunktion Es ist wichtig zu verstehen dass es einen Unterschied zwischen der Lufttemperatur im Weinkühlschrank und der tatsächlichen Temperatur des Weines gibt Sie müssen etwa 12 Stunden warten bevor sich die ...

Page 9: ...y 4 angezeigte Wert verringert sich mit jedem Tastendruck um 1 C 4 Display Zeigt die Temperatur der oberen Zone an 5 Display Zeigt die Temperatur der nteren Zone an 6 Taste zum erhöhen der Temperatur der unteren Zone Drücken Sie mehrmals kurz auf die Taste Der im Display 4 angezeigte Wert erhöht sich mit jedem Tastendruck um 1 C 7 Taste zum verringern der Temperatur der unteren Zone Drücken Sie me...

Page 10: ...entfernen Sie oben und unten die Begrenzungsschrauben mit einem Schraubenzieher 3 wie auf Bild 2 dargestellt 4 Entfernen Sie die obere und untere Aufhängung 6 7 mit einem Schraubenzieher 3 und befestigen Sie die Aufhängungen an der gegenüberliegenden Seite 5 Drehen Sie die Tür um 180 und befestigen Sie sie an der gegenüberliegenden Seite 6 Bringen Sie zum Schluss die dekorativen Nägel an der Blend...

Page 11: ...den kann es sein dass Sie etwas Wasser in den Sammelbehälter füllen müssen um die Erhaltung der Luftfeuchtigkeit zu gewährleisten Ablagen anpassen Ziehen Sie die Ablagen zum Beladen etwa zu 1 3 aus dem Gerät An beiden Seiten des Ablage befindet sich eine Kerbe die Verhindert dass Flaschen herausfallen Wenn Sie eine Ablage entfernen ziehen Sie sie einfach aus der Schiene wie in den folgenden Diagra...

Page 12: ...e um die Löcher der Tür ein bisschen zu weiten Bohren Sie aber nur von der Innenseite der Tür Danach sollte sich der Griff perfekt installieren lassen FEHLERSUCHE UND FEHLERBEHEBUNG Problem Mögliche Ursache und Lösungsansatz Das Gerät läuft nicht Es ist nicht eingesteckt Es ist ausgeschaltet Die Sicherung ist raus oder kaputt Das Gerät ist nicht kalt genug Überprüfen Sie die Temperatureinstellunge...

Page 13: ...ht eben Die Tür schließt nicht richtig Das Gerät steht nicht eben Die Tür wurde umgedreht und nicht richtig angebracht Die Dichtung oder der Magnet sind beschädigt Die Ablagen ragen zu weit heraus HINWEISE ZUR ENTSORGUNG Befindet sich die linke Abbildung durchgestrichene Mülltonne auf Rädern auf dem Produkt gilt die Europäische Richtlinie 2012 19 EU Diese Produkte dürfen nicht mit dem normalen Hau...

Page 14: ......

Page 15: ...the latest user mannual and other information about the product CONTENT Safety Instructions 16 Installation 18 Getting Started 19 Display and Button Functions 21 Maintenance and Modifications 22 Troubleshooting 24 Hints on Disposal 25 TECHNICAL DATA Item number 10032963 Power supply 220 240 V 50 60 Hz DECLARATION OF CONFORMITY Producer Chal Tec GmbH Wallstraße 16 10179 Berlin Germany This product ...

Page 16: ... the appliance with wet hands while standing on a wet surface It is not recommended to use this refrigerator with an extension cord or power board Please ensure that the appliance is plugged directly into the electrical outlet When positioning the appliance ensure that there is at least a 5 cm clearance at the sides and a 10 cm clearance at the back as this is the main outlet for heat This will al...

Page 17: ...To avoid contamination of food please follow the instructions below A prolonged opening of the door can lead to a significant rise in temperature in the compartments of the appliance Regularly clean surfaces that may come into contact with food Clean the water drain regularly If the appliance contains a water tank clean it if it has not been used for 48 hours Rinse the tank if no water has been re...

Page 18: ...hield When placed within 1 meter vicinity of the wine cabinet they may affect the operation of the wine cabinet Placing in cold or hot temperature conditions may cause cellar s temperatures fluctuating and it will not reach the ideal one Installation Unpack and remove all of the protection and adhesive strips from the packaging around and inside the wine cellar The wine cellar must be positioned s...

Page 19: ...culate the air within the wine cellar Loading the Wine Cellar You may load your wine bottles in single or double rows while taking note of the following if you do not have enough bottles to fill your wine cellar it is better to distribute the load throughout the wine cellar so as to avoid all on top or all below type loads Do remove or relocate adjustable wooden shelves to accommodate larger type ...

Page 20: ...al air temperature In the event of a power interruption all previous temperature settings are automatically erased and it will revert to the preset temperature settings The electrical board of all models comes with memory function It is important to understand that there is a difference between the air temperature inside the wine cellar and the actual temperature of the wine You will need to wait ...

Page 21: ...ding to customer requirements 4 Window Display upper zone temperature 5 Window Display lower zone temperature 6 Lower zone temperature setting up button Press one time window 4 the set value will increase 1 degree Celsius in the original setting temperature the setting range according to customer requirements 7 Lower zone temperature setting down button Press one time window 4 the set value will r...

Page 22: ...es The water collected by condensation is therefore recycled Under extremely dry environmental conditions you may have to add some water into the water container provided with your wine cellar Adjusting removing the shelves For easy access to the storage content you must pull the shelves approximately 1 3 of its depth out of the rail compartment These wine cabinets however are designed with a notc...

Page 23: ...er 3 to screw out the door shaft core 4 from the two ends of the top of the door Take out the door and set aside Drawing 2 4 Discharge the upper and lower door hinge 6 7 by M5 inner six angle screwdriver 3 Then to assemble the door hinge on the opposite side Drawing 3 and 4 5 Rotate the door 180 then Install the door on the opposite side of the cabinet Drawing 5 6 Finally install the decorative na...

Page 24: ...ctric drill to drill the holes of the door a bit big in surface side in order to install the handle perfectly TROUBLESHOOTING Problem Possible Cause and Suggested Solution Wine cellar does not operate Not plugged in The appliance is turned off The circuit breaker tripped or the fuse is broken Wine cellar is not cold enough Check the temperature control setting External environment may require a hi...

Page 25: ...noises The Wine cellar is not level The door will not close properly The Wine cellar is not level The door was reversed and not properly installed The gasket is faulty magnet or rubber is spoiled The shelves are out of position HINTS ON DISPOSAL According to the European waste regulation 2012 19 EU this symbol on the product or on its packaging indicates that this product may not be treated as hou...

Page 26: ......

Page 27: ... actualizado y a información adicional sobre el producto ÍNDICE Indicaciones de seguridad 28 Instalación 30 Puesta en funcionamiento 31 Display y botones de función 33 Mantenimiento y modificaciones 35 Detección y resolución de problemas 36 Indicaciones para la retirada del aparato 37 DATOS TÉCNICOS Número de artículo 10032963 Suministro eléctrico 220 240 V 50 60 Hz DECLARACIÓN DE CONFORMIDAD Fabr...

Page 28: ... con las manos mojadas Si puede evitarlo no utilice cables alargadores Si a pesar de ello es necesaria su utilización asegúrese de que el valor en amperios del aparato conectado no supere el valor máximo de amperios de cable de alimentación Deje al menos una distancia de 5 cm hacia los lados y 10 cm hacia atrás para que el aire circule correctamente No introduzca alimentos calientes dentro del apa...

Page 29: ...a de la puerta puede provocar un aumento significativo de la temperatura en los compartimentos del aparato Limpie regularmente las superficies que puedan entrar en contacto con los alimentos Limpie el desagüe regularmente Si el aparato contiene un depósito de agua límpielo si no se ha utilizado durante 48 horas Enjuague el tanque si no se ha eliminado el agua durante 5 días Almacene la carne y el ...

Page 30: ...una toma eléctrica estándar Disponer de una toma de corriente con protección contra alta tensión Situarse lejos de microondas pues pueden provocar interferencias negativas en el aparato Además la temperatura ambiente en la estancia no debe ser ni muy alta ni muy baja El frío y el calor pueden tener un efecto adverso en el funcionamiento de la vinoteca provocando que no se alcance la temperatura de...

Page 31: ...idos Provocados por la contracción y expansión del refrigerante en el proceso de refrigeración Sonidos de ventilación Provocados por la circulación de aire del aparato Carga Puede colocar las botellas de vino en filas individuales o dobles dentro de la vinoteca Si no tiene suficientes botellas para llenar la vinoteca por completo distribúyalas de tal manera que las botellas no queden acumuladas en...

Page 32: ...mos una temperatura de consumo de 7 C para el champán 12 C para el vino blanco y 18 C para el vino tinto Ajustes de temperatura Nota El LED muestra la temperatura interior actual Las placas eléctricas de todos los modelos disponen de una función de memoria Es importante entender que existe una diferencia entre la temperatura del aire en la vinoteca y la temperatura real del vino Debe esperar unas ...

Page 33: ...alor que se indica en el display 4 desciende en 1 C cada vez que pulsa el botón 4 Display Muestra la temperatura de la zona superior 5 Display Muestra la temperatura de la zona inferior 6 Botón para aumentar la temperatura de la zona inferior Pulse varias veces el botón El valor que se indica en el display 4 aumenta en 1 C cada vez que pulsa el botón 7 Botón para reducir la temperatura de la zona ...

Page 34: ...esenta en la imagen 1 3 Sujete la puerta y retire los tornillos de tope inferior y superior con un destornillador 3 como se representa en la imagen 2 4 Retire las bisagras superior e inferior 6 7 con un destornillador 3 y fije las bisagras en el lado opuesto 5 Gire la puerta 180 y colóquela en el lado opuesto 6 Para terminar monte las puntas decorativas en la cubierta ...

Page 35: ... ejemplo que los corchos se sequen Nota En circunstancias de calor extremo es posible que deba introducir un poco de agua en el recipiente colector y para garantizar la generación de la humedad Ajustar las baldas Extraiga 1 3 de cada bandeja para cargarla En ambos lados de cada balda existe una muesca que evita que las botellas se caigan Si retira una balda extráigala completamente de sus guías ta...

Page 36: ...cios de la puerta Taladre solo desde el interior de la puerta A continuación debería poder instalar el asa perfectamente DETECCIÓN Y RESOLUCIÓN DE PROBLEMAS Problema Posible causa y solución El aparato no funciona No está enchufado Está apagado El fusible se ha extraído o está averiado El aparato no enfría lo suficiente Compruebe los ajustes de temperatura El entorno requiere un ajuste menor de te...

Page 37: ...oduzcan crujidos El aparato no está recto La puerta no cierra correctamente El aparato no está recto La puerta se ha revertido y no se ha montado correctamente La junta o el imán están averiados Las baldas están colocadas demasiado hacia afuera INDICACIONES PARA LA RETIRADA DEL APARATO Si el aparato lleva adherida la ilustración de la izquierda el contenedor de basura tachado entonces rige la norm...

Page 38: ......

Page 39: ...emagne Ce produit est conforme aux directives européennes suivantes 2014 30 UE CEM 2014 35 UE LVD 201 1 65 UE RoHS 643 2009 CE ErP 1060 2010 UE ErP Chère cliente cher client Toutes nos félicitations pour l acquisition de ce nouvel appareil Veuillez lire attentivement et respecter les instructions de ce mode d emploi afin d éviter d éventuels dommages Nous ne saurions être tenus pour responsables d...

Page 40: ... avec un câble secteur endommagé Ne touchez pas à l appareil à la fiche de secteur ou au câble avec les mains mouillées Si possible n utilisez aucune rallonge électrique Si toutefois vous y êtes contraint veillez à ce que la puissance de la rallonge soit au moins égale à celle de l appareil Laissez tout autour de l appareil au moins 5 cm d espace sur les côtés et 10 cm à l arrière pour que l air p...

Page 41: ...ut entraîner une augmentation significative de la température dans les compartiments de l appareil Nettoyer régulièrement les surfaces qui peuvent entrer en contact avec les aliments Nettoyez régulièrement l évacuation d eau Si l appareil contient un réservoir d eau nettoyez le s il n a pas été utilisé depuis 48 heures Rincer le réservoir si aucune eau n a été retirée depuis 5 jours Entreposer la ...

Page 42: ...chement électrique standard Disposer d une prise avec protection anti surcharge Se trouver loin du micro ondes car ses interférences auraient une influence négative sur l appareil De plus la température ambiante de la pièce ne doit être ni très froide ni très chaude Le froid et la chaleur peuvent avoir un effet négatif sur la fonction de sorte que la température interne désirée n est pas atteinte ...

Page 43: ...rant pendant le processus de refroidissement Bruits de ventilateur dus à la circulation de l air dans l appareil Chargement Vous pouvez mettre les bouteilles de vin en rangées simples ou doubles dans la cave à vin Si vous n avez pas assez de bouteilles pour remplir complètement l appareil répartissez les bouteilles de sorte qu elles ne se trouvent pas toutes en haut ou en bas de l appareil Si vous...

Page 44: ...ne 12 C pour le vin blanc et 18 C pour le vin rouge Réglages de température Remarque Die LED zeigt standardmäßig die aktuelle Innentemperatur an Le tableau électrique de tous les modèles a une fonction de mémoire Il est important de savoir qu il y a une différence entre la température de l air dans la cave et la température réelle du vin il faut attendre environ 12 heures avant que le réglage de l...

Page 45: ...sur l écran 4 diminue de 1 C à chaque appui sur le bouton 4 Ecran Affiche la température de la zone supérieure 5 Ecran Affiche la température de la zone inférieure 6 Bouton pour augmenter la température de la zone inférieure Appuyez brièvement plusieurs fois sur le bouton La valeur affichée sur l écran 4 augmente de 1 C à chaque appui sur le bouton 7 Bouton pour réduire la température de la zone i...

Page 46: ...la figure 1 3 Tenez fermement la porte et retirez les vis de butée en haut et en bas de la porte avec un tournevis 3 comme indiqué sur la figure 2 4 Retirez les supports supérieur et inférieur 6 7 avec un tournevis 3 et attachez les suspensions du côté opposé 5 Tournez la porte à 180 et fixez la sur le côté opposé 6 Fixez enfin les pointes décoratives sur le panneau ...

Page 47: ...les bouchons de vin de se dessécher Remarque Dans les zones extrêmement chaudes il peut être nécessaire d ajouter de l eau dans le puisard pour maintenir l humidité Ajuster les clayettes Tirez les clayettes d environ 1 3 de leur longueur pour les charger Une encoche de chaque côté du plateau empêche les bouteilles de tomber Lorsque vous retirez une clayette sortez la du rail comme indiqué dans les...

Page 48: ...ment les trous de la porte Mais percez seulement depuis l intérieur de la porte Ensuite la poignée devrait pouvoir s installer parfaitement IDENTIFICATION ET RÉSOLUTION DES PROBLÈMES Problème Cause possible et solution L appareil ne démarre pas Il n est pas branché Il est éteint Le fusible est déclenché ou hors service L appareil n est pas assez froid Contrôlez les réglages de température L enviro...

Page 49: ...arois intérieures peut provoquer des craquements L appareil n est pas posé bien à plat La porte ferme mal L appareil n est pas posé bien à plat Le sens de la porte a été modifié et la porte a été mal installée Le joint ou le magnet est endommagé Les clayettes sortent trop de leur emplacement INFORMATIONS SUR LE RECYCLAGE Vous trouverez sur le produit l image ci contre une poubelle sur roues barrée...

Page 50: ......

Page 51: ...ezza e da un uso improprio del dispositivo INDICE Avvertenze di sicurezza 52 Installazione 54 Messa in funzione 55 Display e funzioni dei tasti 57 Riparazione e modifiche 59 Ricerca e risoluzione dei problemi 60 Smaltimento 61 DATI TECNICI Articolo numero 10032963 Potenza 220 240 V 50 60 Hz DICHIARAZIONE DI CONFORMITÁ Produttore Chal Tec GmbH Wallstraße 16 10179 Berlino Germania Questo prodotto è ...

Page 52: ...limentazione con le mani bagnate Non utilizzare prolunghe Tuttavia se l utilizzo di una prolunga dovesse essere necessario assicurarsi che i valori ampere del dispositivo collegato non superino i valori ampere massimi del cavo di alimentazione Lasciare almeno 5 cm di spazio libero intorno al dispositivo e 10 cm sul retro affinché l aria possa circolare liberamente Non introdurre alimenti caldi nel...

Page 53: ...ortello può portare ad un significativo aumento della temperatura nei vani dell apparecchio Pulire regolarmente le superfici che possono venire a contatto con gli alimenti Pulire regolarmente lo scarico dell acqua Se l apparecchio contiene un serbatoio dell acqua pulirlo se non è stato utilizzato per 48 ore Sciacquare il serbatoio se non è stata rimossa l acqua per 5 giorni Conservare la carne e i...

Page 54: ...a sovratensione essere lontano dalle microonde in quanto le loro interferenze potrebbero influenzare negativamente sul dispositivo Inoltre la temperatura ambiente nella stanza non dovrebbe essere né molto fredda né molto calda Il freddo e il caldo possono avere un effetto negativo sulle funzioni cosicché la temperatura interna desiderata non viene raggiunta Disimballaggio Rimuovere tutto il materi...

Page 55: ...zione e l espansione del liquido di raffreddamento durante il processo di raffreddamento Rumori della ventola causati dalla circolazione dell aria nel dispositivo Carico È possibile porre in frigo le bottiglie di vino in fila o in doppia fila Se non avete abbastanza bottiglie per riempire completamente il dispositivo distribuire le bottiglie in modo che non tutte le bottiglie si trovino in alto o ...

Page 56: ...o 7 C per champagne 12 C per i vini bianchi e 18 C per vini rossi Impostazioni di temperatura Nota Il LED indica da default la temperatura interna corrente Il circuito elettrico di tutti i modelli ha una funzione di memoria E importante capire che c è una differenza tra la temperatura dell aria nel frigorifero da vino e la temperatura effettiva del vino si deve attendere circa dodici ore prima che...

Page 57: ...visualizzato sul display 4 si riduce ad ogni tocco di 1 C 4 Display Visualizza la temperatura della zona superiore 5 Display Visualizza la temperatura della zona inferiore 6 Tasto per aumentare la temperatura della zona inferiore Premere brevemente più volte il pulsante Il valore visualizzato sul display 4 aumenta ad ogni tocco di 1 C 7 Tasto per ridurre la temperatura della zona inferiore Premere...

Page 58: ...me descritto nella figura 1 3 Tenere saldamente ferma la porta e rimuovere sopra e sotto le viti di limite con un cacciavite 3 come mostrato nella figura 2 4 Rimuovere la sospensione sopra e sotto 6 7 con un cacciavite 3 e fissare le sospensioni nel lato antistante 5 Ruotare la porta di 180 e fissarla nel lato antistante 6 Applicare infine i chiodi decorativi ...

Page 59: ...ota In ambienti estremamente caldi può essere che sia necessario riempiere il raccoglitore con dell acqua per garantire il mantenimento dell umidità Regolazione degli scaffali Tirare gli scaffali di circa 1 3 del dispositivo per riempirli Su entrambi i lati dello scaffale si trova un incavatura che impedisce che le bottiglie possano cadere Se volete rimuovere uno scaffale basta trascinarlo dalla s...

Page 60: ... porta Utilizzare il trapano solamente dall interno della porta La maniglia dovrebbe in seguito installarsi perfettamente RICERCA E RISOLUZIONE DEI PROBLEMI Problema Causa e possibile soluzione Il dispositivo non funziona Il dispositivo non è collegato alla corrente Il dispositivo è spento Il fusibile è spento o rotto Il dispositivo non è sufficiente mente freddo Controllate le impostazioni di tem...

Page 61: ...one e dall espansione delle pareti interne Il dispositivo non è in posizione eretta La porta non si chiude bene Il dispositivo non è in posizione eretta La porta è stata girata e non posizionata correttamente La guarnizione o il magnete sono danneggiati Gli scaffali sporgono verso l esterno SMALTIMENTO Se sul prodotto è presente la figura a sinistra il cassonetto mobile sbarrato si applica la dire...

Page 62: ......

Page 63: ......

Page 64: ......

Reviews: