background image

10028130

Stella Prima 

Mikrowelle

Microwave

Microondas

Micro-onde

Microonde

Summary of Contents for Stella Prima 10028130

Page 1: ...10028130 Stella Prima Mikrowelle Microwave Microondas Micro onde Microonde...

Page 2: ......

Page 3: ...und weitere Informationen rund um das Produkt zu erhalten INHALTSVERZEICHNIS Technische Daten 3 Konformit tserkl rung 3 Sicherheitshinweise 4 Ger tebeschreibung und Bedienfeld 6 Installation 7 Inbetri...

Page 4: ...e es nicht aus den Augen falls sich das Essen entz ndet Um die Explosionen oder nachtr glichem Sieden vorzubeugen Erhitzen Sie Fl ssigkeiten nicht in verschlossenen Beh ltern da diese zur Explosion ne...

Page 5: ...n Fachkr ften durchgef hrt werden Falls Rauch entsteht ziehen Sie den Stecker und halten Sie die T r der Mikrowelle geschlossen um m gliche Flammen zu ersticken Das Erhitzen von Fl ssigkeiten kann zu...

Page 6: ...6 DE GER TEBESCHREIBUNG UND BEDIENFELD...

Page 7: ...t in Schr nke oder geschlossene Regale ein Das Ger t muss frei stehen Die R ckseite der Mikrowelle muss zur Wand zeigen Produktionsbedingt befindet sich im Garraum und auf den Heizst ben der Mikrowell...

Page 8: ...100P 80P 60P 40P 20P 100P Hohe Leistung 100 Leistung zum schnellen Erhitzen 80P Mittelhohe Leistung 80 Leistung zum mittelschnellen Erhitzen 60P Mittlere Leistung 60 Leistung zum Dampfgaren 40P Mittel...

Page 9: ...gler drehen 10 00 4 Dr cken Sie auf Instant Start die Zeit im Display wird heruntergez hlt Kombigrill Mit der Grill Funktion k nnen Sie Essen grillen Dr cken Sie mehrmals auf die Grill Taste um eines...

Page 10: ...nden Defrost Programme auszuw hlen d 1 Zum Auftauen von Fleisch mit einem Gewicht von 0 1 bis 2 0 kg d 2 Zum Auftauen von Gefl gel mit einem Gewicht von 0 2 bis 3 0 kg d 3 Zum Auftauen von Meeresfr ch...

Page 11: ...w nschte Programm d 2 3 Stellen Sie das Gewicht mit dem Drehregler ein 0 4 4 Dr cken Sie auf Instant Start um das Auftauen zu starten 5 Nach der H lfte der Auftau Zeit ert nt ein doppelter Piepton der...

Page 12: ...ollte etwa 5 10 C betragen Verwenden Sie eine Tasse mit gro er ffnung und benutzen Sie keinen Deckel A 5 Getr nke Zum Erw rmen von 500 ml Fl ssigkeit Die Start Temperatur der Fl ssigkeit sollte etwa 5...

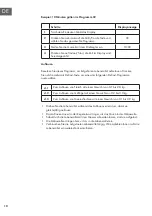
Page 13: ...Lebensmittel ab Falls die Lebensmittel von den Angaben in der Tabelle abweichen k nnen Sie die Kochzeit manuell anpassen um ein optimales Ergebnis zu erzielen Beispiel 450 g Fisch d mpfen Schritte Dis...

Page 14: ...Sie mit dem Drehregler die Minuten ein 12 30 6 Dr cken Sie erneut auf Clock und warten Sie 5 Sekunden bis die Zeit bernommen wird Garprogramm einstellen 7 W hlen Sie das das Garprogramm indem Sie mehr...

Page 15: ...m die Garzeit einzustellen 3 00 3 Dr cken Sie dann auf Grill Combi und w hlen Sie das Grillprogramm aus G 4 Benutzen Sie den Drehregler um die Grillzeit einzustellen 9 00 5 Starten Sie den Garprozess...

Page 16: ...asiertes Keramikgeschirr ohne Metallrand Hitzebest ndiges Plastik Ja Nein Nein Nicht zum langen Kochen in der Mikrowelle geeignet Hitzebest ndiges Glas Ja Ja Ja Abdeckhaube aus Plastik Ja Nein Nein Be...

Page 17: ...assen Sie das Essen nach dem Garen noch etwas in der Mikrowelle ruhen damit es allm hlich abk hlen kann Konsistenz der Nahrungsmittel Farbe und H rte der Nahrungsmittel helfen festzustellen wann sie f...

Page 18: ...ie St cke in einer Tasse 2 3 Minuten lang auf h chster Stufe in der Mikrowelle 2 Stellen Sie eine Tasse roten Tee in die Mikrowelle und erhitzen Sie sie auf h chster Stufe 3 Stellen Sie Orangenschalen...

Page 19: ...Minute lang laufen Leuchtet die Ofenlampe L uft das K hlgebl se Halten Sie zur berpr fung die Hand an die L ftungsschlitze an der R ckseite Dreht sich der Glasteller Der Teller kann sich sowohl im als...

Page 20: ...ischer Ger tschaften Richten Sie sich nach den rtlichen Regelungen und entsorgen Sie Altger te nicht ber den Hausm ll Durch die regelkonforme Entsorgung der Altger te werden Umwelt und die Gesundheit...

Page 21: ...ity Scan the QR code to get access to the latest user manual and other information about the product CONTENT Safety Instructions 22 Product Description and Control Panel 24 Installation 25 Getting Sta...

Page 22: ...not be heated in sealed container since they are liable to explode Baby bottles fitted with a screw cap or teat are considered to be sealed containers Use the wide mouthed container to cook liquid an...

Page 23: ...ay only be carried out by trained specialists If smoke is generated pull the plug and keep the microwave door closed to prevent possible flames Heating liquids may result in sudden boiling Be careful...

Page 24: ...24 EN PRODUCT DESCRIPTION AND CONTROL PANEL...

Page 25: ...osed The microwave must not be placed in a cabinet The microwave oven is intended to be used freestanding The back of the oven must be placed against a wall As there is manufacturing residue or oil re...

Page 26: ...les to show 100P 80P 60P 40P 20P 100P High power 100 power for fast heating 80P Medium High power 80 power for medium rapid heating 60P Medium power 60 power for steam cooking 40P Medium Low power 40...

Page 27: ...ight knob 10 00 4 Press Instant Start button to start and LED will count down to show running time Grill Combi This function use for grill food press this button LED Display will cycle to show G G1 G2...

Page 28: ...d 2 d 3 d 1 For defrosting meat the weight range from 0 1 to 2 0 kg d 2 For defrosting poultry the weight range from 0 2 to 3 0kg d 3 For defrosting seafood the weight range from 0 1 to 0 9kg It is ne...

Page 29: ...ood kind d 2 3 Turn Time Weight knob to set the defrost weight 0 4 4 Start cooking by pressing Instant Start 5 In half way during defrosting 3 beep sound will be heard two times to prompt you turn ove...

Page 30: ...arm a piece of chilled pizza of 0 15 kg A 4 Beverage Heating a cup of 250 ml liquid The liquid temperature is about 5 10 C Use a big mouth cup and do not seal A 5 Beverage Heating a cup of 500 ml liqu...

Page 31: ...shape of food will largely influence the cooking effect If any deviation has been found to the factor noted on above menu you can adjust the cooking time for best result Example Steam 0 45 kg fish St...

Page 32: ...rent clock 3 Set hours by turning Time Weight knob 12 00 4 Press Clock button again to confirm hours 12 00 5 Set minutes by turning Time Weight knob 12 30 6 Press Clock button once or waiting for 5 se...

Page 33: ...ess Grill combi button to select desired grill menu G 4 Turn Time Weight knob to set cooking time 9 00 5 Start cooking by pressing Instant Start Note When microwave cooking is finished the microwave o...

Page 34: ...at resistant ceramic Yes Yes Yes Never use the ceramics which are decorated with metal rim or glazed Heat resistant plastic Yes No No Can not be used for long time microwave cooking Heat resistant gla...

Page 35: ...ter cooking times out leave the food in the oven for an adequate length of time this allows it to complete its cooking cycle and cooling it down in a gradual manner Whether the food is done Color and...

Page 36: ...y be some strange odors exist in oven Following 3 methods can get rid of them 1 Place several lemon slices in a cup then heat with high Micro Power for 2 3 min 2 Place a cup of red tea in oven then he...

Page 37: ...icrowave and let it run for one minute Is the oven light on Is the cooling fan running To check hold your hand to the ventilation slots on the back Is the glass plate turning The plate can rotate both...

Page 38: ...oduct is disposed of correctly you will help prevent potential negative consequences for the environment and human health which could otherwise be caused by inappropriate waste handling of this produc...

Page 39: ...QR para obtener acceso al manual de usuario m s reciente y otra informaci n sobre el producto NDICE DE CONTENIDOS Indicaciones de seguridad 40 Aparato y panel de control 42 Instalaci n 43 Puesta en fu...

Page 40: ...alienta la comida en recipientes de pl stico mant ngala bajo supervisi n para evitar que entre en combusti n Para evitar explosiones y una ebullici n posterior No caliente los l quidos en recipientes...

Page 41: ...realizadas por personal t cnico cualificado Si se forma humo desconecte el enchufe y mantenga la puerta del microondas cerrada para evitar alimentar a posibles llamas El calentamiento de l quidos pue...

Page 42: ...42 ES APARATO Y PANEL DE CONTROL...

Page 43: ...ento del microondas No instale el microondas en armarios o estanter as cerradas El aparato debe estar colocado de manera independiente La parte trasera del aparato debe orientarse a la pared A causa d...

Page 44: ...miento muy r pido 80P Potencia media alta 80 de potencia para calentamiento r pido 60P Potencia media 60 de potencia para cocci n 40P Potencia media baja 40 de potencia para descongelar 20P Potencia b...

Page 45: ...Pulse Instant Start y comenzar la cuenta atr s del tiempo Modo grill y combinaci n Con la funci n grill puede gratinar alimentos Pulse varias veces el bot n grill para seleccionar uno de los siguient...

Page 46: ...uno de los siguientes programas de descongelaci n d 1 Para descongelar carne con un peso de entre 0 1 y 2 kg d 2 Para descongelar carne de ave con un peso de entre 0 2 y 3 kg d 3 Para descongelar mari...

Page 47: ...l programa que desea d 2 3 Seleccione el peso con el regulador 0 4 4 Pulse Instant Start para comenzar con el proceso 5 Una vez transcurrido la mitad del tiempo el microondas emitir dos pitidos para r...

Page 48: ...tar 250 ml de l quido La temperatura de inicio del l quido debe estar compredida entre 5 10 C Utilice una taza con una gran abertura sin tapa A 5 Bebidas Para calentar 500 ml de l quido La temperatura...

Page 49: ...dida del peso y de la forma del alimento Si el alimento no encaja en ninguno de los modos predeterminados ajuste el tiempo manualmente para conseguir el mejor resultado Ejemplo cocinar 450 g de pescad...

Page 50: ...00 5 Ajuste los minutos con el regulador 12 30 6 Pulse de nuevo Clock y espere 5 segundos hasta que se hayan guardado los cambios Seleccione un programa de cocci n 7 Seleccione la potencia de cocci n...

Page 51: ...3 00 3 Pulse el bot n Grill Combi y seleccione el programa Grill G 4 Utilice el regulador para ajustar el tiempo de gratinado 9 00 5 Inicie el proceso de cocci n pulsando Instant Start Nota Cuando fin...

Page 52: ...er mica resistente al calor S S S No utilice cer mica esmaltada o con bordes de metal Pl stico resistente al calor S No No No es apto para procesos de cocci n largos Cristal resistente al calor S S S...

Page 53: ...tro y viceversa un par de veces Tener en cuenta el tiempo de reposo Deje reposar la comida tras la cocci n unos minutos dentro del microondas para que pueda enfriarse un poco Consistencia del alimento...

Page 54: ...as 1 Corte un lim n en trozos y cali ntelo en una taza durante 2 3 minutos a la m xima potencia 2 Coloque una taza de t rojo en el microondas y cali ntela a la m xima potencia 3 Coloque c scara de nar...

Page 55: ...galo en funcionamiento durante un minuto Se ilumina la l mpara interior Funcionan los ventiladores Para comprobarlo coloque la mano en las ranuras de ventilaci n de la parte trasera Se mueve el plato...

Page 56: ...os Respete las leyes territoriales y no arroje aparatos viejos al cubo de la basura dom stica Una retirada de aparatos conforme a las leyes contribuye a proteger el medio ambiente y a las personas a s...

Page 57: ...QR Code pour acc der la derni re version du mode d emploi et d autres informations concernant le produit SOMMAIRE Consignes de s curit 58 Appareil et panneau de commande 60 Installation 61 Mise en mar...

Page 58: ...r chauffez un plat emball dans un contenant plastique surveillez le au cas o le plat prendrait feu Pour emp cher les explosions et l bullition post cuisson Ne r chauffez pas des liquides dans des emba...

Page 59: ...parations ne doivent tre effectu es que par un professionnel Si de la fum e se d gage d branchez la fiche et maintenez la porte du four ferm e pour touffer les ventuelles flammes Le r chauffage d alim...

Page 60: ...60 FR APPAREIL ET PANNEAU DE COMMANDE...

Page 61: ...jours rester ferm e Ne pas placer le four micro ondes dans un placard ou une tag re ferm e La partie arri re du four micro ondes doit se trouver face au mur Des r sidus d huile de fabrication peuvent...

Page 62: ...uissance 100 Pour une r chauffer rapidement 80P Puissance moyenne lev e Puissance 80 Pour une r chauffer vitesse moyenne 60P Puissance moyenne Puissance 60 Pour une cuisson la vapeur 40P Puissance moy...

Page 63: ...gler le temps de cuisson 10 00 4 Appuyer sur la touche Instant Start Le minuteur se met en route Mode de cuisson combin gril micro ondes Utiliser cette fonction pour faire griller les aliments Appuye...

Page 64: ...aliments Appuyer plusieurs fois sur la touche DEFROST pour s lectionner l un des programmes de d cong lation suivant d 1 Pour d congeler de la viande de 100 g 2 kg d 2 Pour d congeler de la volaille d...

Page 65: ...s sur la touche DEFROST d 2 3 Tourner le bouton de r glage pour r gler le poids 0 4 4 Appuyer sur la touche Instant Start pour lancer la d cong lation 5 Lorsque la moiti du temps s est coul e deux bip...

Page 66: ...liquides de 250 ml Leur temp rature de d part doit tre de 5 10 C Utiliser une tasse sans couvercle A 5 Boissons Indiqu pour r chauffer des liquides de 500 ml Leur temp rature de d part doit tre de 5 1...

Page 67: ...liment Dans le cas o les aliments sont diff rents des indications ci dessus le temps de cuisson peut tre adapt pour obtenir un meilleur r sultat Exemple cuire 450 g de poisson la vapeur tapes Affichag...

Page 68: ...2 30 6 Appuyer une nouvelle fois sur le bouton CLOCK et attendre 5 secondes pour que l heure soit enregistr e R gler le programme de cuisson 7 S lectionner le programme de cuisson de votre choix en ap...

Page 69: ...ouche Grill Combi et choisir la fonction gril G 4 Tourner le bouton de r glage pour ajuster le temps du gril 9 00 5 Appuyer sur la touche Instant Start pour lancer la cuisson Remarque Lorsque la cuiss...

Page 70: ...aill e ou avec des rebords m talliques Plastique r sistant la chaleur oui non non Ne pas utiliser pour de longues cuissons au four micro ondes Verre r sistant la chaleur oui oui oui Cloche micro ondes...

Page 71: ...s Une fois la cuisson termin e laisser les aliments reposer un court moment dans le four micro ondes pour qu ils puissent refroidir progressivement Consistance des aliments La couleur et la consistanc...

Page 72: ...cro ondes pendant 2 3 minutes la puissance la plus lev e 2 Placer une tasse de th rouge dans le four micro ondes et faire chauffer la puissance la plus lev e 3 Placer des pluchures d orange dans le fo...

Page 73: ...er une minute La lumi re fonctionne t elle Le ventilateur tourne t il Pour v rifier placer votre main devant les fentes d a ration situ e l arri re du four micro ondes Le plateau tourne t il Ce dernie...

Page 74: ...ues Conformez vous aux r glementations locales et ne jetez pas vos anciens produits avec les ordures m nag res Le respect des r gles de recyclage des vieux produits aide la protection de l environneme...

Page 75: ...itivo Scansionare il codice QR seguente per accedere al manuale d uso pi attuale e per ricevere informazioni sul prodotto INDICE Avvertenze di sicurezza 76 Prodotto e pannello di controllo 78 Installa...

Page 76: ...spegnere il dispositivo e staccare la spina dalla presa Se si riscaldano alimenti in contenitori di plastica controllare costantemente il microonde Per evitare esplosioni o ebollizione improvvisa Non...

Page 77: ...o qualificato In caso di formazione di fumo staccare la spina dalla presa e tenere chiuso lo sportello del microonde per soffocare eventuali fiamme Il riscaldamento di liquidi pu comportare un ebolliz...

Page 78: ...78 IT PRODOTTO E PANNELLO DI CONTROLLO...

Page 79: ...circolazione dell aria intorno al microonde La parte posteriore del microonde deve essere rivolta verso la parete Per motivi di produzione nella camera di cottura e sulle resistenze ci sono residui di...

Page 80: ...i seguenti programmi nella sequenza 100P 80P 60P 40P 20P 100P Potenza massima Potenza 100 Per una cottura rapida 80P Potenza medio alta Potenza 80 Per una cottura media 60P Potenza media Potenza 60 P...

Page 81: ...ttura girando la manopola 10 00 4 Premere Instant Start sul display appare il tempo rimanente Griglia combinata Con la funzione grill possibile grigliare i cibi Premere pi volte il tasto grill per sel...

Page 82: ...emere ripetutamente il tasto Defrost per selezionare uno dei seguenti programmi d 1 Per scongelare carne con un peso compreso tra 0 1 2 0 kg d 2 Per scongelare pollame con un peso compreso tra 0 2 3 0...

Page 83: ...utamente il tasto Defrost e selezionare il programma desiderato d 2 3 Impostare il peso girando la manopola 0 4 4 Premere Instant Start per attivare la funzione scongelamento 5 Trascorsa la met del te...

Page 84: ...A 4 Bevande Per riscaldare 250 ml di liquidi Si consiglia di riscaldare ad una temperatura di 5 10 gradi Utilizzare una tazza senza coperchio A 5 Bevande Per riscaldare 500 ml di liquido La temperatur...

Page 85: ...ll alimento Per gli alimenti non contenuti nella tabella regolare il tempo di cottura manualmente in modo da ottenere dei risultati ottimali Esempio Cuocere a vapore 450 g di pesce Istruzioni Display...

Page 86: ...tasto Clock per confermare 12 00 5 Impostare i minuti con la manopola 12 30 6 Premere nuovamente Clock dopo 5 secondi il timer impostato Impostare il programma di cottura 7 Selezionare il programma di...

Page 87: ...ottura desiderato girando la manopola 3 00 3 Premere Grill Combi e selezionare il programma per il grill G 4 Impostare il tempo di cottura con il grill girando la manopola 9 00 5 Attivare la cottura p...

Page 88: ...tate prive di bordi in metallo Plastica resistente al calore si no no Non adatta a tempi lunghi di cottura Vetro resistente al calore si si si Solo vetro resistente al calore Pellicola protettiva in p...

Page 89: ...po di riposo Dopo la cottura lasciare riposare l alimento nel microonde in modo che si possa raffreddare gradualmente Consistenza degli alimenti Il colore e la solidit dell alimento servono a stabilir...

Page 90: ...in una tazza per 2 3 minuti impostando la potenza massima 2 Mettere una tazza di t rosso nel microonde e riscaldarlo impostando la potenza massima 3 Riscaldare delle bucce di arancia nel microonde per...

Page 91: ...nzione per un minuto La spia del forno lampeggia La ventola di raffreddamento funziona Mettere la mano nella parte posteriore del microonde per verificare Il piatto girevole funziona Pu girare sia in...

Page 92: ...positivi elettrici ed elettronici Non smaltire i vecchi dispositivi con i rifiuti domestici Grazie al corretto smaltimento dei vecchi dispositivi si proteggono il pianeta e la salute delle persone da...

Page 93: ......

Page 94: ......

Page 95: ......

Page 96: ......

Reviews: