background image


User instructions 


11 

PROGRAM 

SELECTION 

TYPE AND GRADE OF DIRT


PROGRESS 

PROGRAM


DURATION 


CONSUMPTION 


MINUTES 

(1) 


WATER 

LITRES


POWER 
KWh (1)


RINSE


Pans and dishes awaiting 

completion of the load


Cold prewash  

15 

5,5 

0,02 

LIGHT


Delicate dishes with light dirt 

Wash at 45°C 
Cold rinse 
Rinse at 70°C 
Dry 

65 

9,5 

1,10 

BIO 


Dishes with normal dirt, 

washed immediately after use 

Wash at 55°C 
Cold rinse 
Rinse at 70°C 
Dry 

100 

17 

1,35 

NORMAL


Mixed dishes with normal dirt 

without dried-on residues


Cold prewash 
Wash at 65°C 
Cold rinse 
Rinse at 70°C 
Dry 

55 

9,5 

1,35 

10 

STRONG


Very dirty pans and dishes, 

washed immediately after use 

Wash at 70°C 
2 cold rinses 
Rinse at 70°C 
Dry 

95’ 

17 

1,50 


(1) 

The  cycle  duration  and  power  consumption  may  vary  according  to  the  water  and  room 
temperatures, and the type and amount of dishes. 


The washing cycle will not take place if the dishwasher door is left open 
or not properly closed. 


Summary of Contents for DW6010

Page 1: ...kitchen collection Instructions for use and warranty details Dishwasher Free Standing Model No DW6010 ...

Page 2: ...our new appliance Correct installation will avoid delays and unnecessary service call costs Once installation is complete please read this entire instruction manual carefully and get to know the controls and the features of your new Kleenmaid appliance Again congratulations and thank you for choosing Kleenmaid Congratulations on the purchase of your new Kleenmaid appliance ...

Page 3: ...id out to provide you with a step by step guide to all your appliance s functions the texts are easy to understand and are complete with detailed illustrations Recommendations are given for the correct use of the baskets spray arms containers filters washing programs and for operating the controls Following the cleaning instructions provided here will keep your dishwasher s performance at peak lev...

Page 4: ...RER DECLINES ALL RESPONSIBILITY FOR USES OTHER THAN THOSE DESCRIBED ABOVE THE NAME PLATE FEATURING THE TECHNICAL DATA SERIAL NUMBER AND MARKINGS IS VISIBLY POSITIONED ON THE INNER EDGE OF THE DOOR THE NAME PLATE ON THE INNER EDGE OF THE DOOR MUST NEVER BE REMOVED DO NOT LEAVE THE DISCARDED PACKAGING MATERIALS UNSUPERVISED WITHIN THE HOME SEPARATE THE VARIOUS MATERIALS WHICH MAKE UP THE PACKAGING A...

Page 5: ...ICABLE COLLECTION POINT FOR THE RECYCLING OF ELECTRICAL AND ELECTRONIC EQUIPMENT DISPOSAL MUST BE CARRIED OUT IN ACCORDANCE WITH LOCAL ENVIRONMENTAL REGULATIONS FOR WASTE DISPOSAL FOR MORE DETAILED INFORMATION ABOUT TREATMENT RECOVERY AND RECYCLING OF THIS PRODUCT PLEASE CONTACT YOUR LOCAL CITY OFFICE YOUR HOUSEHOLD WASTE DISPOSAL SERVICE OR THE SHOP WHERE YOU PURCHASED THE PRODUCT DO NOT USE APPL...

Page 6: ...E AND DO NOT ALLOW THE SOLENOID VALVE TO DROP INTO WATER IN THE EVENT OF DAMAGE TO THE WATER INTAKE HOSE DISCONNECT THE APPLIANCE FROM THE ELECTRICAL POWER SUPPLY AND FROM THE WATER SUPPLY IMMEDIATELY AFTER INSTALLING THE DISHWASHER PERFORM A QUICK TEST OF THE APPLIANCE FOLLOWING THE INSTRUCTIONS BELOW IF THE DISHWASHER FAILS TO OPERATE CORRECTLY DISCONNECT IT FROM THE ELECTRICAL POWER SUPPLY AND ...

Page 7: ...r more other appliances it is essential to comply with all the recommendations provided by the appliance s manufacturer minimum distances installation procedures etc For free standing models only Installing a cooktop on top of a free standing dishwasher is absolutely forbidden If the appliance is not built in and is therefore accessible on on side the door hinge area must be covered for safety rea...

Page 8: ...pliers This dishwasher is equipped with the ACQUASTOP device the filters is already fitted inside the threaded ring The dishwasher can also be connected to a hot water supply not exceeding 60 C Supplying the appliance with hot water cuts down the washing time by approximately 20 minutes but slightly reduces its effectiveness Make the connection to the domestic hot water supply using the same proce...

Page 9: ...nd should be positioned at a height of between 30 and 100 cm and should never be submerged in water If a horizontal drain extension hose is used for a maximum of 3 m the drain hose can be placed at a maximum height of 85 cm from the ground ...

Page 10: ...ONNECT THE PLUG BY PULLING ON THE POWER SUPPLY LEAD IN THE EVENT OF DAMAGE TO THE SUPPLY CORD HAVE IT REPLACED BY THE MANUFACTURER OR AN AUTHORIZED TECHNICAL SERVICE CENTRE DO NOT USE ADAPTORS OR SHUNT CONNECTIONS IN ORDER TO AVOID THE POSSIBILITY OF OVERHEATING OR BURNING In the event of damage to the supply cord have it replaced by the manufacturer or an Authorized Technical Service Centre in or...

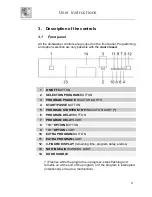
Page 11: ... LIGHTS 4 START PAUSE BUTTON 5 PROGRAM STARTED STOP INDICATOR LIGHT 6 PROGRAM DELAY BUTTON 7 PROGRAM DELAY LIGHT 8 3 1 OPTION BUTTON 9 3 1 OPTION LIGHT 10 EXTRA PROGRAM BUTTON 11 EXTRA PROGRAM LIGHT 12 3 FIGURE DISPLAY remaining time program delay alarms 13 NO RINSE AID WARNING LIGHT 14 DOOR HANDLE Flashes while the program is in progress stops flashing and remains on at the end of the program or ...

Page 12: ...ishes with normal dirt even with dried on residues Cold prewash Wash at 50 C Cold rinse Rinse at 65 C Dry 100 11 1 3 4 HALF LOAD Half load of dishes with normal dirt washed immediately after use Wash at 65 C Cold rinse Rinse at 70 C Dry 90 11 1 20 5 SUPER Very dirty pans and dishes even with dried on residues Hot prewash Wash at 70 C 2 cold rinses Rinse at 70 C Dry 155 15 5 1 60 Only run the soak ...

Page 13: ...diately after use Wash at 55 C Cold rinse Rinse at 70 C Dry 100 17 1 35 9 NORMAL Mixed dishes with normal dirt without dried on residues Cold prewash Wash at 65 C Cold rinse Rinse at 70 C Dry 55 9 5 1 35 10 STRONG Very dirty pans and dishes washed immediately after use Wash at 70 C 2 cold rinses Rinse at 70 C Dry 95 17 1 50 1 The cycle duration and power consumption may vary according to the water...

Page 14: ...s securely closed EXTRA PROGRAMS Button gives access to five extra programs in addition to the ones which can be selected directly using the program selector button This button must be pressed the light comes on after selection of the main program 1 2 3 4 or 5 This function is retained in the memory so the button has to be pressed again the light goes out if the user wishes to execute one of the 5...

Page 15: ...he soak program By pressing the button 8 you activate the 3 1 option confirmed when the relative light comes on This option has been designed for the use of dishwashing tablets with integrated substances in place of regenerating salt or rinse aid known on the market as 3 in 1 or triple action products in this case the dishwasher will use the product in an optimal way avoiding salt and rinse aid co...

Page 16: ...ich the appliance will start After setting the delay start the program press the START PAUSE button 4 for a few seconds until the PROGRAM STARTED light 5 starts flashing The appliance will prewash the dishes after which the program delay set previously will come into effect To cancel the program delay once the wash has started proceed as follows Press the START PAUSE button 4 for a few seconds unt...

Page 17: ...ually updated as the washing program progress The 3 FIGURE DISPLAY 12 shows the estimated duration of the washing program If it is necessary to open dishwasher door during the washing cycle there will be a 1 minute delay before the program can be resumed After correctly closing the door press the START PAUSE button 4 again This operation may negatively affective the progress of the washing cycle E...

Page 18: ...ergents are harmful to the environment To avoid using excessive amounts of detergent and to save on electricity observe the following separate the more delicate items from dishes that are more resistant to aggressive detergents and high temperatures do not pour the detergent directly on the dishes REMOVING THE DISHES At the end of the washing program wait at least 20 minutes before removing the di...

Page 19: ...ADDING THE RINSE AID The rinse aid helps the dishes dry faster and prevents the formation of scale deposits and staining it is automatically added to the water during the final rinse cycle from the container situated on the inner side of the door To fill the rinse aid reservoir Open the door Rotate the container cap anticlockwise by of a turn and remove it Add the rinse aid until the container is ...

Page 20: ...e circular stains If on the other hand the dishes are sticky or have white streaks it is necessary to reduce the rinse aid setting ADDING THE DETERGENT To open the detergent dispenser cover lightly press the button P Add the detergent and close the cap carefully During the washing cycle the dispenser will be opened automatically When a program with hot prewash is selected see program table extra d...

Page 21: ...an only be achieved at 65 C using traditional detergents For the safeguarding of the environment we recommend the use of phosphate and chlorine free detergents The introduction of detergent into the rinse aid dispenser even in liquid form will damage the dishwasher 4 1 General warnings and recommendations Before using the dishwasher for the first time it is advisable to read the following recommen...

Page 22: ...maged by the high washing temperatures Handcrafted items these are rarely suitable for washing in a dishwasher The relatively high water temperatures and the detergents used may damage them Plastic dishes heat resistant plastic dishes must be washed in the upper basket Dishes and objects in copper tin zinc or brass these tend to stain Aluminium dishes items made from anodised aluminium may lose th...

Page 23: ...ore be used for the toughest items with a heavier degree of soiling All types and combinations of loads are permitted provided that the dishes pots and pans are arranged with all the soiled surfaces exposed to the water jets coming from the bottom To make the most of the space inside the basket when loading large items this dishwasher is equipped with tip up supports for plates in 2 sections With ...

Page 24: ...at plates soup plates dessert and serving dishes positioning them vertically Pots pans and their covers must be loaded upside down When loading soup plates and dessert bowls be sure to leave a gap between them Loading examples Examples of loading for intensive dirt ...

Page 25: ...cutlery should be arranged in an orderly manner inside the basket with the handles pointing downwards Take care during loading to avoid injury from the knife blades The basket is suitable for all types of cutlery except those long enough to interfere with the upper spray arm Ladles wooden spoons and cooking knives can be placed in the upper basket making sure that the knife blades do not protrude ...

Page 26: ...c If the upper basket is used in the lowermost position it can also be loaded with serving dishes provided they are only slightly soiled LOADING THE UPPER BASKET Load plates facing forward cups bowls etc must always be facing downwards The left side of the basket can be loaded with cups and glasses on two levels In the centre section plates and saucers can be loaded vertically into the supports pr...

Page 27: ... of the top basket can be adjusted to allow large dishes or pans to be placed in the bottom basket The adjustment procedure is described below Adjustment is in three positions on both sides The sides of the basket must always be set at the same height Raise the basket by pulling on the top edge 1 to the first or second catch depending on the height required To lower the basket first release it by ...

Page 28: ...CLEANING THE WATER INTAKE FILTER The water intake filter A located at the outlet of the water supply tap needs to be cleaned periodically After having closed the water supply tap unscrew the end of the water intake hose remove the filter A and clean it delicately under running water Reassemble filter A in its seat and carefully screw the water intake hose back into position CLEANING THE SPRAY ARMS...

Page 29: ...lters should be cleaned under running water using a stiff brush When removing the filter take care that there are no food residues on it If any residues fall into the washing pit they might block hydraulic components or foul the spray arm nozzles It is essential to thoroughly clean the filters according to the above instructions the dishwasher cannot function if the filters are clogged Carefully r...

Page 30: ...check that the dishwasher is connected to the electrical power supply there is no power failure the water tap is open the dishwasher door is properly closed If water remains inside the dishwasher check that the drain hose is not kinked the drain siphon is not obstructed the dishwasher filters are not clogged If the dishes are not being cleaned properly check that the correct amount of detergent ha...

Page 31: ...re are visible traces of rust inside the tank the tank is made of steel and therefore any rust marks are due to external elements fragments of rust from the water pipes pots cutlery etc Special products are commercially available to remove such marks check that the amount of detergent being used is correct Certain detergents can be more corrosive than others If after following the above troublesho...

Page 32: ...recise water quantity that has been loaded E8 Problem on the water distribution system to the baskets E9 Water intake system malfunction If an alarm occurs the appliance interrupts the program in progress and signals a fault Alarms E1 E2 E3 E4 E8 and E9 interrupt the current program immediately The E5 E6 alarms interrupts the running program once the cause is resolved it will bring back the execut...

Page 33: ...edge of the control panel Free standing 600 mm Semi integrated 570 mm Height Free standing from 850 mm to 890 mm Semi integrated from 820 mm to 890 mm Capacity 14 Standard place settings Water supply pressure min 0 05 max 0 9 MPa min 0 5 max 9 bar Electrical characteristics See rating plate ...

Page 34: ... Kleenmaid Warranty however if repair is needed because of Product failure during normal Domestic Use Kleenmaid has the option to repair or replace the defective Product or part of the Product with a product or part of like kind and quality A replacement part may be new or reconditioned of like kind and quality and may cost less than the original Product purchased and no charges or refunds will be...

Page 35: ...s 16 Any repairs or services required that are outside the terms and conditions of this Kleenmaid Warranty can be carried out at your request at your cost including where the Product has not been installed or set up correctly Kleenmaid will always advise you of this cost and seek your agreement to pay such costs before commencing such repairs A credit card may be required prior to the commencement...

Page 36: ...tany Road Alexandria NSW 2015 E TVQQPSU LMFFONBJE DPN BV www kleenmaid com au Other products available in the Kleenmaid range of appliances Washing machines Clothes dryers Dishwashers Ovens Cooktops Steam ovens Microwave ovens Built in espresso coffee machines Rangehoods Freestanding ovens ...

Reviews: