background image

Topside System Connections

3-7

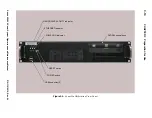
Figure 3-1:  

TPU Back Panel

TOWFISH connector

NOTE:  

Connectors that are not

called out are not used or are
for factory use only.

NAV connector

AC INPUT connector

1 PPS IN connector

T/F TRIG connector

TRIG A connector

LAN connector

Summary of Contents for 5000 V2 Series

Page 1: ...SERIES 5000 V2 SONAR SYSTEM Operations and Maintenance Manual P N 11214512 Rev 04 11 Klein Drive Salem NH 03079 1249 U S A Tel 603 893 6131 Fax 603 893 8807 www KleinMarineSystems com...

Page 2: ...responsibility or liability for any errors inaccuracies or omissions that may be present in this document The SonarPro software program may be used or copied only in accordance with the terms of the S...

Page 3: ...lectronics may occur if the sonar towfish is operated out of the water for periods longer than 15 minutes Let the sonar cool 15 minutes or longer between operations Protect the sonar towfish from dire...

Page 4: ...What s in This Manual xvi Note Warning Caution and Shock Hazard Notices xvii Customer Service xviii CHAPTER 1 Overview 1 1 1 1 Main Features 1 1 1 2 System Components 1 2 1 2 1 Towfish 1 2 1 2 2 TPU...

Page 5: ...3 3 2 TPU and SonarPro Workstation Circuit Breakers 3 2 3 4 Towfish Setup 3 2 3 4 1 Connecting the Tow Cable 3 3 3 4 2 Connecting the Tow Cable with the Optional K Wing Depressor 3 4 3 4 3 Disconnect...

Page 6: ...lectronics 4 8 4 7 Testing the Towfish Electronics 4 9 4 7 1 Checking the Multiplexer Board 4 10 4 7 2 Checking the Transmitter Board 4 10 4 7 3 Checking the Receiver Boards 4 10 4 7 4 Checking the Se...

Page 7: ...2 Querying or Changing the TPU IP Address C 2 C 3 Editing the TPU Startup File C 3 C 4 Updating the TPU Software C 4 APPENDIX D Different Tow Cable Lengths and the Startup ini File D 1 D 1 Measuring...

Page 8: ...Key 4 5 Figure 4 6 Tail Fins being Inserted into Tail Cone 4 6 Figure 4 7 Tail Fins being Secured to Tail Cone 4 6 Figure 4 8 Push Pull Assembly 4 7 Figure 4 9 Jacking Screw 4 7 Figure 4 10 Electroni...

Page 9: ...igure B 2 Spooling Real to Drum B 2 Figure B 3 Cable Loop and Kink B 3 Figure B 4 Damaged Cable B 3 Figure C 1 The Klein Linux TPU Updater Dialog Box C 1 Figure C 2 The Select RS 232 Port Dialog Box C...

Page 10: ...x Series 5000 V2 Sonar System Operations and Maintenance Manual P N 11214512 Rev 04 List of Tables Table 3 1 TPU Power Cable Wiring 3 2 Table E 1 List of Drawings and Parts Lists E 1...

Page 11: ...ke manner but its liability under this warranty is limited to the obligation to remedy at Seller s expense any such service work not performed satisfactorily upon receipt of written notice within nine...

Page 12: ...or to negligent or accidental mishandling f Except where Seller has performed the installation of specific equipment Seller assumes no responsibility for damage incurred during installation of equipm...

Page 13: ...e to resolve the dispute by good faith negotiation either Seller or Buyer may refer the matter to litigation LIMITATION OF LIABILITY TO THE MAXIMUM EXTENT PERMITTED BY APPLICABLE LAW SELLER SHALL NOT...

Page 14: ...tion or any network server owned by or leased to you provided that the Software is used only in connection with one KMS Series 3000 UUV 3500 3900 4900 5000 5000 V2 5900 HydroChart 3500 HydroChart 5000...

Page 15: ...limited rights only as provided in DFAR 252 227 7015 Nov 1995 or FAR 52 227 14 June 1987 whichever is applicable You agree not to remove or deface any portion of any legend provided on any licensed pr...

Page 16: ...Chapter 2 Specifications Provides detailed physical and performance specifications for the main components of the system including the acoustic transducers the environmental and navigation sensors an...

Page 17: ...purposes Note Warning Caution and Shock Hazard Notices Where applicable note warning caution and shock hazard notices are included throughout this manual as follows NOTE Recommendations or general inf...

Page 18: ...ical support can be contacted using any of the following means Mail Klein Marine Systems Inc 11 Klein Drive Salem NH 03079 Email TechSupport KleinMarineSystems com Telephone 603 893 6131 Facsimile 603...

Page 19: ...s provides extraordinary sea floor images In addition rugged construction low weight and simple setup enables operation from large or small vessels 1 1 Main Features The Series 5000 V2 Sonar System pr...

Page 20: ...side the towfish housing is a pressure housing containing the sonar electronics a downlink demultiplexer for control signals an uplink multiplexer for sonar and sensor data a transmitter board for tra...

Page 21: ...mponents 1 3 Figure 1 1 Series 5000 Towfish Starboard transducer array Tow bracket Safety cable Carrying handle 4 Tail cone Stabilizing fins Nose cone Stainless steel towfish housing Safety cable tab...

Page 22: ...erview Series 5000 V2 Sonar System Operations and Maintenance Manual P N 11214512 Rev 04 Figure 1 2 Series 5000 V2 Sonar System Topside System Main Components SonarPro Workstation Transceiver and Proc...

Page 23: ...m the GPS This signal is used in conjunction with a NMEA ZDA message input to add an accurate time stamp to the data 1 2 3 SonarPro Workstation The SonarPro Workstation is an industrial grade based co...

Page 24: ......

Page 25: ...se length Range scales 50 75 100 and 150 m 50 and 75 m are high resolution 200 and 250 m reconnaissance mode Swath width 100 to 500 m usable swath width varies with environmental conditions and pulse...

Page 26: ...at 100 watts for the TPU and the towfish together 2 2 2 TPU Size 8 9 cm 3 5 in H 48 3 cm 19 0 in W 35 6 cm 14 0 in D Weight 7 6 kg 17 lb Chassis type 2U 19 inch rack mount I O ports 1 LAN 4 RS 232 4 B...

Page 27: ...8 cm 6 6 in diameter 30 5 cm 24 in wide including tail fins 61 0 cm 24 in high including tail fins Weight in air 70 5 kg 155 lb Weight in water 47 7 kg 105 lb 2 3 2 Transducers Type Proprietary line a...

Page 28: ...iplexing format Time division multiplexing TDM Number of channels 32 Data rate 29 12 Mbaud Data format NRZ Bit error rate Better than 1x10 8 before correction 2 3 7 Power Input power Powered from the...

Page 29: ...0 40 Type Double layer counter helical galvanized improved plow steel GIPS Stainless steel can be a special order Conductors Coaxial copper Diameter OD 10 2 mm 0 40 in Breaking strength 4990 kg 11 00...

Page 30: ...Voltage rating 3000 VDC Termination Stainless steel shackle at towfish end 2 5 Towfish Options The towfish can be equipped with the following options Responder interface Transponder interface Magneto...

Page 31: ...2 Locating the Topside System Components The TPU and the SonarPro Workstation should be located in an area that is protected from weather and spray and where the temperatures are consistently between...

Page 32: ...ion Circuit Breakers The main AC power input line is protected by a switch circuit breaker in both the TPU and the SonarPro Workstation The one on the TPU is located on the front panel on the far righ...

Page 33: ...side to side rocking motion while pressing on the connector but do not bend the pins When properly inserted there should be no gap between the surfaces of the two connectors WARNING Before connecting...

Page 34: ...ackle on the tow cable connects mechanically to the towfish K Wing depressor tow bracket using a tow pin The depressor connects mechanically to the towfish The waterproof connector on the towfish jump...

Page 35: ...cable hold down clips on the top of the towfish housing Place a cable tie through the shackle pin hole and wrap around the shackle pin to prevent the shackle from loosening Use electrical tape every...

Page 36: ...ning ring from the tow pin and withdraw the pin Disengage the tow cable shackle from the towfish or tow bracket Replace the tow pin in the hole in the tow bracket and secure it with the retaining ring...

Page 37: ...7 Figure 3 1 TPU Back Panel TOWFISH connector NOTE Connectors that are not called out are not used or are for factory use only NAV connector AC INPUT connector 1 PPS IN connector T F TRIG connector TR...

Page 38: ...per second signals TOWFISH Type N coaxial connector that connects to the towfish using a deck cable or a tow cable AC INPUT IEC type connector that connects to the AC power source 3 5 2 SonarPro Work...

Page 39: ...igure 3 2 SonarPro Workstation Back Panel ON OFF switch AC INPUT connector ETHERNET connector 2 USB connector 4 NOTE Connectors that are not called out are not used or are available for optional use D...

Page 40: ...r on the TPU A user supplied RS 232 serial cable is required where one end is terminated with a DB9 female connector and the other end is as required by the navigation system 5 Verify that the GPS is...

Page 41: ...narPro Workstation include controls and indicators on the front panels The SonarPro Workstation also has its power switch on the back panel 3 7 1 TPU Controls and Indicators All of the TPU controls an...

Page 42: ...tions and Maintenance Manual P N 11214512 Rev 04 Figure 3 3 TPU Front Panel POWER indicator SYS READY indicator T F POWER indicator TOWFISH indicators POWER switch STATUS indicators NOTE Indicators th...

Page 43: ...on the SonarPro Workstation front panel which is shown is Figure 3 4 Also shown is the location of the DVDRW optical drive The SonarPro Workstation controls and indicators are the following ON OFF sw...

Page 44: ...0 V2 Sonar System Operations and Maintenance Manual P N 11214512 Rev 04 Figure 3 4 SonarPro Workstation Front Panel HARD DRIVE ACTIVITY indicator POWER ON indicator DVDRW optical drive ETHERNET indica...

Page 45: ...E indicators should turn on the DOWNLINK and TRIGGER indicators should flash and the TF POWER should be on 6 Start SonarPro and observe that the towfish is operational by viewing the waterfall sonar d...

Page 46: ...ER indicator should turn on and the SYS READY indicator should flash After approximately 1 minute the SYS READY and AWAKE indicators should turn on the DOWNLINK and TRIGGER indicators should flash and...

Page 47: ...percent of range A good starting vessel speed is 4 5 knots Check for the following The image is satisfactory Pitch roll depth and altitude are being displayed Speed and heading are being displayed fro...

Page 48: ......

Page 49: ...ion Inventory the system related spares and accessories carefully Record the serial numbers of the major components Store the shipping boxes in a safe place so they can be reused when needed A small a...

Page 50: ...se on the metal pins of the connector a very light coating is sufficient 5 Check that all of the screws on the towfish are tight 4 2 2 Weekly Maintenance Checklist Perform the following maintenance st...

Page 51: ...Replacing the Fixed Tail Cone Assembly The following procedure describes how to install or replace the fixed tail cone assembly P N 14105284 used on the towfish This assembly is installed on all new...

Page 52: ...arge hole to the upper right align the tail cone with the rear center pin and thread the rear tail cone bolt 7 into the rear center pin using the 8 mm hex key 3 Using the pliers tighten the rear tail...

Page 53: ...screw driver align the threaded hole in the crossbar 4 and screw the bolt 7 with the retaining cup 5 into the crossbar with the 8 mm hex key Leave the retaining cup loose to accommodate the tail fins...

Page 54: ...inserting the forward slot into the towfish body The rearward slot should be secured by the retaining cup 7 Tighten the retaining cup bolt 7 so that the tail fins are secured 4 4 Removing the Fixed Ta...

Page 55: ...onics When flipped over the assembly pushes the electronics end cap into the pressure housing 2 Disconnect all the cables from the bulkhead connectors on the electronics housing end cap 3 Position the...

Page 56: ...gure 4 10 3 Reconnect the cables to the bulkhead connectors on the electronics housing end cap The altimeter cable is marked with colored shrink tubing as shown in Figure 4 11 Connect this cable to th...

Page 57: ...her and nut onto the jacking screw and hand tighten 7 Replace the nose cone 4 7 Testing the Towfish Electronics Remove the towfish electronics as described in Removing the Towfish Electronics on page...

Page 58: ...2 VDC is present at TP10 and that green LED D11 is illuminated The 1 2 VDC is generated from the 3 3 VDC In addition refer to Figure 4 14 for some applicable waveforms 4 7 2 Checking the Transmitter B...

Page 59: ...Testing the Towfish Electronics 4 11 Figure 4 13 Multiplexer Board Waveforms Figure 4 14 Sample Transmit Waveform TP18 Telemetry TP17 TP28 TVG curve...

Page 60: ...mbient temperature measure the ambient temperature with an accurate thermometer Set the potentiometer on the Sensor Interface board which is shown in Figure 4 15 to the current temperature The tempera...

Page 61: ...ation Cgo Starts compass for calibration Rotate the towfish 360 degrees while rotating the towfish through the limits of pitch and roll This should be done over a time frame of 1 minute Ch Halt compas...

Page 62: ......

Page 63: ...ng software control of operating parameters Previously this would have required hardware changes 5 1 Towfish The towfish transmits and receives the sonar signals processes them and outputs the process...

Page 64: ...ceiver boards The Receiver boards process the backscatter information by applying fixed gain time varied gain TVG and frequency filtering to the input voltage signals received from the individual sub...

Page 65: ...Towfish 5 3 Figure 5 2 The Series 5000 V2 Sonar System TPU Electronics Chassis Power Supply board Sensor Interface board Receiver board 2 Transmitter board Multiplexer board Compass board...

Page 66: ...VDC Routes the 200 VDC to the Transmitter boards Generates 5 VDC 3 3 VDC and 28 VDC Generates the time varied gain TVG curves for the received sonar signals from the transducers Multiplexes all the d...

Page 67: ...xternal input and output signal and data connections for the TPU It also provides the required recovery of signal and clock detects trigger inputs and 1 PPS signals generates the trigger outputs input...

Page 68: ...5 6 CHAPTER 5 Technical Description Series 5000 V2 Sonar System Operations and Maintenance Manual P N 11214512 Rev 04 Figure 5 3 The Series 5000 V2 Sonar System TPU Electronics Block Diagram...

Page 69: ...he Series 5000 V2 Sonar System TPU Electronics Chassis Topside Telemetry board CPU board Demultiplexer High Voltage Power Supply 200V Power Filter board 12V Power Filter board 12V Power Supply board L...

Page 70: ...reformats the data as required for the Demultiplexer board Generates command and timing signals for the towfish Matches the time references at the tow fish and the TPU 12V Power Filter board The 12V P...

Page 71: ...hecked with field data wherever possible At best the values are within 15 accurate with the greatest accuracy at towfish depths between 91 m 300 ft and 914 m 3000 ft and at tow speeds of 3 to 7 knots...

Page 72: ...The K Wing mounts directly to the towfish end Interpreting the Graphs Pick the graph closest to your operating conditions With a given speed and cable length you can determine effective tow depth You...

Page 73: ...A 3 Figure A 1 Cable Length vs Towfish Depth Graph 1...

Page 74: ...A 4 APPENDIX A Sample Towing Characteristics Series 5000 V2 Sonar System Operations and Maintenance Manual P N 11214512 Rev 04 Figure A 2 Cable Length vs Towfish Depth Graph 2...

Page 75: ...A 5 Figure A 3 Cable Length vs Towfish Depth Graph 3...

Page 76: ...A 6 APPENDIX A Sample Towing Characteristics Series 5000 V2 Sonar System Operations and Maintenance Manual P N 11214512 Rev 04 Figure A 4 Cable Length vs Towfish Depth Graph 4...

Page 77: ...A 7 Figure A 5 Cable Length vs Towfish Depth Graph 5...

Page 78: ......

Page 79: ...el should be revolved and the rope taken off the way it was put on the reel as shown in Figure B 1 for two effective methods Place a shaft through the reel center and jack it up so that the reel revol...

Page 80: ...kinking are discussed below B 3 1 Cause of Cable Kinking Kinking is caused when the cable takes a spiral shape as the result of an unnatural twist One of the most common causes of twisting is imprope...

Page 81: ...nking is that strands and wires are displaced creating uneven tension which causes excessive wear at the point of the kink The kink can be straightened out so that the damage appears slight however si...

Page 82: ......

Page 83: ...stalling SonarPro and can be used to perform the following tasks Query or change the IP address of the TPU Edit the startup file of the TPU Download and install software updates to the TPU C 1 Startin...

Page 84: ...n the SonarPro Workstation and wait for the Windows desktop to appear 3 Turn on the TPU 4 Start Linux TPU Updater The Klein Linux TPU Updater dialog box opens 5 Click Read TPU IP Address The Select RS...

Page 85: ...startupCdi3000 ini To edit the TPU startup file 1 Connect the supplied Ethernet cable to the LAN connector of the TPU and to the ETHERNET connector of the SonarPro Workstation 2 Turn on the SonarPro W...

Page 86: ...changes to the startupCdi3000 ini file as required and then exit Notepad Notepad exits and the changed file is saved The TPU software restarts and a window opens confirming the file update 8 To ensure...

Page 87: ...1 The address will already be displayed if it was queried or changed as described in Querying or Changing the TPU IP Address on page C 2 6 Click Update TPU Software An dialog box opens that enables fi...

Page 88: ......

Page 89: ...save the file The adjustment parameters are as follows set PREEMPHISIS x x 0 7 SonarPro Command ML x set LBOGAIN x x 0 3 SonarPro Command MG x We recommend the following For a 15 meter cable set PREE...

Page 90: ...suggest that you use a Hewlett Packard 4194A Impedance Gain Phase Analyzer or similar A sample plot is shown in Figure D 1 If you do not have access to a Hewlett Packard 4194A Impedance Gain Phase An...

Page 91: ...ightweight Kevlar reinforced 150 meter minimum length tow cable This extra cable will allow you to bypass your primary tow cable assembly and speed up fault isolation Figure D 2 Setup for Measuring To...

Page 92: ......

Page 93: ...54 Assembly Electronics Bottle Towfish 5000 V2 15100952 Assembly Drawing Option Kit 25 Tailfin T Sys 5000 14105284 Assembly Spares Kit Tailfins Cone 5000 V2 14315006 Wiring Diagram Chassis Electronics...

Page 94: ...E 2 APPENDIX E Drawings and Parts Lists Series 5000 V2 Sonar System Operations and Maintenance Manual P N 11214512 Rev 04...

Page 95: ...E 3...

Page 96: ...E 4 APPENDIX E Drawings and Parts Lists Series 5000 V2 Sonar System Operations and Maintenance Manual P N 11214512 Rev 04...

Page 97: ...E 5...

Page 98: ...E 6 APPENDIX E Drawings and Parts Lists Series 5000 V2 Sonar System Operations and Maintenance Manual P N 11214512 Rev 04...

Page 99: ...E 7...

Page 100: ...E 8 APPENDIX E Drawings and Parts Lists Series 5000 V2 Sonar System Operations and Maintenance Manual P N 11214512 Rev 04...

Page 101: ...E 9...

Page 102: ...E 10 APPENDIX E Drawings and Parts Lists Series 5000 V2 Sonar System Operations and Maintenance Manual P N 11214512 Rev 04...

Page 103: ...E 11...

Page 104: ...E 12 APPENDIX E Drawings and Parts Lists Series 5000 V2 Sonar System Operations and Maintenance Manual P N 11214512 Rev 04...

Page 105: ...E 13...

Page 106: ...E 14 APPENDIX E Drawings and Parts Lists Series 5000 V2 Sonar System Operations and Maintenance Manual P N 11214512 Rev 04...

Page 107: ...E 15...

Page 108: ...E 16 APPENDIX E Drawings and Parts Lists Series 5000 V2 Sonar System Operations and Maintenance Manual P N 11214512 Rev 04...

Page 109: ...E 17...

Page 110: ...E 18 APPENDIX E Drawings and Parts Lists Series 5000 V2 Sonar System Operations and Maintenance Manual P N 11214512 Rev 04...

Page 111: ...E 19...

Page 112: ...E 20 APPENDIX E Drawings and Parts Lists Series 5000 V2 Sonar System Operations and Maintenance Manual P N 11214512 Rev 04...

Reviews: