Replacing the Fixed Tail Cone Assembly
4-3
2.
Thoroughly clean the TPU, cables and towing equipment. Clean the top and
outside surfaces of the TPU using a cloth dampened with fresh water. Use a small
amount of detergent if necessary. Do not let dirt and salt deposits accumulate on
the TPU cabinet.
3.
Remove the screws securing the nose cone of the towfish and check that the
connectors are firmly seated. Use a thin film of silicone grease on all external
connectors. Make sure the transducer leads are free from cuts or abrasion.
4.
Follow the instructions in the manufacturer's manual for any necessary cleaning
and maintenance of the SonarPro Workstation.
4.3
Replacing the Fixed
Tail Cone Assembly
The following procedure
describes how to install or
replace the fixed tail cone
assembly, P/N 14105284, used
on the towfish. This assembly
is installed on all new Series
5000 V2 towfish and can be
retrofitted on older Series 5000
V2 towfish using the collision
tolerant tail cone assembly.
The following tools and parts
are required:
• 8-mm hex key with a shaft
at least 6 in. (15 cm) long
• Medium flat bladed screwdriver
• Pliers
• Tail cone assembly (P/N 14105284)
Also refer to Drawing 15100952, Option Kit, .25" Tailfin, "T", System 5000
throughout the procedure.
To replace the fixed tail cone assembly:
1.
Align rear center pin. This center pin is not part of the tail cone assembly and
is used with both the older collision tolerant tail cone and the new fixed tail
cone assembly.
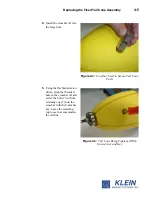
Figure 4-1:
Towfish Tail with Rear Center Pin
in Place
Summary of Contents for 5000 V2 Series
Page 24: ......
Page 48: ......
Page 62: ......
Page 73: ...A 3 Figure A 1 Cable Length vs Towfish Depth Graph 1...
Page 75: ...A 5 Figure A 3 Cable Length vs Towfish Depth Graph 3...
Page 77: ...A 7 Figure A 5 Cable Length vs Towfish Depth Graph 5...
Page 78: ......
Page 82: ......
Page 88: ......
Page 92: ......
Page 95: ...E 3...
Page 97: ...E 5...
Page 99: ...E 7...
Page 101: ...E 9...
Page 103: ...E 11...
Page 105: ...E 13...
Page 107: ...E 15...
Page 109: ...E 17...
Page 111: ...E 19...


