TJXTREME
Installation and Operation Manual
PG 28/36
REV: A (5/8/2020)
9.6.
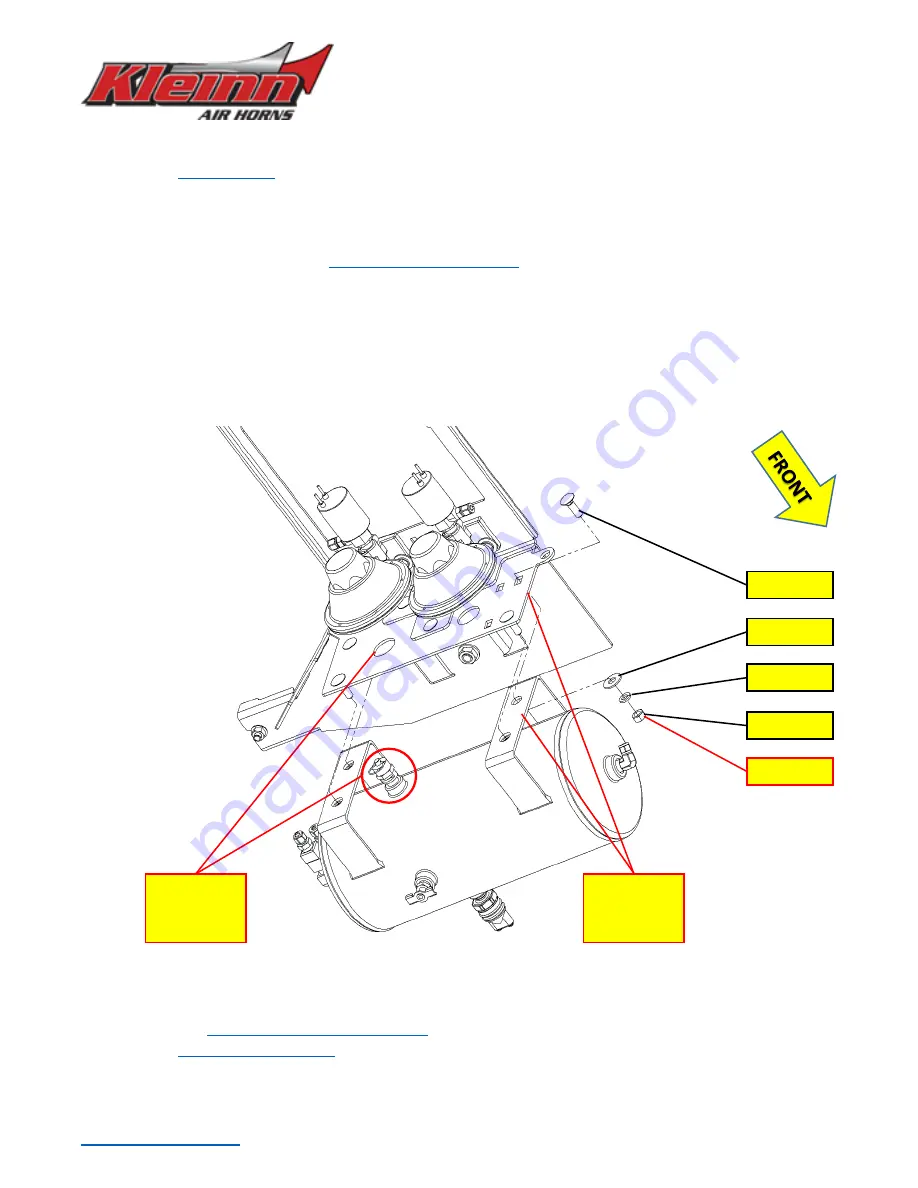
Install Air Tank
9.6.1.
into four (4) Tank Bracket slots, as shown below, then lift Air Tank into place over
Bolts. Ensure Tank is oriented properly with Pressure Switch toward Transfer Case.
NOTE:
If performing installation solo, use Vise Grips or clamp to temporarily hold Air Tank onto Bracket.
9.6.2.
With Air Tank in place install
, as shown below. Apply medium-strength
Loctite and tighten by hand only.
9.6.3.
Adjust Air Tank laterally and vertically, to ensure adequate clearance between Drive Shaft and inboard
Seat Bolt, respectively. Rotate Drive Shaft by hand to ensure at least
1/4” of clearance exists between
Air Tank fitting and Shaft throughout entire 360 deg rotation.
Final torque fasteners to 75 in-lbs
.
CAUTION:
It is paramount to ensure that Air Tank Safety Valve is properly inserted through opening hole
in Bracket and ring
is not interfering. Pull on ring to verify it’s centered through hole.
Figure 17
–
Installing Air Tank onto Bracket (TJ-201), Exploded View (No Air Tubing Shown)
9.7.
Connect Air Tubing to Air Tank
9.7.1.
Reference
Figure #9 Air Tubing Connections
9.7.2.
into small hole on Air Tank Bracket, and push Air Tubing from Compressor
through hole, trim to length and attach to Air Tank Fitting. Use of grease on Grommet will help insertion.
9.7.3.
Trim Air Tubing from Air Horn T-Fitting to length and firmly attach to proper Air Tank Fitting.
Ensure
Valve is
Centered
Vise Grip or
Clamp here
H9 (4)
H12 (2)
H10 (4)
H11 (4)
75 in-lbs


