background image


System Level


support


Driving situation (recommended)


UL (Ultra Low)


No support, system is activated


downhill


L (low)


Low support


In the plain


M (medium)


Medium support


Slightly inclines; headwind


H (High)


High support


Steep inclines; fierce headwinds


~

 (Ultra High) (while pedaling)


Strongest support


Steep ramps; violent gusts


Propulsion system of Klever Mobility


But this also means that you have either to pedal or press   
the TURBO button on the display bracket to retrieve   
power of the electric motor. 
 
This button functions as a starting and pushing aid to max.4     
km/h it helps you to accelerate from a standstill. It was designed   
as an aid when starting uphill or for the case that the wheel has   

to be pushed. 

6.2 Levels of support 


The propulsion system provides five levels of support available.   
Depending on topography, weather conditions and your own   
feelings, you can choose the power of the engine by using the   
PLUS (+) and MINUS (-) keys and the 

~

 (TURBO) button on the control   

panel (see Section 6.4 display.). 


13


When 

~


(TURBO) button is pushed without pedaling,   

“throttle” mode provides motor output for < 18 km/h at H; < 12 km/h at M; < 4 km/h at L.   

Summary of Contents for B Speed

Page 1: ...he battery 31 6 4 4 Transport of the battery 32 6 5 Troubleshooting 32 7 The Bicycle 33 7 1 Saddle and handlebar adjustment 33 7 2 Headset 35 7 3 Suspension fork 36 7 4 Brakes 37 7 5 Drive and gearshi...

Page 2: ...l find all the important technical issues and details and further relevant information Should you have any further questions please ask one of our authorized dealers or contact our technical hotline w...

Page 3: ...f the brakes and the air pressure in the tires Launch of the electric drive Image 3 To start the propulsion system there are three ways to activate the system 1 Press and hold for 1 second the POWER b...

Page 4: ...riate supplied charger The battery can be charged on and off bike for removal the battery see Chapter 6 4 3 Connect the charger with the power cable and the power plug to the wall socket The LED on th...

Page 5: ...d care we have in this booklet carefully compiled for your information Please note the additional information in the instructions supplied with the components Pay particular attention to the bolded se...

Page 6: ...ion 168 2013 and rated as vehicle in category L1eB You can use it safely on public roads The additional electric drive is limited to max 45 km h and thus complies with the statutory requirements for a...

Page 7: ...www klever mobility com Tel 49 2234 93342 0 info klever mobility com Hereby confirms for the product B3 Commercial name B Speed Plus B Speed The conformity with regard to regulation EU No 168 2013 Su...

Page 8: ...th of the tires 5 Check the lighting system for proper operation 6 Check the tightness of the bolts and the wheels 7 Check the minimum insertion of the seat post Caution Do not start when you in one o...

Page 9: ...lf familiar with the traffic rules and stick to the rules Be ready to brake at any time and expect misconduct of others Drive defensively and be considerate to other road users Drive where it is alway...

Page 10: ...yday life Slops can be better managed and the wind resistance can be overcome better This electric auxiliary drive consists of the following components 1 Battery 2 Engine Motor 3 Control unit Display...

Page 11: ...motor output is temporarily shut off and will not automatically restored The system will shut off when the bike stops To restore the system from auto protection mode to normal operation press the powe...

Page 12: ...eve power of the electric motor This button functions as a starting and pushing aid to max 4 km h it helps you to accelerate from a standstill It was designed as an aid when starting uphill or for the...

Page 13: ...ble to activate your Pedelec with the E KEY of another bike There are two same E KEY on a bike after manufacturing Every press of a button will be confirmed with a short acoustic signal As soon as the...

Page 14: ...Location Function POWER Upper left edge On Off INFO Top left Switch between clock range trip odo and fitness PLUS Middle left Switch up support level MINUS Lower left Switch down support level TURBO L...

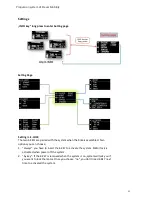
Page 15: ...INFO button shortly to switch among available items Defaults are time trip km day odo SOC and kcal Some examples of them are listed after Note The available items might depend on bike model and versi...

Page 16: ...the RESET Select trip then confirm by long pressing the ENTER button Image 7 odo Accumulated riding kilometers Image 8 example 1234 km Image 8 Km day Kilometers ridden since 00 00 every day Image 7 1...

Page 17: ...release the button the support from the motor stops immediately 2 As a turbo support while pedaling When you need extra support for a short period of time for example on a steep ramp press the button...

Page 18: ...tly needed Image 10 Additionally you can check the charging level with the LED on the front side of the battery See also Section 6 4 1 Charging the battery To save energy it s not possible to choose t...

Page 19: ...18 km h at H 12 km h at M 4 km h at L 20 Image 12 Speedometer Image 12 The main display will show you the current speed Regen Power Image 12 1 This will show you the regen power you get from the syste...

Page 20: ...e system when the bike is assembled Two options you can choose 1 always you have to insert the E KEY to activate the system Motor lock is activated when power off the system 2 by key If the E KEY is r...

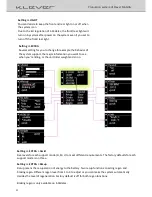
Page 21: ...ort the major information you want to see when you re riding or the unit rider weight and so on Setting EXTRA Assist Five levels for each support mode H M L to meet different requirements The factory...

Page 22: ...accessory and please ask Klever team or authorized dealers Setting EXTRA Bright The brightness of backlight can be adjusted Setting EXTRA Sound The volume of system sound can be adjusted Setting EXTR...

Page 23: ...has no memory effect you can charge it at any time even if it is not completely discharged In practice it has been shown that it is even better to charge it again after short distances of a few kilom...

Page 24: ...g Caution Do not put it on a heater do not heat with a hair dryer Caution Charge the battery only with the provided exclusively dedicated charger Do not use any other type of charging unit since this...

Page 25: ...rips Avoid temperatures below 10 C and above 45 C for a long time Never start with a cooled battery After an extended period about two months of storage the battery should be recharged Protect it from...

Page 26: ...cator LEDs on the charger and battery Connect the power cable from the charger to the charger Insert the power plug of the charger into the wall socket the LED lights solid red the charger is ready to...

Page 27: ...n Final charging 100 Steady green no LED Fully charged Battery and charger become warm during charging Ensure adequate ventilation of the battery and charger The vents should not be covered Place the...

Page 28: ...strong depending on the chosen level of support the technical condition of the bike oiled chain optimal tire pressure etc the total weight of the system bike rider and luggage to the topography of th...

Page 29: ...bracket on the frame Image 28a Now you can charge the battery separately or store it safely for a longer ride break We recommend you cover the battery connector by the rubber seal to prevent from wate...

Page 30: ...p the battery in such a manner that it cannot move around in the packing Please also observe possibly more detailed national regulations In every case of concerning transport of the battery please ref...

Page 31: ...wing lines Caution All work described require mechanic experience and appropriate tools Use to tighten the screws a torque wrench and never exceed the maximum torque of the screws All the necessary to...

Page 32: ...ortive the further your upper body is bent forward This leads to better aerodynamic but puts more stress on your arms wrists and your upper body and a worse comfort In order to optimally adjust the ha...

Page 33: ...adset and frame the headset has to be readjusted Headsets 35 Image 37 The Bicycle Attention The adjustment of the headset requires some experience It is the best the dealer should do this If you shoul...

Page 34: ...fork which increases your comfort and the safe handling of the bike The fork is set at the factory and ready to run A lock out lever that sits on the right side of the fork crown you can lock your sus...

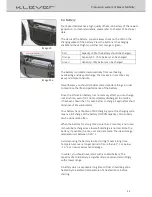
Page 35: ...break control front wheel break Not properly run in brakes do not reach their optimal deceleration values and prone to vibrations and loud squeal The brake pads and rotors must be regularly checked f...

Page 36: ...could lengthen slightly and the shifter must be readjusted With the adjustment screw of the shifting lever image 43 you can readjust the tension of the shift cable With the two positioning screws on t...

Page 37: ...s and leads to increased wear on the chain wheel and on the sprockets of the cassette The exact control of the chain should be carried out at the dealer who has the necessary tools to measure and repl...

Page 38: ...This should be done by an authorized dealer For removal and installation of the wheels due to a puncture or in the case of transportation you take the following steps Disassembly of the rear wheel Sh...

Page 39: ...events the accidental compression of the pads by the unintended application of the lever the assembly is done in reverse order During assembly please insert carefully the disc between the brake pads p...

Page 40: ...is between 2 0 bar 55psi load and 4 0 bar 55 psi load Regularly check the correct tire pressure before every ride and pump up if necessary The bike is standard equipped with an inner tube with Schrade...

Page 41: ...les 6 Repair the tube according to the instructions on the repair kit or if necessary replace it 7 Check the tire for sharp objects that could have caused the puncture and remove them If the fabric of...

Page 42: ...niers Please note however the maximum load capacity of the luggage rack of 20 kg With weights over 20 kg the luggage carrier may not be loaded Image 50 Caution Please ensure that you do not reach the...

Page 43: ...battery the display as well as other non fixed accessories such as Air pump and luggage bags Additional protection should be given to electrical contacts on the display holder and the battery connect...

Page 44: ...e to corrosion should be maintained and preserved by appropriate means The chain should be lubricated regularly like all other movable mechanical parts such as the joints of the rear derailleur Cautio...

Page 45: ...icated and well preserved in a dry place and cover perhaps additionally with a tarp Conserve the electrical contacts through some suitable care oil Winter storage in the garage is only partially recom...

Page 46: ...parately and returned to an environmentally friendly recycling The same goes for batteries according to the European Directive 2006 66 EC Please return broken or defective batteries to an authorized r...

Page 47: ...ED 35 red orange 35 75 75 Green Allowable discharge temperature 20 C 50 C Allowable storage temperature 12 months 20 C 25 C optimal 5 C 20 C Allowable charging temperature range 5 C 45 C 5 C optimal 2...

Page 48: ...40 Nm Clamp screw locking washer M5 Allen wrench 3mm 5 5 Nm Stand Clamp screw M10 Open end wrench 46 Nm max Brake lever Clamp screw M6 Allen wrench 5mm 9 5 Nm max Brake body Mounting screw M6 Allen w...

Page 49: ...e value gradually in steps of 0 5 Nm If necessary adjust the maximal value never exceed it and loosen the screw by half a revolution before finally tightening it Tools Toolsl Combination Wrenches Sock...

Page 50: ...ms are available if the fault was present before the purchase of the Pedelec in the case of a material manufacturing or information error if no function related wear was present see Chapter 14 Warrant...

Page 51: ...f borrowing and renting travel and transportation costs or loss of profits are excluded This warranty does not cover damages caused by misuse function by Wear and tear by accidental damage vandalism a...

Page 52: ...g and roadworthy regular reviews and inspections are required or necessary repairs should be made immediately Klever Mobility is not liable if the Speed Pedelec is used against its original purpose or...

Page 53: ...obstacle Regularly check the concentricity of the rim and the spoke tension If the wheel has a radial or axial offset it should be readjusted immediately In the event of breakage of a spoke the broken...

Page 54: ...participate in public transport the Speed Pedelec must be equipped according to the EU type regulation If the bike will be driven or purchased in a different country familiarize yourself with their na...

Page 55: ...tal accident 17 FAQs How far can I travel with one battery charge This is dependent on the temperature the topography of the terrain the technical condition of the total weight of the bicycle Tires wi...

Page 56: ...f properly It is best to take it to an authorized dealer How many times can I charge my battery We guarantee that the battery after 500 full charge cycles or two years from now owns 60 of the original...

Page 57: ...nt the pass in the case of warranty claims together with proof of purchase If your Pedelec is once stolen the data facilitate the work of the police Name Street Postcode Town Tel Email Type of bike Fr...

Page 58: ...Inspection After 3000 4000 km or later than 2 years after purchase Date Repairs Replaced components Date Stamp Signature 3 Inspection After 5000 7000 km or no later than 3 years after purchase Date Re...

Page 59: ...regarding the information and illustrations in this manual are reserved A liability of publishers and other third parties for contributions from this manual and the fact devoted damages of any kind a...

Reviews: