Assembly and Repair Instructions
page 1 of 5
release 0
RK-Proball KH 1T M
file:
provide: BNi
approval:
printed pages will not be updated
date: 01.01.2006
Assembly and Repair Instructions for KLINGER SCHÖNEBERG Ball Valves,
Type RK-Proball KH 1T M
Table of Contents
1
Validity ........................................................................................................................................................... 2
2
General Remarks........................................................................................................................................... 2
3
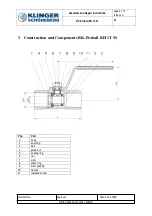
Construction and Components of the RK-Proball KH 1T M ........................................................................... 3
4
Assembly of the RK-Proball KH 1T M............................................................................................................ 4
4.1
Preparing for Assembly ........................................................................................................................ 4
4.2
Assembling the valve............................................................................................................................ 4
4.3
Function, Strength and Tightness Test................................................................................................. 4
4.4
Independent Conversion and Manufacture of Spare Parts................................................................... 4
4.5
Incorrect Operation............................................................................................................................... 4
5
Dismantling of the RK-Proball KH 1T M......................................................................................................... 5
5.1
Precautionary Measures....................................................................................................................... 5
5.2
Preparing for Dismantling..................................................................................................................... 5
5.3
Dismantling........................................................................................................................................... 5
5.4
Check of the Parts................................................................................................................................ 5

