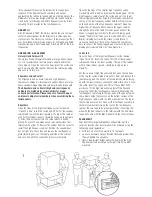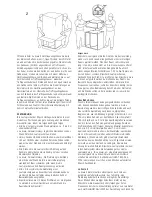
place it on top of the low frequency cabinet while placing the
low frequency cable toward the rear and out the gap between
the cabinets. Align the recesses on the bottom surface of the
high frequency cabinet with the rubber bumpers on the top of
the low frequency cabinet. Connect the low frequency cable to
the two screw barrier strip on the rear of the low frequency
cabinet. Be sure to observe proper polarity by connecting the
wire with the Red Indicator to the terminal with the Red mark-
ing and the wire with the Black indicator to the other terminal.
PLACEMENT
Your Klipsch Heritage loudspeakers will perform well in a
variety of locations but best results will be achieved using the
following general guidelines:
• All: Place on a common wall 6 to 15 feet apart.
• La Scala, Cornwall, Heresy: Position them equidistant from
the wall behind the speakers.
• Heresy: Equidistant height above the floor with the high
frequency drivers at seated ear height if wall or cabinet
mounted.
• All: Angle speakers toward the listener and even with or
forward of any adjacent obstructions.
• La Scala, Cornwall, Heresy: Placing them near a corner or
wall provides the greatest amount of bass while moving the
speakers away from room boundaries reduces bass energy.
• All: Asymmetrical placement of a pair of speakers from
adjacent side walls can smooth room-induced bass
unevenness.
• Experiment with the above guidelines to suit your taste and
to compensate for your room's acoustic characteristics.
Klipschorn
Klipschorn speakers typically perform best when positioned in
the corners on the long wall of a rectangular room. If the room
is very narrow and long with corners farther apart than 18 to
20 feet, the stereo image may not be optimal. A room with a
length to width ratio of 1.00 to .618 is preferred. In addition,
Klipschorn loudspeakers seem to benefit from ceiling heights
no lower than 8.5 feet. The Klipschorn requires corner place-
ment because the walls of the room serve to complete the
speaker’s low frequency horn. To achieve full low frequency
extension, the Klipschorn should fit tightly in a corner without
baseboard or trim interference and the wall surfaces should
extend at least 25 inches beyond the side grilles.
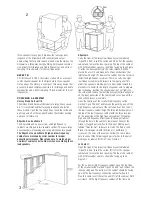
False Corners
If proper corners are not available in your listening room, false
corners can be constructed to yield bass performance similar
to a full corner and also allow for some adjustment of toe-in if
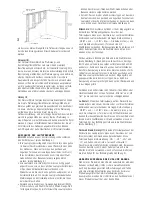
desired. Start with a 2’ x 4’ framework as shown in Figure 3.
Klipsch recommends using standard 4 foot wide sheets of
3/4” plywood securely glued and nailed to the framework. The
backside may be covered with a thinner material such as
3/16” masonite or 1/2” plywood. Paint to match wall color, or
finish with a laminate or other material. (See Figure 3.) In the
case of very wide spacing, a false corner can be employed on
one of the Klipschorns to reduce the distance between speak-
ers. Another solution to widely spaced Klipschorn loudspeakers
in an audio only system is the addition of a center speaker
such as the La Scala to create a three-speaker stereo array.
Please contact Klipsch Technical Support at 1-800-554-7724
for connection details.
La Scala II
The La Scala II features a self-contained, front-firing, folded
bass horn to permit placement out of the corner if required.
However, because this model has less bass extension than the
Klipschorn, the low-frequency acoustic reinforcement of corner
placement may be optimal. The La Scala also offers full flexi-
bility with regard to the amount of toe-in for the desired stereo
image. Deep bass performance may also be augmented with a
high performance Klipsch subwoofer.
Cornwall III
The Cornwall III offers the placement and toe-in flexibility of
the La Scala with low frequency extension similar to the
Klipschorn at a reduced output capability. As with the La Scala
and Heresy, corner positioning yields the greatest amount of
bass output while placements out of the corner or away from
rear walls will yield less bass. Since room acoustics and
personal taste vary we recommend experimenting with several
locations to fine tune the speaker’s performance. Self-stick
rubber pads are supplied for attachment to the bottom of the
riser for use on hard floors.
Heresy III
The Heresy III offers the greatest degree of placement flexibili-
ty of all of the Heritage models due to its relatively compact
size. It delivers the same basic frequency range as the La
Scala but at more modest output levels. Corner, floor place-
ment will deliver the highest degree of low bass reinforcement
and the slant riser base helps to compensate for the Heresy’s
short stature. This riser may be removed for shelf or cabinet
placement. Self-stick rubber pads are supplied for attachment
to the bottom of the cabinet to prevent scratching of shelves
and hard surfaces.
CONNECTING YOUR LOUDSPEAKER
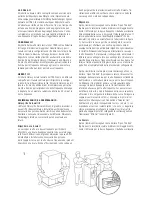
Caution
: Turn your amplifier off before making any
connections! (See Figure 4.)
• Your loudspeakers are equipped with positive (Red) and
negative (Black) connection terminals, on the rear or side
of the cabinet. These correspond to the positive and
negative terminals on the appropriate channel (left, right,
etc.) of your amplifier and will accomodate bare wire,
spade lugs or banana plugs (See Figure 4).
• All speakers in your system must be connected in phase
with the positive speaker terminal connected to the positive
amplifier terminal. Repeat this for the negative
speaker and amplifier terminals. Most speaker wire has
distinguishing markings on the insulation of one of the
conductors to assist in correct hookup.
• Use 16-gauge (AWG), two conductor, copper wire at a
minimum and larger gauge wire for longer runs. The
connection terminals on your loudspeaker will accommo
date bare wire, spade terminals or banana type plugs.
•
Caution:
With all connection types take care that there is
no contact between the positive and negative terminals at
the speaker and amplifier. Damage to your equipment
may result! (See Figure 4.)
Summary of Contents for Klipschorn
Page 1: ... Owner s Manual ...
Page 28: ...Chinese ...
Page 29: ...1 ...
Page 30: ...2 3 ...
Page 31: ......
Page 32: ...Japanese ...
Page 33: ...1 ...
Page 34: ...2 3 ...
Page 35: ......
Page 36: ...FIGURE 4 ...


