Assembly Instructions
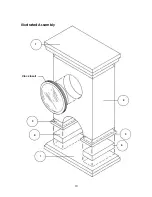
(Refer to Assembly & Front/Side Elevation Illustrations on
pages 10 and 11)
:
Once all parts have been machined, you may complete final
sanding (up to 220 grit) in preparation for assembly. Make certain to run through a dry-
run assembly (no glue) of all parts prior to proceeding with glue assembly. Once you
have completed dry assembly, you may begin with glue assembly of the wood parts.
Apply a thin layer of glue to the top surface of the clock body (Item 2) and allow it to
dry.
Note:
This initial coating of glue will help to seal the porous end grain of the top
surface of the clock body, and result in a stronger glue bond.
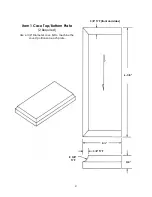
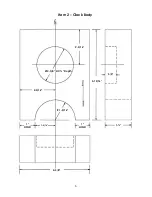
Apply a second, thin coating of glue to the top surface of the clock body (Item 2) and
mount it to the top plate (Item 1) as illustrated.
Note:
The coved portions of the top
plate should be facing down toward the bottom of the clock body. The body (Item 2)
should be centered side to side on the top plate, and the back surface of both parts
should be perfectly flush. Apply clamping and remove any excess glue with a
dampened cloth. Set the assembly aside to dry (refer to the listed dry time as
recommended by the glue manufacturer).
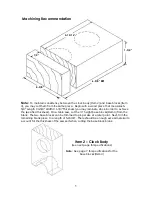
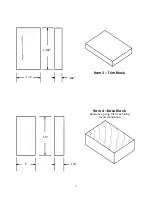
Once the glue has dried, you may remove clamping. Glue the trim blocks (Item 3) to the
bottom surface of the clock body (Item 2) on each side of the bottom arch. When
applying glue to the bottom surface of the clock body, use the same process described
previously to seal the porous end grain. The trim blocks should be mounted so that the
back surface of the body and trim blocks are perfectly flush. Note that the side and front
portions of each trim blocks should overhang the clock body by about 1/8” (as shown in
the front and side elevation illustrations). Apply clamping and remove excess glue with a
dampened cloth. Allow the assembly proper time to dry.
Once clamping can be removed, you may proceed to mount the base blocks (Item 4).
Once again, the top and bottom end grain surfaces of the base blocks should be sealed
with a thin layer of glue as described previously. Glue the base blocks (Item 4) to the
bottom surface of the trim blocks (Item 3) so that the back edges are perfectly flush. The
base blocks should be centered on the trim blocks so that the trim blocks overhang the
base blocks by 1/8” on the front and sides (just as with the clock body). Apply clamping
and remove any excess glue. Allow proper drying time.
Once clamping can be removed, you may mount the bottom plate (Item 1). If you
have not done so, seal the porous end grain of the bottom surface of the base blocks
(Item 4) as described previously. Apply a second, thin coating of glue to the bottom
surface of the base blocks and mount the assembly to the base plate (Item 1).
Note:
The coved portions of the bottom plate should be facing up towards the top of the
assembly. Make certain the back surface of the clock assembly and bottom plate
(Item1) are perfectly flush, and make certain to center the clock assembly side to side on
the bottom plate. Apply clamping and remove any excess glue. Allow the assembly to
dry.
Finishing:
Complete any final sanding in preparation for staining and finishing.
If you
have not done so already, sand the entire assembly with 150 grit and 220-grit sandpaper,
sanding with the grain. Take a moment to carefully inspect the assembled case for any
traces of glue residue that may restrict stain penetration. Be sure to remove any glue
residue by sanding lightly with fine grit sandpaper. Also, make certain to sand areas that
were dampened to remove excess glue. Remove all sanding residue with a clean, dry,
lint-free cloth.
There are numerous stains and finishes available on the market. No matter what
products you decide to use, please take ample time to study and choose the best
8


