background image


SECTION 9 

HYDRAULIC SYSTEM


Nov 2002 

p. 9-1


05148416 


9


Features 

In addition to “slow start”, other features of the hydraulic system are 
listed below: 


Hydraulic 4-way valve – 

directional control valve (DCV)–solenoid–

operated.  Used for HP cylinder shifting. 


Close - coupled motor/hydraulic pump –

 pump mounts directly to 

the motor, saving approximately 8-10 inches of length on the overall 
pump/motor assembly, reducing footprint of the waterjet pump 
package.  The pump is directly coupled to the motor rather than a 
conventional standalone housing and shaft coupling assembly.  


Reference hydraulic gage – 

used for adjusting pressures in the 

HI/LO relief valves.  Displays hydraulic pressure, as well as water 
pressure in multiple units directly at the pressure adjustment knob. 


Built in hydraulic oil drip pan – 

allows for the spills to be contained 

within the machine while addressing environmental issues of mixing 
water and oil. 


Remote dual pressure control – 

allows for flexibility at the cutting 

nozzle in pressure adjustments for certain pure water/abrasive 
applications.


Pressure adjustment control – 

allows for infinite pressure settings 

though out the entire pressure range for flexibility.


9.1


Components 

Following are the hydraulic system components: 

Summary of Contents for STREAMLINE SL-IV PLUS

Page 1: ...Printed 12 21 04 49836299 doc STREAMLINE HIGH PRESSURE WATERJET PUMP OPERATION and SERVICE MANUAL SL IV PLUS 50 HP Stripped Proportional Pressure Manual No 49835952 ...

Page 2: ... the information described in this manual to be accurate and reliable Much care has been taken in its preparation however the Company cannot accept any responsibility financial or otherwise for any consequences arising out of the use of this material The information contained herein is subject to change and revisions may be issued to advise of such changes and or additions KMT Waterjet Systems 635...

Page 3: ... Seller Obligations 2 1 2 4 Installation Requirements Utilities 2 2 2 5 Equipment Location Environment 2 2 2 6 Service Connections 2 3 2 7 High Pressure Plumbing Installation 2 6 SECTION 3 OPERATION 3 Operation 3 1 SECTION 4 MAINTENANCE 4 Maintenance 4 1 4 1 Scheduled Maintenance 4 3 4 2 General Maintenance 4 3 SECTION 5 TROUBLESHOOTING 5 Troubleshooting 5 1 SECTION 6 LOW PRESSURE WATER SYSTEM 6 L...

Page 4: ...ulic Cylinder 7 25 7 4 HP Dump Valve 7 26 7 5 HP Attenuators 7 26 SECTION 8 ELECTRICAL SYSTEM 8 Electrical System 8 1 8 1 Sensor Solenoid Functional Descriptions 8 1 8 1 1 Motor Starter Circuit 8 1 8 1 2 Control Circuits and Logic 8 2 8 1 3 Operation 8 3 8 2 Maintenance Overview 8 5 8 2 1 Proximity Switch Service 8 5 SECTION 9 HYDRAULIC SYSTEM 9 Hydraulic System 9 1 9 1 Components 9 1 9 2 Operatio...

Page 5: ...tions 11 1 11 2 Torque Specifications 11 4 11 3 Cutting Water Specifications 11 5 11 4 Cooling Water Specifications 11 5 11 5 Orifice Support Capacity 11 6 SECTION 12 PARTS LISTS 12 Parts Lists and Drawings Electrical Schematic Diagram Hydraulic Schematic Diagram ACCESSORIES ...

Page 6: ... Intensifier Pumps Motor Horsepower Rating Plunger Quantity and Diameter inches Hp Kw Intensifier Model HP Water Max Oper Pressure psi 7 8 0 875 22 mm 1 1 8 1 125 29 mm Frame Dim L inches Redundant Option Available 30 22 SL IV 30 2 67 75 Yes 50 37 SL IV 50 2 67 75 Yes 60 45 SL IV 60 2 77 75 Yes 75 56 SL IV 75 2 77 75 Yes 100 75 SL IV 100D 4 77 75 No 100 75 SL IV 100S 60 000 2 77 75 Yes 1 1 Physica...

Page 7: ... with 10 micron double length filter High efficiency heat exchanger in independent recirculation pump circuit Stand alone unit with built in motor starter wye delta or across the line High pressure safety dump valve Dual pressure compensator 1 or 2 liters of high pressure attenuator volume Microprocessor control with diagnostic capability Water inlet shut off valve Booster pump Integral water and ...

Page 8: ...fer to Table 1 2 for HP water performance limits for various power levels of SL IV waterjet pumps TABLE 1 2 HP WATER PERFORMANCE SL IV WATERJET INTENSIFIER PUMPS 55 000 psi 60 000 psi Horsepower Orifice Size inches Flow Rate gpm Orifice Size inches Flow Rate gpm 30 0 011 0 60 0 010 0 52 50 0 014 0 98 0 013 0 88 60 0 015 1 12 0 014 1 02 75 0 017 1 44 0 016 1 33 100 0 020 2 00 0 019 1 88 The recircu...

Page 9: ... training is also available 1 3 1 Service Department To contact the KMT Waterjet Service Department USA Customer Service Manager Europe Technical Manager KMT Waterjet Systems KMT Waterjet Systems GmbH P O Box 231 Wasserstrahl Schneidetechnik 635 West 12th Street Auf der Laukert 11 Baxter Springs KS 66713 D 61231 Bad Nauheim USA Germany Phone 620 856 2151 Phone 49 0 6032 997 117 Fax 620 856 5050 Fa...

Page 10: ...nts Yes No 2 Is the unit a convenient size Yes No 3 Controls a Are the controls user friendly b Is the unit easy to operate Comments Yes Yes No No 4 Performance a Does the unit perform smoothly and meet your expectations Does the unit run quietly Comments Yes Yes No No 5 Did installation and start up go smoothly Comments Yes No 6 What feature s do you consider the most significant with this unit Q...

Page 11: ...uantity of the photos illustrations Comments Yes No Text 1 Does the information in the manual adequately explain how to operate and service the equipment Comments Yes No 2 Are there paragraphs or procedures you feel need clarification Please identify them by page number and add your comments Comments Yes No 3 Is there anything you would add or delete from the manual to make it more useful Comments...

Page 12: ... if the caution instruction is ignored Indicates the presence of a hazard which can cause severe personal injury death or substantial property damage if the warning instruction is ignored ISO 3021 High pressure waterjet can cause eye injury Wear eye protection when operating or working near machine Hazardous noise can cause hearing loss Wear ear protection when operating or working near machine IS...

Page 13: ...SECTION 1 INTRODUCTION Page 1 8 49831878 Rear of Waterjet Pump HP Water OUT Plant Air IN Cooling Water IN Cooling Water OUT Cutting Water IN Drain ...

Page 14: ...see if the power goes off Each device should be checked on a specified schedule Each time the device is checked it must function or be replaced before operating the system Apply High Purity Goop P N 10084440 to all threaded high pressure connections All tubing fittings and bolted connections should be torqued to recommended values Do NOT attempt to tighten or loosen a HP water fitting when the cir...

Page 15: ...sent Make sure the safety devices are operational To panic stop the pump and bleed the high pressure the EMERGENCY STOP buttons must be pushed in The system pressure dump valves must be open Do not attempt to touch or be exposed to high pressure water The high pressure water will penetrate all parts of human body without exception The liquid stream or material ejected by these extreme pressures ca...

Page 16: ... HP water present a jet of HP water will exit the nearest weep hole with possible hazardous results Use extreme caution when handling high pressure equipment Possible failure from fatigue cracking or over pressurization can result in a hazardous high pressure leak or component failure A flexible HP tube whip is frequently used on the cutting system to allow cutting nozzle movement Supports and gui...

Page 17: ... KS 66713 620 856 2151 Back Side This person has been working with water jetting at pressures to 55 000 psi 374MPa 3740 bar 3867 Kg cm2 with a jet velocity of 3 000 fps 914 mps Foreign material sand may have been injected with water Unusual infections with microaerophilic organisms occurring at lower temperatures have been reported such as gram negative pathogens as are found in sewage Bacterial s...

Page 18: ...rvices brought to the unit Provide and install power drops with fused disconnects sized to the equipment power requirements Provide and install pneumatic drops with manual shutoff valves Provide all mounting and support brackets and hardware for high pressure tubing runs Provide and install water conditioning equipment necessary to meet water purity requirements Provide and install manual shutoff ...

Page 19: ...nt The SL IV waterjet pump must be installed indoors Ambient conditions must not exceed maximum specifications Moving The SL IV waterjet pump has provisions to be moved with a forklift Check weight specifications The waterjet pump is top heavy Avoid situations that could result in the equipment tipping or overturning Electrical connections must be made by qualified personnel and must meet national...

Page 20: ...ng must meet national and local piping codes Prior to operation insure that the cutting water meets minimum standards listed in Section 11 Specifications Operation without proper water quality will shorten the life of certain intensifier parts and void their warranty Use only plastic or copper plumbing from the cutting water source to the SL IV PLUS pump cutting water supply filter Thoroughly purg...

Page 21: ...vation of EMERGENCY STOP will be discharged from the intensifier drain port and must be piped to an appropriate location i e sewer line The volume of water released will be minimal and will not require high pressure plumbing Piping must meet national and local piping codes Compressed Air The facility air connection to the SL IV Pump should provide clean dry air at 85 PSIG Air usage is minimal and ...

Page 22: ...times the tube engagement length in the following table Cut tubing to length and deburr High pressure piping and fittings rated for 4 138 bar 60 000 psi must be used Failure to do so may result in component failure causing equipment damage personal injury or death Tube Engagement Length HP Tube Diameter inch Engagement Length EL mm inch 1 4 12 7 0 50 3 8 17 5 0 69 9 16 21 3 0 84 1 1 1 3 WARNING ...

Page 23: ...of the tube per following diagram and procedure Cone and Thread Dimensions O D Size mm inch I D size mm inch D max mm inch L max mm inch Thread NF LH 6 35 1 4 2 11 0 083 3 58 0 141 14 3 0 562 1 4 28 9 52 3 8 3 18 0 125 5 56 0 219 19 1 0 750 3 8 24 14 27 9 16 4 78 0 188 7 14 0 281 23 8 0 938 9 16 18 ...

Page 24: ...rence Cone and Threading Tool Item Description 1 Cutter Handle 2 Cutter Support 3 Feed Nut 4 Cutting Blades 5 Collet 6 Housing 7 Gland Nut Tube Size inch 1 4 3 8 9 16 A mm inch 3 30 0 13 4 07 0 16 7 11 0 28 Coning Tool IR Part 10079556 10097418 10079663 Threading Tool IR Part 10079697 10097434 10097442 ...

Page 25: ...lockwise until cutting blades 4 contact end of tubing Rotate the cutter handle 1 in a clockwise direction while simultaneously turning the feed nut 3 in a clockwise direction at a rate to assure that the cutting blades 4 are taking a light cut at all times Continue rotating cutter handle until feed nut bottoms on housing 6 then rotate cutter handle several more revolutions to face off the end of t...

Page 26: ...the tubing 1 as shown and lubricate the threads with a light coat of High Purity Goop Thread the collar 3 on the tubing until one to two threads are exposed between the collar 3 and the tube cone 2 Lubricate the male threads of the gland nut with High Purity Goop Insert the tubing assembly into the fitting engage the gland nut and tighten finger tight 3 Tighten the gland nut to the specified torqu...

Page 27: ...not subject the tubing to torsional rotational stress To do so will cause premature failure 1 Slip the gland nut 2 and the anti vibration collet 4 on the tubing 1 Thread the collar 3 on the tube until one to two threads are exposed between the collar and the tube cone 2 Lubricate the male threads of the gland nut with High Purity Goop Insert the tubing assembly into the fitting engage the gland nu...

Page 28: ...odel SL IV PUMP OPERATION STRIPPED PROPORTIONAL PRESSURE CONTROL Note all operational control functions for this KMT Watertjet SL IV pump are provided by the motion cutting table box OEM For a description of the KMT Waterjet model SL IV pump sensors and solenoids see Section 8 Electrical Systems ...

Page 29: ...ding electric motor and hydraulic valve manifold block The pump is a variable displacement axial piston and pressure compensated type Recirculation Pump including a fixed displacement gear type pump oil to water heat exchanger hydraulic return line type filter and related hydraulic hoses and fittings The gear pump mounts to the back of the variable piston pump which has a through shaft Booster Pum...

Page 30: ...CE July 2002 p 4 2 49836224 Item Description 1 Hydraulic Pump 2 Recirculation Pump 3 Booster Pump 4 Intensifier Assembly 5 Control Panel 6 Intensifier Ass y Redundant Option 7 End Closure Detail Plus Intensifier T series ...

Page 31: ...s Cooling Water Inlet Outlet Oil Water Heat Exchanger X F Motor Bearings Lube Hydraulic Power Unit X R Lubrication Filter Checks Hydraulic Filter Hydraulic Oil Tank X X R Electric Motor F L Vibrations Rotating Equip Hydraulic Pump F Splined Shaft Service Motor Pump Connection Motor Female Spline Piston Pump Male Spline L2 Hydraulic Pump F HP Tubing Valves Fittings F Hydraulic Manifolds Hydraulic I...

Page 32: ...hould be kept Work Area Maintain a clean work area for repair and maintenance of the waterjet pump Use a clean work bench in a dust and dirt free work area Use lint free material for wipe cloths When blowing off parts with compressed air use only clean dry air When flushing parts with a solvent use only clean filtered fluid Always use original Ingersoll Rand replacement parts for consistent perfor...

Page 33: ...any high pressure fitting After servicing any high pressure components flush the high pressure water system by operating the waterjet pump for a short period with the nozzle valve open and no orifice in place Next shut down the waterjet pump install an orifice and slowly increase the discharge water pressure in stages Check all high pressure connections for leaks Unusual requirements should be ref...

Page 34: ...TION or HIGH TEMPERATURE BOOSTER PUMP bold letters indicate display messages Motor Overload Relay Tripped Find reason for overload Reset overload relay Inlet Water Valve Turned Off Reset water valve by pressing RESET on Run menu 5 1 2 Console Display and Lights Fail to Illuminate E STOP Button Depressed Pull out E STOP button Check all remote E STOP pushbuttons Push CONTROL POWER ON button white l...

Page 35: ...ng Light Message On Operator s Console Overstroke Check for HP piping leaks Check for HP seal leak Check air pressure Check booster pump pressure Check for HP check valve leaks Check for HP valve leaks Check for sufficient water supply Check for dump valve closure or seal leakage Check orifice condition and proper diameter Oil Temp Verify hydraulic oil tank temperature is above 620C 1440F Check ou...

Page 36: ...roper shifting of 4 way directional control valve Verify proper proximity switch operation 5 2 2 Hot Surfaces On HP Cylinder Components HP Discharge Check Leaking Inspect check valve seat poppet spring and spring guide condition and sealing head LP Inlet Check Valve Leaking Inspect check valve poppet spring o ring poppet retaining screw and sealing head Sealing Head or Plunger Check plunger and se...

Page 37: ... required with 600 emery cloth 5 2 4 HP Check Valve Leak If there are no visible HP water leaks but there are higher temperatures on HP cylinder or sealing head this indicates a HP or LP check valve leak Use corrective action listed in 5 5 for both discharge and inlet checks 5 2 5 Normal Temperature but Check Valve Problem Follow the instructions for HP check valve leak described in 5 5 5 2 6 HP C...

Page 38: ...flow through the exchanger Check operation and setting of water modulating valve Water Modulating Valve Setting Check and adjust setting of water modulating valve Compressing spring clockwise slows water flow and increases temp reducing spring tension counterclockwise increases water flow and lowers oil temp Heat Exchanger Clogged Flush heat exchanger improve flow of cooling water or replace heat ...

Page 39: ...pump OFF allowing HP water to remain trapped in HP piping and HP attenuator 5 Wait approximately 60 seconds to see if HP water pressure bleeds down 6 If gage pressure bleeds downward then one of the HP OUTLET check valves is the likely leak path NOTE If the HP water nozzle valve is leaking or if HP leaks exist elsewhere in the HP water manifold then the above test is less valid If the bleed down t...

Page 40: ...der either the LH INLET cutting water check valve or the RH OUTLET HP water check valve is at fault 8 Combining the results of the dead head bleed down test described in paragraph 5 5 2 above with the short stroke test described in steps 4 and 5 above determine which HP cylinder LH or RH HP OUTLET check valve is at fault NOTE The bolted flange metal to metal seal arrangement of the SLIV Plus seali...

Page 41: ...r Hydraulic Oil Cooling A minimum inlet pressure of 40 psig and 700 Fahrenheit maximum inlet temperature is required to maintain oil temperature under extreme operating conditions 6 2 Cutting Water Supply Refer to Figure 6 2 for a schematic diagram of the LP cutting The cutting water supply circuit Refer to the Parts Lists Section 12 for detailed component information on the LP cutting water circu...

Page 42: ...bar 60 psi T and Q series Water at booster pump outlet maintained at less than 128 deg F NOTE While the intensifier assembly reverses direction the booster pressure will fluctuate slightly above and below the normal setting Pressure fluctuation greater than 2 bar 30 psi may indicate inadequate water supply to unit or poor booster pump performance 6 2 2 Operation The cutting water enters the pump t...

Page 43: ... 5 is located ahead of the booster pump to protect the pump as well as the intensifier and other HP components The filter gages 4 and 6 indicate the condition of the filter A difference of 1 bar 15 psi indicates a dirty filter element that should be replaced Item Description 1 Booster Pump 2 Temperature Sensor 3 Pressure Control Valve 4 Pressure Gage 5 Filter Head 6 Pressure Gage 7 Orifice 8 Filte...

Page 44: ...SECTION 6 LOW PRESSURE WATER May 2003 6 4 05148390 Figure 6 2 LP Cutting Water Supply Circuit ...

Page 45: ...5148390 Figure 6 3 LP Water Cooling Circuit Item Description 1 Water Oil Heat Exchanger 2 Water Modulating Valve 3 Hydraulic Filter 4 Hydraulic Reservoir 5 Recirculating Hydraulic Pump 6 Water Booster Pump 7 Main Hydraulic Pump 8 Electric Motor ...

Page 46: ...t the booster pump outlet is too high then temperature switch 2 activates an automatic shutdown circuit in the PLC that stops the main electric motor pumps stop rotating Note that temperature switch 2 is located on manifold 18 for Q and later T series KMT Waterjet pumps but is located on the booster pump for earlier series pumps see Detail A Figure 6 2 e If water pressure to the booster pump inlet...

Page 47: ... water clean for proper operation it is necessary to replace the water filter and or adjust the booster pump The guidelines for servicing these parts are described below 6 3 1 Water Filter Service Replace filter elements when there is a 1 bar 15 psi pressure differential between gages 4 and 6 Components Bleed Valve Element Head Housing Recommended Tools Supplied filter thread unthread tool to turn...

Page 48: ... pressure control knob Container To capture some water spill Rags Parts None required Booster Pump Adjustment Procedure 1 Turn on cutting water supply 2 Start waterjet pump and observe booster discharge pressure 3 Stop waterjet pump and press E Stop button 4 Remove acorn nut from the side of the booster pump and turn screw clockwise to increase pressure or counter clockwise to decrease pressure 5 ...

Page 49: ...on 11 7 1 Components The HP water components include the hydraulic intensifier HP attenuator s HP dump valve HP pressure indicator optional and HP piping Maintenance on the intensifier is discussed in detail in this section In addition to HP components and assemblies the hydraulic cylinder features of the intensifier are discussed in this section Item Description 1 Bulkhead Fittings 2 Inlet Check ...

Page 50: ...hat HP attenuators are not considered to be serviceable by the customer Item Description 1 HP Cylinder 2 Plunger 3 Sealing Head 4 Hydraulic Cylinder Head 5 HP Seal 6 Ring 7 Ring Flange 8 Hydr Seal Cartridge 9 Retaining Flange 10 Stud Bolt 11 Cylinder Liner 12 O ring 13 End Flange 14 Retainer Ring 15 Hydraulic Cylinder 16 Back up Ring 17 O ring 18 Cap Screw 19 Proximity Switch 20 Cap Screw 21 Pisto...

Page 51: ...e performed HP cylinder can be removed from hydraulic cylinder head HP plunger seal can be serviced After the pump has been reassembled then the HP water piping and LP water disconnect are reinstalled as follows 5 Slide inlet water collar over sealing head until it rests against the head nut Connect LP inlet water quick disconnect to collar 6 Install the HP water piping to the intensifier Check HP...

Page 52: ...rtup and cycling of intensifier to extend and stop toward the disconnected proximity switch Shut off the pump shut off LP water supply observe LOCK OUT TAG OUT safety rules Before performing maintenance on the waterjet pump observe electrical LOCK OUT TAG OUT procedures 2 Disconnect HP and LP piping hoses per paragraph 7 2 1 above 3 With support cradle tool located under HP cylinder jug unthread a...

Page 53: ...no further need to flush air from lines 7 2 3 Stud Nuts and End Flange Sealing Head Disassembly Re assembly NOTE KMT Waterjet recommends removing the HP cylinder sealing head flanges AS AN ASSEMBLY for servicing the plunger HP seals plunger hydraulic seals etc KMT Waterjet DOES NOT recommend loosening stud nuts except to service the sealing head inlet HP check valve cone seat etc Refer to Table 7 ...

Page 54: ... flange Install sealing head and end flange over stud bolts and into cylinder bore Note that end flange should be oriented with the LP water fitting oriented near the 9 o clock or 3 o clock positions for ease of making the LP water connection 3 Thread nuts onto studs to hand tightness Apply molygrease to stud threads Table 7 2 item 3 Verify end flange and ring flange are parallel to within 0 070 i...

Page 55: ... HP cylinder for approximately 1 inch into bore Sand any obvious ridges or grooves with 600 grit wet dry sandpaper Note that grooves or ridges are typically caused by seal debris buildup rather than by marks in ID wall of HP cylinder 6 Inspect plunger surface for flaws Rotate plunger 360 degrees by hand while viewing light reflection on plunger surface to note any dullness streaks pits or other de...

Page 56: ...m Ft Lb 1st Stage Hand Tight Hand Tight Hand Tight Hand Tight 2nd Stage 135 100 135 100 3rd Stage 200 150 200 150 4th Stage 257 285 190 210 257 285 190 210 Max Out of Parallel 1 8mm 0 070 1 8mm 0 070 Socket Wrench Size 1 7 16 1 7 16 Table 7 2 Lube Specs KMT Intensifier Pumps Item No IR P N Description Applications 1 10087385 FML Grease White Lube Parts HP Cylinder 2 10084440 High Purity Goop SS Th...

Page 57: ...c Cylinder Head Ref Part No Æ 7 2 1 7 2 1 7 2 2 7 2 3 7 2 5 7 2 6 1 Outlet HP Check Valve Sealing Head Yes No No No No No 2 Inlet HP Check Valve Sealing Head Yes Yes No Yes No No 3 HP Plunger Seal HP Cylinder Yes Yes Yes No No No 4 Hydraulic Seal Cartridge Plunger Hydraulic Cylinder Head Yes Yes Yes No Yes No 5 Sealing Head Cone Seal Sealing Head Yes Yes No Yes No No 6 HP Cylinder Yes Yes No Yes N...

Page 58: ...ex flats of tool with pins Force tool by hand under pins then rotate tool slightly to cause pins to retract enough to release plunger Plunger can now be extracted from hydraulic piston See Section 7 3 5 for servicing the plunger 5 To install new plunger slip cartridge plunger removal tool over plunger hex end toward plunger button to help center plunger in cylinder head Position plunger in mating ...

Page 59: ... flats provide a small lip for loosening the cylinder head 5 To remove the hydraulic piston 21 from the hydraulic cylinder 15 remove one cylinder head remove the proximity switch toward that end On the opposite end remove the HP cylinder and end cap then remove the retainer flange and hydraulic cartridge The piston must be driven from the cylinder bore due to the seal squeeze and friction Use a pl...

Page 60: ... HIGH PRESSURE WATER May 2003 p 7 12 49831951 Item Description 1 Cylinder Head 4 Bushing Retainer Flange 2 Plunger 5 Retaining Ring 6 Hydraulic Cylinder 3 Hydraulic Cartridge Plunger Seal 7 Plunger Removal Tool ...

Page 61: ...p 7 13 49831951 Item Description 2 Plunger 9 Bushing Retainer Flange 18 Cap Screw 4 Cylinder Head 19 Proximity Switch 15 Hydraulic Cylinder 20 Cap Screw 16 O ring 21 Hyd Piston Assy 8 Hyd Cartridge Plunger Seal Assy 17 Backup Ring 28 Spacer ...

Page 62: ... serviced with the sealing head either installed in or removed from its intensifier HP cylinder 1 Remove the gland nut from the sealing head using a pair of wrenches 2 When the gland nut is removed the spring guide and spring will normally stay in the gland nut The seat is removed with a magnet Inspect the seat for damage or cracking A cracked seat should be replaced The seat is symmetrical and ca...

Page 63: ...SECTION 7 HIGH PRESSURE WATER May 2003 p 7 15 49831951 Item Description 1 Sealing Head 2 Poppet 3 Gland Nut 4 Poppet Seat 5 Spring 6 Guide Pin ...

Page 64: ...g head The gland nut should be hand tightened until there is a gap of 5mm 0 20 between the gland nut and sealing head No threads should show If the gap exceeds 5mm 0 20 then one of the parts has slipped out of place and they must be removed inspected and reassembled 6 Using a crowfoot torque wrench combination torque the gland nut to 176 Nm 130 ft lbs 7 Reconnect high pressure and low pressure pip...

Page 65: ... head If both sides are worn replace poppet 4 Assemble poppet 2 and spring 7 on poppet retainer 11 Apply small amount of Locktite 222 thread locker to thread of poppet retainer taking care not to get Locktite on poppet or other inlet check valve sealing surfaces 5 Tighten poppet retainer 11 using 1 2 in flat blade screwdriver taking care not to twist off poppet retainer If torque wrench tools are ...

Page 66: ...SECTION 7 HIGH PRESSURE WATER May 2003 p 7 18 49831951 Item Description 1 Sealing Head 2 Poppet 3 Gland Nut 5 Seal Head Spacer 6 Flange Ring 7 Suction Spring 9 End Flange 11 Retainer ...

Page 67: ...on Refinishing the seal head inlet poppet face is mandatory when rebuilding the sealing head Using a piece of plate glass not window glass on a sturdy table place a piece of 400 grit wet dry sandpaper atop the plate of glass which provides the absolutely flat surface necessary for the polishing process Using even deliberate strokes polish the sealing head until smooth Rotate the head about 10 15 d...

Page 68: ...unning a fingernail across it will cause it to appear as a surface flaw It is usually necessary to clean the area before performing an inspection 4 Use 600 grit wet dry sandpaper to polish HP cylinder inside diameter where the seal will locate Polish only in a circumferential motion Do not polish or drag the sandpaper along the length of the cylinder Hold the sandpaper on the end of your finger an...

Page 69: ...ce or the outboard end can become smeared with stainless steel due to contact with the bore liner If any of these conditions become severe the plunger HP seal and possibly the hydraulic seals will leak excessively Repair of plunger surface flaws usually cannot be accomplished on site KMT Watejet offers a plunger reconditioning service Item Description 1 Plunger Button 2 Plunger 3 Button Chamfer ...

Page 70: ...tridge body 1 surfaces for scratches signs of metal to metal contact deformation or other unusual wear Item Description 1 Cartridge Body 2 U cup Seal 3 O Ring 4 Back Up Ring 5 O ring 6 O Ring 7 Back Up Ring 8 U cup Seal NOTE It is important to examine the inside diameter surfaces of cartridge seal grooves for scratches especially any scratches in the axial direction that might offer a leak path Us...

Page 71: ...eals 2 8 so that they match figure above 2 Apply food grade grease to seals and cartridge seal components to aid in installation and seal seating Use installation tool if available for installation of U cup seals 2 8 Verify that U cup O rings are in place in their respective U cup seals after installation ...

Page 72: ...ure to the piston opposite side These check valves prevent hydraulic pressure from building behind the plunger button Replace Piston Seal 1 Remove bearing rings 10 and worn seal ring assembly 9 Do not scratch bottom surface of piston seal groove Scratches to the seal groove sides and or bottom can result in a hydraulic leak NOTE Use a smooth dull edged blade made from brass or similar soft relativ...

Page 73: ...tom of the plunger socket The bottom of this socket may show the impression of the plunger on it due to the high contact forces between piston and plunger This compression mark is normal Service Piston Internal Check Valves NOTE Check valve 4 servicing is not necessary unless there is suspicion of a problem If the check valves 2 each or piston internal passages must be serviced seal and pin servic...

Page 74: ... Hydraulic Piston Assy into Hydraulic Cylinder NOTE Piston seal assembly must be compressed before the piston assembly will slide into the hydraulic cylinder A ring compression tool such as shown in the figure below is recommended 1 Check that hydraulic cylinder bore is free grit or contamination and that the proximity switches are removed to prevent interference Lubricate piston bearing and seal ...

Page 75: ...SECTION 7 HIGH PRESSURE WATER May 2003 p 7 27 49831951 Item Description 15 Hydraulic Cylinder 20 Seal Ring Compression Tool P460 19 Proximity Switch 21 Hydraulic Piston Assy ...

Page 76: ...the hydraulic cylinder should be inspected for wear grooves and surface finish whenever the hydraulic cylinder heads are removed Excessive grooving on this bore is indicative of piston seal wear Item Description 1 Hydraulic Cylinder 2 Cylinder Head 3 Proximity Switch 5 Cap Screw 8 Back up ring 9 O ring 10 Spacer ...

Page 77: ...in the Parts Lists Section 12 see Figure 12 7 Bulkhead Piping Assy 7 5 HP Attenuator There is no servicing of the HP attenuator at the customer level The seals in the HP attenuator are tested at Ingersoll Rand to high pressure in excess of operating pressure making disassembly difficult In the event of a HP water leak of a HP attenuator the attenuator should be replaced The defective attenuator sh...

Page 78: ...SECTION 7 HIGH PRESSURE WATER May 2003 p 7 30 49831951 ...

Page 79: ...lly closed NC switch is located on the low pressure water filter assembly this pressure switch opens at approx 30 psi telling the PLC that there is insufficient pressure at the inlet to the cutting water booster pump This switch is intended to protect the booster pump from damage due to insufficient water supply pressure 5Y8 Safety High Pressure HP Dump Valve The HP dump valve is located on the fr...

Page 80: ... at the customer s operator console stripped pump versions 4Y1 4Y2 Directional Control Valve 4 Way Valve Solenoid s The hydraulic directional control valve DCV also called the 3 position 4 way valve is located near the main pump mounted to a manifold block A pair of 24 vdc solenoids operated a small DO3 size DCV which in turn directs hydraulic pilot pressure to the main spool of the DO8 sized DCV ...

Page 81: ...booster pump temperature switch is normally closed NC hence when it is exposed to temperature exceeding approximately 135 deg F the switch opens 3S5 3S6 RH LH Proximity Switches Proximity switches 2 each per intensifier are mounted onto the outside diameter of the hydraulic cylinder portion of the intensifier These switches detect end of stroke of the hydraulic piston and send a signal to the PLC ...

Page 82: ...SECTION 8 ELECTRICAL SYSTEM Aug 2002 p 8 4 49836323 ...

Page 83: ...on 1 Electrical Harness Sensor Control 2 Cable Cutting Water Supply Solenoid 3 HP Shutoff Dump Valve 4 Cable 2 ea Directional Control Valve 5 Cable HI LO Pressure Solenoid 6 Cable Proximity Switch Sensor Single Intensifier 7 Cable Proximity Switch Sensor Redundant Intensifier 8 Motor Electrical Hookup 9 Cable Hot Booster Pump Temperature Sensor 10 Electric Motor 11 Cutting Water Inlet Shutoff Valv...

Page 84: ...ity Switch Service If the pump quits pumping water the proximity switch may need to be replaced Check the LED lights on the switch Symptoms of a failed proximity switch are 1 the LED lights do not change state indicating not sensing the piston or 2 the LED lights are continuously flashing Replace the switch when failure occurs Components 1 Intensifier Assembly 2 Piston 3 Proximity Switch 4 Hydraul...

Page 85: ...p 8 7 49836323 Replace Proximity Switch 1 Turn off waterjet pump disconnect and LOCKOUT electric power 2 Disconnect cable 3 Unscrew bolts remove proximity switch 4 Install new switch Install bolts 5 Torque bolts to 16 18 Nm 140 160 in lbs ...

Page 86: ...andalone housing and shaft coupling assembly Reference hydraulic gage used for adjusting pressures in the HI LO relief valves Displays hydraulic pressure as well as water pressure in multiple units directly at the pressure adjustment knob Built in hydraulic oil drip pan allows for the spills to be contained within the machine while addressing environmental issues of mixing water and oil Remote dua...

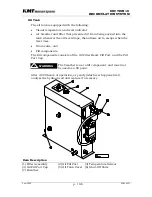
Page 87: ...tch between pressures at the operator s console Item Description 1 HI pressure control 2 LO pressure control 3 Fixed relief valve 4 Gage 5 Manifold 6 Pump 7 Motor 8 Directional Control Valve 9 Hydraulic Cylinder 10 Hi Lo Solenoid Valve 9 2 Operation The hydraulic system operates at HI or LO pressure settings up to the maximum flow capacity of the variable displacement piston pump Upon ...

Page 88: ...o reverse direction of movement of piston until activating the opposite end of stroke proximity switch Although one DCV supplies hydraulic power to two intensifier hydraulic cylinders arranged in parallel these cylinders operate at approximately the same cycle rate due to logic built into the PLC see Section 8 Electrical System 9 2 1 Hydraulic Pressure Adjustment A variable displacement pressure c...

Page 89: ... Decrease Maximum Minimum High Pressure 1 Clockwise Counterclockwise 207 3 000 1 7 25 Low Pressure 2 Clockwise Counterclockwise 103 1 500 1 7 25 Main Relief 3 Fixed Fixed 234 3 400 Not applicable NOTE Do not adjust the HI pressure control to pressures greater than 207 bar 3 000 psi Doing so will cause the main relief to open limiting hydraulic pressure to 234 bar 3 400 psi Also due to excessive op...

Page 90: ...il and filter maintenance see Section 10 Recirculation System The hydraulic system components that require periodic maintenance are the motor and the manifold The motor needs to be serviced every 5000 hours of use The operating pressure settings of the manifold needs to be checked daily and adjusted if necessary Recommended Tools Manual Grease Gun Open End Wrench 14mm 9 16 Rags Parts Bearing Greas...

Page 91: ...se pressure and counterclockwise to decrease Lock in place with nut 9 3 3 Motor Pump Coupling Spline Lubrication Recommended Annual Service Procedure Special Tools and Supplies Optimal Spline Lubricant IR P N 10184802 Cleaning Solvent Miscellaneous Wooden Blocks Shop Rags Spare Shaft Seal See Table Below Shaft Seal Part No s Hydraulic Pumps Model kW hp Piston Pump Displacement cc s rev Shaft Seal ...

Page 92: ...l control harness to the top pan should be removed to allow the electrical control panel 6 Wipe residue from motor internal spline and from male pump splines Avoid damage to shaft seal on hydraulic pump 7 Inspect splines for unusual wear Consult with KMT Waterjet Service if spline wear appears beyond limits 8 Note presence of hydraulic oil or evidence of hydraulic leak in shaft cavity If hydraulic...

Page 93: ...ides a separate heat exchanger Whether mounted on the pump or separate the gear pump supplies oil flow to the heat exchanger then to the oil filter Oil filter assembly includes a gage to show the filter element condition It also includes a bypass or relief valve should the filter element be allowed to become entirely clogged with dirt contaminants 10 2 Operation The recirculation pump 1 takes oil ...

Page 94: ...ture at least 115 deg F within the above conditions the oil filter should be replaced when the indicator reads 40 psi or greater Continued operation at a pressure differential greater than this level will result in hydraulic oil bypassing the filter element When adding hydraulic oil to the reservoir use the oil fill fitting located next to the oil filter A suitable filter buggy is recommended for ...

Page 95: ...il temperature is factory set at 46 C 115 F based on the temperature and flow of cooling water at the factory Field adjustment may be necessary 10 3 System Pressure Protection System pressurization over 4 2 bar 60 psi is prevented by relief valve 8 located on filter head 5 ...

Page 96: ...the filter element when it indicates that it is time The hydraulic oil should be changed after 2 000 hours or 1 year of service whichever comes first or whenever a fluid sample indicates that it is contaminated and beyond being fixed by simply operating the filter Parts Hydraulic Oil General service use Mobil DTE Heavy Medium No 021029 part 05022702 Food service use Conoco AA 20 part 49835762 Oil ...

Page 97: ...Change the filter element when the pressure gage reads 40 psi or greater Components 1 Oil Filter Head 2 Element 3 Pressure Gage Parts Element Tools Filter Wrench Rags Container to collect oil spills Replace Oil Filter 1 Unscrew element from filter head with the filter wrench 2 Oil gasket of new element 3 Screw new element on head 4 Start pump and check for leaks ...

Page 98: ...cape when the level rises Drain valve and Fill components The fill components consists of the Oil Filter Head Fill Port and the Fill Port Cap The breather is not a fill component and must not be used as a fill point After 2 000 hours of operation or yearly whichever happens first analyze the hydraulic oil and replace if necessary Item Description 1 Filter Assembly 2 Oil Fill Port 3 Temperature Sen...

Page 99: ... assure clean filtered oil is pumped into the tank Oil must be filtered through an equivalent filter such as a 10 micron filter element or see filter element in figure 12 in section 12 Failure to do so will cause damage to the primary hydraulic components voiding the warranty 5 Check oil sight gage to assure proper fill level Remove hose cap fill port 6 Remove the plug of the main hydraulic pump c...

Page 100: ...imum Operating Temp 95 95 Electrical see note 3 Motor type TEFC TEFC see note 4 200 3 50 92 150 208 3 60 88 144 240 3 60 80 130 400 3 50 46 75 415 3 50 44 72 480 3 60 40 65 Voltage Service Amps 575 3 60 32 52 Volts Phase Hertz Amps Sound Level 72 5 72 5 dB A see note 5 Note Specifications listed below apply equally to 30 hp and 50 hp models Controls Voltage 24 volts DC Power Supply 10 amps DC Safe...

Page 101: ...re must be maintained within operating specifications 2 When relative humidity is above 50 frequently check oil in tank for water content 3 Not all motor voltages are readily available check with factory for availability 4 Totally enclosed fan cooled 5 Sound level per TUV report DE1 I 9047401 ...

Page 102: ...ar psi Maximum inlet pressure 7 100 bar psi Maximum outlet pressure 8 3 120 bar psi Maximum inlet temperature 29 85 C F Optimum inlet temperature 18 65 C F Factory Booster Pump Settings Inlet Pressure 4 58 bar psi Outlet Pressure Set at 8 3 120 bar psi see Note 8 Cutting Water Out 2 4 0 63 3 8 1 0 l min gpm 55 000 Maximum flow rate 2 2 0 58 3 4 0 9 l min gpm 60 000 Note Specifications listed below...

Page 103: ... larger than 10 microns upstream of the filter for each particle per ml greater than 10 microns downstream of the filter Note 7 ISO 4406 fluid cleanliness ratings 17 1 300 particles per ml 25 microns 14 160 particles per ml 15 microns Note 8 Booster pump discharge pressure is dependent on inlet pressure ...

Page 104: ...P Fitting Gland Nuts 1 4 Nut 34 25 5 8 Crowfoot 3 8 Nut 67 50 13 16 Crowfoot 9 16 Nut 149 110 1 3 16 Crowfoot See Section 7 for complete tightening procedure NOTE Measurements are made with lubricated components and a calibrated torque wrench Inconsistencies in wrench settings lubrication and technique may not produce a leak tight seal If leakage persists increase the torque until the components s...

Page 105: ...mg l 25 25 10 Oxygen mg l 2 1 0 1 pH Value 6 5 8 5 6 5 8 5 6 5 8 5 Silica mg l 15 10 1 Sodium mg l 50 10 1 Sulfate mg l 25 25 1 Total Dissolved Solids mg l 200 100 5 Total Hardness as CaCO3 mg l 25 15 1 Turbidity NTU 5 5 1 Do not reduce beyond this amount or the water will become too aggressive 11 4 Cooling Water Specifications Depending on the type of cooling system closed recirculation once thro...

Page 106: ...quilibrium with respect to calcium carbonate 11 5 Orifice Support Capacity The SL IV Waterjet Pump supplies high pressure HP water up to 3 800 bar 55 000 psi The following table shows size ratings and maximum quantity of orifices that can be supported Qty of Orifice by size 1 Rated power kW hp Pressure Bar Psi Flow lpm gpm 14 13 11 10 9 7 5 22 30 3 800 55 000 2 4 0 63 1 2 4 22 30 4 100 60 000 2 2 ...

Page 107: ...ts Department Europe Spare Parts Manager KMT Waterjet Systems KMT Waterjet Systems GmbH Production Equipment Group Wasserstrahl Schneidetechnik 635 West 12th Street POB 231 Auf der Laukert 11 Baxter Springs KS 66713 0231 D 61231 Bad Nauheim USA Germany Phone 800 826 9274 Phone 49 0 6032 997 115 Fax 620 856 5050 Fax 49 0 6032 997 271 E mail wj_service kmtwaterjet com E mail Spares waterjet kmtwater...

Page 108: ...n these parts lists Table 12 1 Part Description Abbreviations and Nominal Size Guide Item Description Item Description Assy Assembly Mm sq Square millimeters 1 4 9 16 3 4 Nominal sizes in fractions of an inch eg 1 2 NPT 0 50 inch national pipe thread or 9 16 HP tube 0 56 inch OD HP tubing or tube fitting JIC 37 degree flared threaded Hydraulic fitting JIC standard typically used on Hydraulic hose ...

Page 109: ...ping 49837156 12 17 12 8 Hydraulic Manifold Assembly 05071766 12 19 12 9 Bulkhead Piping 49835937 12 21 12 10 Pneumatic Valve Assembly 05069703 12 23 12 11 Low Pressure Filter Assembly 49838378 12 25 12 12 Hydraulic Power Unit 49834229 12 27 12 13 Motor Pump Assembly 05071758 12 29 12 14 Reservoir Assembly 05085659 12 31 12 15 Top cover Assembly 05124920 12 33 12 16 Electrical Assembly 80073844 12...

Page 110: ... 1 49835937 Bulkhead Pipe Assembly 10 1 05143714 Frame Assembly 11 1 05085659 Reservoir Assembly 12 1 05124920 Cover Assembly 13 1 49834229 Hydraulic Power Package 14 1 80076839 Hydraulic Hose Connections 15 05022702 Hydraulic Fluid 16 05072582 Stripping 17 05072590 Stripping 18 4 05059605 Spring 19 4 05090857 Spring Bracket 20 4 05072293 Spring Bracket 21 8 95099024 Btn Hd Scr 10 24 x 3 8 22 8 95...

Page 111: ...SECTION 12 PARTS LISTS July 2003 page 12 5 49836349 ...

Page 112: ...44209 End Flange 14 2 05034798 Ring Retaining 15 1 05034764 Cylinder Hydraulic 16 2 10075000 O ring 17 2 05034855 Ring Backup 18 16 05141106 Cap Screw Socket Head M14x60 19 2 05127584 Switch Proximity 20 250 VAC VDC 20 4 10183572 Cap Screw Socket Head M6x1x22mm 316 304 Stainless 21 1 05132253 Piston Assembly Hydraulic 22 12 10069904 Heavy Hex Nut 7 8 9 23 2 05049812 Mounting Stem 25 8 05079652 Cap...

Page 113: ...SECTION 12 PARTS LISTS July 2003 page 12 7 49836349 ...

Page 114: ...ART No DESCRIPTION 1 1 05144357 Body Sealing Head 2 1 05144662 Poppet Inlet Cutting Water 3 1 05116777 Gland HP Sealing Head 4 1 05112768 Seat HP Sealing Head 5 1 05116561 Poppet Valve HP Check 6 1 05144670 Retainer Poppet 7 1 05049863 Spring Compression 8 1 49884562 Spring Compression 9 1 05116751 Pin Guide ...

Page 115: ...SECTION 12 PARTS LISTS July 2003 page 12 9 49836349 ...

Page 116: ...2261 Body Hydraulic Piston 2 12 05074380 Pin Clevis 3 2 05049887 Screw Set Socket with Through Hole 4 2 10148757 Valve Check Cartridge with O ring 5 49877509 Adhesive Thread Locker 6 2 05088364 Ring Snap Flat Wire 7 2 05049994 Ring Backup 8 2 05087713 O ring 9 1 05117965 Seal Assembly Hydraulic Piston 10 2 05117940 Bearing Hydraulic Piston ...

Page 117: ...SECTION 12 PARTS LISTS July 2003 page 12 11 49836349 ...

Page 118: ...TEM No QTY PART No DESCRIPTION 1 1 05130109 Body Seal Cartridge 2 2 05015060 Seal U Cup with O ring 3 1 10193522 O ring 4 1 05050760 Ring Backup 5 1 05129481 O ring 6 1 05013024 O ring 7 1 05129515 Back up Ring 8 1 05027255 Seal U Cup Ref 1 0 05015136 Tool Seal Smoothing Ref 2 0 05009048 Tool Seal Installation ...

Page 119: ...SECTION 12 PARTS LISTS July 2003 page 12 13 49836349 ...

Page 120: ...05060751 Hose Assembly Hydraulic 25 ID 4 JIC Swivel Both Ends 32 10 3 05049713 Hose Assembly Hydraulic 75 ID 12 JIC Swivel Both Ends 27 11 2 05071105 Hose Assembly Hydraulic 75 ID 12 JIC 90 deg x 12 JIC Swivel 12 1 05071121 Hose Assembly Hydraulic 25 ID 4 JIC Swivel Both Ends 18 13 2 05052493 Elbow 45 Degree 12 JIC x 10 SAE O ring Steel 14 2 95702619 Adapter 12 JIC x 12 SAE O ring 15 3 10142644 Ad...

Page 121: ...SECTION 12 PARTS LISTS July 2003 page 12 15 49836349 ...

Page 122: ... cu in 4 200 bar TUV 11 2 49830599 Tee HP 56 60ksi Stainless 12 8 10083897 Ferrule 25 13 4 95413696 Washer Lock ID 14 4 05144837 Spacer Accumulator 15 4 95383790 Cap Screw Socket Head 13 x 1 in Stainless 16 2 05090717 Nut Retaining HP Accumulator 17 150 10186153 Conduit Extra Flexible 38 in ID Galvanized 18 1 49837362 Tube Bent 38 in HP 60 ksi Stainless 19 1 10105443 Tube 38 in HP x 4 00 Lg 20 1 1...

Page 123: ...SECTION 12 PARTS LISTS July 2003 page 12 17 49836349 ...

Page 124: ...045497 Gage Pressure Hydraulic O 5 000 psig 4 SAE O ring Bottom Mount 7 1 10187052 Valve Relief Hydraulic 100 3 000 psi Range Knob Adjustable 8 1 10187060 Valve Relief Hydraulic 25 800 psi Range Adjustable 9 1 10074953 O ring 10 1 49889744 Retainer Valve Cartridge 1 in 11 1 49889736 Valve Check Hydraulic Cartridge 12 1 05092523 Valve Directional Hydraulic Solenoid Operated DO 8 24 VDC 040 in Orifi...

Page 125: ...SECTION 12 PARTS LISTS July 2003 page 12 19 49836349 ...

Page 126: ... 2 20 in Conduit 16 1 10077055 Adapter Bulkhead 4 15 Brass 19 4 10069771 Washer 63 23 1 10176766 Elbow 90 deg L P NPT 24 4 10189025 Adapter Hose JIC 8 x 8 26 4 49832959 Screw Hex Head 5 8 11 x 1 75 27 4 49833072 Lock Washer 63 30 24 10079903 Tube Polyethylene 25 in 36 2 49895303 Adapter Straight 25 NPT x 8 37 2 49886989 Adapter Pipe JIC Str 6 x 8 40 4 05113964 Grommet 42 2 05139506 Pressure Gage 4...

Page 127: ...SECTION 12 PARTS LISTS July 2003 page 12 21 49836349 ...

Page 128: ... PART No DESCRIPTION 1 1 10184760 Pneumatic Control Valve Less Nozzle Tube Seat 2 1 49888035 Valve Solenoid 24 Volt 3 1 10102226 Nipple Hex 1 8 NPT 4 1 10077030 Elbow 90 Deg x 1 8 NPT 6 1 10079580 Adapter 56 x 25 HP Tube 60 ksi 7 1 10078913 Gland 38 HP Tube Anti Vibration 8 1 10078715 Collar 38 HP Tube ...

Page 129: ...SECTION 12 PARTS LISTS July 2003 page 12 23 49836349 ...

Page 130: ... 8 6 1 05140751 Pressure Switch 7 1 05142062 Pressure Switch 8 1 49868813 Temperature Sensor 9 1 05070982 Valve Relief 50 150 psi NPT 10 1 05135645 Adapter Pipe Hose Barb 8 NPT x 8 Hose 11 1 05135652 Check Valve 12 2 49830714 Adapter Pipe Hose Barb 90 Degree 4 13 1 05038690 Body Filter Water NPT 14 1 49834716 Element Filter LP Water Polypropylene 10 Micron 15 4 95391322 Washer Flat 25 16 4 9583831...

Page 131: ...SECTION 12 PARTS LISTS July 2003 page 12 25 49836349 ...

Page 132: ...3 3 95572897 Hex Head Screw 1 4 20 x 5 8 4 3 95838314 Lock Washer 1 4 5 1 49887094 Vane Water Pump 12 1 10092302 Shaft Coupling 13 2 10116952 Cap Plug 14 2 95750394 Lock Washer 3 8 15 2 95416319 Hex Head Screw 3 8 16 x 1 16 1 10091510 Decal 18 1 05092523 Directional Control Valve 19 6 95055026 Socket Head Screw 1 2 13 x 1 3 4 20 6 95688750 High Collar Lock Washer 1 2 21 2 10069714 Washer 3 8 ...

Page 133: ...SECTION 12 PARTS LISTS July 2003 page 12 27 49836349 ...

Page 134: ...d Screw M10 x 1 50 x 25mm 6 2 10069714 Flat Washer 3 8 7 1 05114988 Manifold Assembly 8 1 05047451 Adapter JIC O ring 90 Degrees 12 12 9 1 05045364 Gear Pump Double Shaft 10 4 05091756 Socket Head Screw 7 16 14 x 6 11 4 05050356 High Collar Lock Washer 44 12 1 10074953 O ring 13 12 05089792 Flat Washer 7 16 14 6 95897294 Hex Head Screw 5 8 11 x 1 1 2 15 4 95688719 Lock Washer 63 16 05088083 Shaft ...

Page 135: ...SECTION 12 PARTS LISTS July 2003 page 12 29 49836349 ...

Page 136: ...5069976 Cap NPT Hex Steel 10 1 05071063 Tee Male Branch O Ring JIC 12 Steel 11 1 10085033 Pipe Plug 75 12 4 95716890 Lock Washer 50 13 4 10069763 Washer 50 14 1 05057559 Adapter O ring Pipe 12 15 1 49868524 Adapter Bushing 1 1 4 x 1 NPT Steel 16 1 05006291 Diffuser Return Line Hydraulic Oil 17 1 10099901 Elbow 90 Deg NPT x 4 JIC 18 1 10080901 Valve Shutoff Manual 1 2 NPT Brass 19 1 95033619 Plug 1...

Page 137: ...SECTION 12 PARTS LISTS July 2003 page 12 31 49836349 ...

Page 138: ...pport Cover SL IV Weldment 3 1 05072772 Hinge Cover 4 2 05058664 Cover Top 5 24 05092002 Screw Flange Head 3 8 16 x 1 25 in Black Oxide 6 24 95484382 Nut Hex 3 8 16 UN Black Oxide 7 20 05041439 Nut Machine Hex 10 24 Nylon Locking 9 20 05091988 Nut Flanged 3 8 16 Black Oxide 10 1 05073051 Gasket Cover 12 20 95670972 Washer Lock 3 8 ID Black Oxide 14 20 95367207 Washer Flat 10 Stainless Steel 15 8 1...

Page 139: ...SECTION 12 PARTS LISTS July 2003 page 12 33 49836349 ...

Page 140: ... 80073810 Junction Box 3 4 10097657 Screw Button Head 1 4 20 x 3 4 4 96 49867104 Cable 18 5 1 10067205 Cable Connector 7 12 10159143 8 Terminal Ring 9 5 10125912 Cable Tie 11 1 05044029 Adapter Block 12 2 95077012 Hex Head Screw 5 16 18 x 1 3 4 13 1 05043161 Terminal Block 14 2 95686721 Socket Head Screw 1 4 20 x 1 3 4 17 2 05062344 Lock Nut 1 4 20 22 2 10069755 Washer 31 ...

Page 141: ...SECTION 12 PARTS LISTS July 2003 page 12 35 49836349 ...

Page 142: ...anel Insert 3 5 10103034 Din Rail 4 3 10073492 Screw Pan Head 8 32 x 1 2 5 2 05032362 End Anchor 6 1 05046214 Terminal Block 22 14 7 13 05113634 Terminal Block 3 Level 8 1 05112826 Terminal Block Jumper 9 1 05112818 Terminal Block Marker 10 1 05117601 End Barrier 11 1 05032370 End Barrier 12 05032396 Terminal Block Marker 13 6 10170165 Wire 16 14 1 10181873 Ring Terminal ...

Page 143: ...SECTION 12 PARTS LISTS July 2003 page 12 37 49836349 ...

Page 144: ...ITEM No QTY PART No DESCRIPTION 1 1 05148804 Accumulator Support 2 1 05040696 HP Accumulator 3 8 05091954 Screw Button Head 3 8 16 x 1 4 8 95670972 Lock Washer 38 5 8 95660957 Washer 38 6 2 10079465 HP Tee 56 7 2 05112057 Tube HP 56 x 188 x 4 97 8 2 05090717 Retaining Nut 9 8 95484382 Hex Nut 3 8 16 ...

Page 145: ...SECTION 12 PARTS LISTS July 2003 page 12 39 49836349 ...

Page 146: ......

Page 147: ......

Reviews: