background image

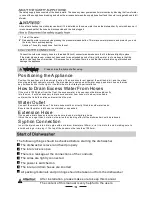
Please close the hydrant after using.

Turn off the water.

Release the water pressure by depressing the pressure release button. This relieves water pressure and protects you, and
the room, from severe splashing.

Unscrew The safety supply hose from the faucet..

2

1

Connect the cold water supply hose to a threaded 3/4(inch) connector and make sure that it is fastened tightly in place.
If the water pipes are new or have not been used for an extended period of time, let the water run to make sure that the
water is clear and free of impurities. If this precaution is not taken, there is a risk that the water inlet can get blocked and
damage the appliance.

A hose that attaches to a sink spray can burst if it is installed on the same water line as the dishwasher. If your sink has one, it
is recommended thet the hose be disconnected and the hole plugged.

The safety supply hose consists of the double walls. The hose's system guarantees its intervention by blocking the flow of water

in case of the supply hose breaking and when the air space between the supply hose itself and the outer corrugated hose is full

of water.

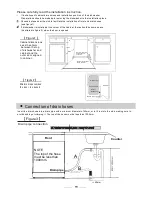
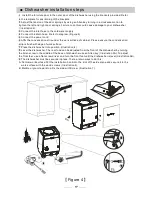
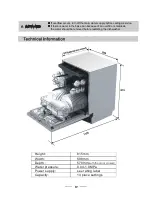
Positioning the Appliance

How to Drain Excess Water From Hoses

If the sink is 1000 higher from the floor, the exces s water in hoses cannot be drained di rectly
into the sink. It will b e necessary to d rain excess water from hoses into a bowl or suitable
container that is held outside and lower than the sink.

Water Outlet

Connect the water d rain hose. The d rain hose must b e co rrec tly fi tted to av oid wate r leaks.
En sure that the wat er inlet hose is not kinked or s quashed.

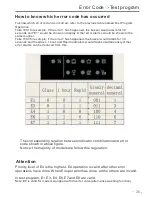
The following things should be checked before starting the dishwasher.

Syphon Connection

Insert the drain hose into a d rain pipe with a minimum diameter of 40mm, or let it run into th e sink, making sure to
avo id bending o r crimping it . The top of the ho se mus t be less than 100 0m m.

The content of this manual is very helpful to the users.

After installation, please make sure to keep this manual.

Extension Hose

If you n eed a drain hose extensi on, make sure to use a similar dra in ho se.
It m ust be no longer than 4 metres; o therwise the cleanin g effect o f the dishwasher could b e re duced.

1

The dishwasher is level and fixed properly

2

The inlet valve is open

3

There is a leakage at the connections of the conducts

4

The wires are tightly connected

5

The power is switched on

6

The inlet and drain hoses are knotted

7

All packing materials and printings should be taken out from the dishwasher

Position the appliance in the desired location. The back should rest against the wall behind it, and the sides,
along the adjacent cabinets or walls. The dishwasher is equipped with water supply and drain hoses that can
be positioned either to the right or the left sides to facilitate pro per installation.

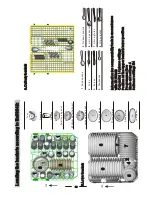
Summary of Contents for KD14WC

Page 1: ... 日 期 日 期 会 签 处数 工 艺 审 核 设 计 标记 更改文件号 审 定 批 准 校 对 签 名 张 第 张 共 广东美的集团股份有限公司 数 量 阶 段 标 记 量 重 比 例 D 美的洗涤电器制造有限公司 REV 1 1 1 英文用户手册 丹麦 KD14WC 7307 KNAU 1 PANTONE BLACK C 2 3 A4 A5 4 技术要求 所有印刷颜色为 该用户手册内页的彩色图片也按黑白制作 文档规格为 实际要求按 规格输出菲林和印刷 如供应商的排版需要加空白页 请加在最后 80克双胶纸 00 ...

Page 2: ...14 place settings KD14WC ...

Page 3: ...ding instructions Press the Programme button until the selected programme lights up See the section entitled Operationg instruction When the working cycle has finished the buzzer of the dishwasher will sound 8 times then stop Turn off the appliance using the Power button If the appliance is switched off during a wash cycle Open the door carefully Hot steam may escape when the door is opened If the...

Page 4: ...liance is intended to be used in household and similar applications such as staff kitchen areas in shops offices and other working environments farm houses by clients in hotels motels and other residential type environments bed and breakfast type environments Dishwasher Features 3 A Water Softener 4 Attention before or after loading the Dishwasher Baskets 9 Filtering System 13 Caring for the Dishw...

Page 5: ...th a visual heating element If the supply cord is damaged it must be replaced by the manufacturer or its service agent or a similarly qualified person in order to avoid a hazard Please dispose of packing materials properly Use the dishwasher only for its intended function Remove the door to the washing compartment when removing an old dishwasher from service or discarding it Dishwasher detergents ...

Page 6: ...e Therefore cut off the power supply cable and make the door closing device unusable Cardboard packaging is manufactured from recycled paper and should be disposed in the waste paper collection for recycling By ensuring this product is disposed of correctly you will help prevent potential negative consequences for the environment and human health which could otherwise be caused by inappropriate wa...

Page 7: ...2 4 6 8 Start Pause Button To start the selected washing program or pause the washing program when the machine is working 1 On Off Button To turn on off the power supply 5 Washing Program Button To Press the button to selector appropriate Program 7 Delay indicators to show the delay time 3h 6h 9h 6 Delay Button To Press the button to delay 2 Power indicator To show when the power on 4 Program indi...

Page 8: ... button or no operation for 5 seconds to end the set up model the Start Pause WATER SOFTENER The hardness of the water varies from place to place If hard water is used in the dishwasher deposits will form on the dishes and utensils The appliance is equipped with a special softener that uses a salt container specifically designed to eliminate lime and minerals from the water Contact your local wate...

Page 9: ...orming droplets on your dishes which can leave spots and streaks It also improves drying by allowing water to roll off the dishes Your dishwasher is designed to use liquid rinse aids The rinse aid dispenser is located inside the door next to the detergent dispenser To fill the dispenser open the cap and pour the rinse aid into the dispenser until the level indicator turns completely black The volu...

Page 10: ...lack dot on the rinse aid level indicator changes as illustrated below Full 3 4 full 1 2 full 1 4 full Should refill to eliminate spotting Empty When to Refill the Rinse Aid Dispenser If there is no rinse aid warning light in the control panel you can estimate the amount from the colour of the optical level indicator C located next to the cap When the rinse aid container is full the whole indicato...

Page 11: ...nd will not dissolve properly Concentrated Detergent Detergent Tablets Detergent Dispenser conventional alkaline detergents with caustic components low alkaline concentrated detergents with natural enzymes Normally new pulverised detergent is without phosphate Thus the water softener function of phosphate is not given In this case we recommend to fill salt in the salt container even when the hardn...

Page 12: ...lose the lid and press until it locks in place If the dishes are heavily soiled place an additional detergent dose in the pre wash detergent chamber This detergent will take effect during the pre wash phase A B Fill in Detergent You find information about the amount of detergent for the single programme on the last page Please aware that according to the level soiling and the specific hardness of ...

Page 13: ...ups glasses pans etc With the opening facing downwards so that water cannot collect in the container or a deep base Consider buying utensils which are identified as dishwasher proof Use a mild detergent that is described as kind to dishes If necessary seek further information from the detergent manufacturers For particular items select a program with as low a temperature as possible To prevent dam...

Page 14: ...minded that The Bottom Basket features folding spikes so that larger or more pots and pans can be loaded Folding Spikes of Lower Basket For better stacking of pots and pans the spikes can be folded down as show in the picture right Adjusting the Upper Basket The height of the upper basket can be adjusted in order to create more space for large utensils both for the upper lower basket The height of...

Page 15: ...test in accordance with EN 50242 as follows Capacity 14 setting Position Upper basket upper wheels on rails Rinse aid setting 6 Pl 0 55W Po 0 45W Means need to fill rinse into the Rinse Aid Dispenser or 3in1 5 30g or 3in1 5 30g or 3in1 5 30g Pre wash Pre wash Wash 65 Rinse Rinse 55 Drying Pre wash Wash 50 Rinse Rinse 60 Drying Wash 50 Rinse Drying Pre wash Rinse 60 Wash 40 Rinse Rinse 45 175 170 1...

Page 16: ... the machine will keep on working after 10 seconds during a wash cycle Premise A cycle that is underway can only be modified if it has only been running for a short time Otherwise the detergent may have already been released and the appliance may have already drained the wash water If this is the case the detergent dispenser must be refilled see the section entitled Loading the Detergent Press the...

Page 17: ...le Main filter 1 Coarse filter2 Fine filter 3 2 3 1 Filter assembly The filter efficiently For best performance and results the filter must be cleaned regularly this reason it is a good idea to remove the larger food particles trapped in the filter after each wash cycle by rinsing the semicircular filter and cup under running water To remove the filter device pull the cup handle in the upward dire...

Page 18: ...he filters could be contorted and the performance of the dishwasher could be decreased To clean the edge around the door you should use only a soft warm damp cloth To avoid penetration of water into the door lock and electrical components do not use a spray cleaner of any kind Never use a spray cleaner to clean the door panel as it may damage the door lock and electrical components Abrasive agents...

Page 19: ...cloth with warm soapy water To remove spots or stains from the surface of the interior use a cloth dampened with water an a little vinegar or a cleaning product made specifically for dishwashers Remove the Plug No Solvents or Abrasive Cleaning Moving the Appliance Seals After every wash turn off the water supply to the appliance and leave the door slightly open so that moisture and odours are not ...

Page 20: ...when the door is opened Figure2 Cabinet dimensions Figure1 Cabinet Dishwasher Door of dishwasher Minimum space of 50mm Less than 5mm between the top of dishwasher and cabinet and the outer door aligned to cabinet 90 90 600 mm 820mm 100 580mm 80 Space between cabinet bottom and floor Electrical drain and water supply line entrances Connection of drain hoses Insert the drain hose into a drain pipe w...

Page 21: ...trip under the work surface of cabinet Please ensure the condensation strip is flush with edge of work surface Place the dishwasher into position Illustration 4 Level the dishwasher The rear food can be adjusted from the front of the dishwasher by turning the Allen screw in the middle of the base of dishwasher use an Allen key Illustration 5A To adjust the front feet use a flat screw driver and tu...

Page 22: ...roper outlet installed by a qualified electrician Ensure the voltage and frequency of the power being corresponds to those on the rating plate Only insert the plug into an electrical socket which is earthed properly If the electrical socket to which the appliance must be connected is not appropriate for the plug replace the socket rather than using a adaptors or the like as they could cause overhe...

Page 23: ...It will be necessary to drain excess water from hoses into a bowl or suitable container that is held outside and lower than the sink Water Outlet Connect the water drain hose The drain hose must be correctly fitted to avoid water leaks Ensure that the water inlet hose is not kinked or squashed The following things should be checked before starting the dishwasher Syphon Connection Insert the drain ...

Page 24: ...seconds and the Glass 1 hour and Rapid indicators would flash simultaneously Other error alarms can be deduced from this The corresponding relation between indicator and error code shown in above figure Notice the majority of models are follow this regulation combination Priority level of E4 is the highest E4 operation is valid after other error operations have done When E4 operation has done all ...

Page 25: ... will be stopped immediately At the same time the buzzer will alarm for 30 seconds and the error 3 will be shown 27 E4 Overflow In test program once open circuit failure of thermistor is detected by controller the E6 would occur When E6 occurs the drain pump will run until flowmeter keep motionless for 2 minutes and all the other components will be stopped immediately At the same time the buzzer w...

Page 26: ...y controller the E7 would occur When E7 occurs the drain pump will run until flowmeter keep motionless for 2 minutes and all the other components will be stopped immediately At the same time the buzzer will alarm for 30 seconds and error 7 will be shown E7 Short circuit failure of thermistor 28 ...

Page 27: ...programme and rearrange the items of crockery This has no influence on the dishwasher function if in doubt contact a suitably qualified plumber Detergent with colourant was used Make sure that the detergent is the one without colourant Improper detergent Make sure the dishwasher is turned on and the door is closed securely Check that the water supply is connected properly and the water is turned o...

Page 28: ...hwasher immediately after washing Open the door slightly so that the steam can escape Begin unloading the dishwasher only once t he dishes are barely warm to the touch Empty the low basket first This prevents water form dropping off dishes in the upper basket In short program the washing temperature is lower This also lowers cleaning performance Choose a program with a long washing time Water drai...

Page 29: ...0 04 1 0MPa Power supply see rating label Capacity 14 place settings If overflow occurs turn off the main water supply before calling a service If there is water in the base pan because of an overfill or small leak the water should be removed before restarting the dishwasher ...

Page 30: ...rly basket 3 Cutterly basket Information for comparability tests in accordance with EN 50242 Information for comparability tests in accordance with EN 50242 Capacity 14 place settings Capacity 14 place settings Position of the upper basket lower position Position of the upper basket lower position Programme Eco Programme Eco Rinse aid setting 6 Rinse aid setting 6 Softener setting H4 Softener sett...

Page 31: ...onsumption will depend on how the appliance is used Water consumption 3500 litres per year based on 280 standard cleaning cycles Actual water consumption will depend on how the appliance is used A highest efficiency to G lowest efficiency This program is suitable for cleaning soiled normally soiled tableware and that it is the most efficient programme in terms of its combined energy and water cons...

Reviews: