background image


Electric motors          Size 63 - 225 ATEX / IECEx 


Maintenance 


52 


2016-05-23


 Pos : 9.29 /KN 2006-Pr ojekte/Herforder Elektromotoren-Wer ke/Wartung/1.1 Sc hraubenanz ugsdr ehmomente @ 67\mod_1208937207889_1.doc @ 1150009 


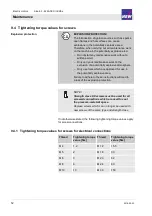
9.4  Tightening torque values for screws 


Explosion protection 


EXPLOSION PROTECTION! 

The introduction of ignition sources such as sparks, 
open flames and hot surfaces can cause 
explosions in the potentially explosive area. 
Therefore, when carrying out all maintenance work 
on the machine in the potentially explosive area: 

–  Do not start any maintenance work without a 

written permit. 

–  Only carry out maintenance work to the 

exclusion of a potentially explosive atmosphere. 

–  Only use tools which are approved for use in 

the potentially explosive area. 

Failure to adhere to these instructions will lead to 
a loss of the explosion protection. 


NOTE! 

Strength class 8.8 screws must be used for all 
screwed connections which are used to seal 
the pressure-resistant space.
  

Replace screws which can no longer be used with 
new screws of the same type and strength class. 


If not otherwise stated, the following tightening torque values apply 
for screw connections. 


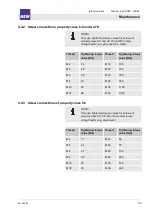
9.4.1  Tightening torque values for screws for electrical connections 


Thread 

Tightening torque 
value [Nm] 

Thread 

Tightening torque 
value [Nm] 

M 4 

1.2 

M 12 

15.5 

M 5 

M 16 

30 

M 6 

M 20 

52 

M 8 

M 24 

80 

M 10 

10 

M 30 

150 


Summary of Contents for N630 EX

Page 1: ...L OPERATION AND INSTALLATION INSTRUCTION ENGLISH KNF 320945 04 21 ATEX Notice Before operating the pump and accessories read and observe the operating and installation instructions as well as the safe...

Page 2: ...function 17 6 Transport 20 7 Installation and connection 24 8 Operation 35 9 Servicing 37 10 Troubleshooting 47 11 Spare parts and accessories 50 12 Returns 51 13 Appendix 52 KNF Neuberger GmbH Alter...

Page 3: ...tructions within reach at all times Project pumps For customer specific project pumps pump models that begin with PJ or PM there may be deviations from the operating and installation instruc tions For...

Page 4: ...ied here Danger levels Signal word Meaning Consequences if not observed DANGER warns of immediate danger Death or serious injury or serious damage will result WARNING warns of possible dan ger Death s...

Page 5: ...ons of pictograms Pictogram Meaning General warning symbol Warning of hot surface Warning of electrical voltage Warning of explosive materials Warning of poisonous substances Warning of hand injuries...

Page 6: ...erous gases and vapors from the pump system Requirements on the transferred medium Before transferring a medium check whether the medium can be trans ferred danger free in the specific application Bef...

Page 7: ...Device category See Chapter 2 4 2 Device categories for gas Ex Symbol indicates that the device complies with one or more ignition protection types H Symbol for ignition protection type See Chapter 2...

Page 8: ...a dust air mix ture is present constantly or for long periods of time or often 2G Devices of this category are designed for use in areas in which it is to be expected that an explosive atmosphere con...

Page 9: ...fuel Jet fuel Heating oils n hexane Acetalde hyde IIB Town gas Ethylene Ethyl alcohol Hydrogen sulfide Ethyl ether IIC Hydrogen Acetylene Carbon disulfide Tab 5 The classification of gases and vapors...

Page 10: ...r mixture in which it is used Temperature class The maximum surface temperature arises from the design of the pump and is specified as temperature class Temperature class Max surface temperature C Ign...

Page 11: ...ith high protection level for use in potentially explosive areas in which there is no risk of ignition during normal operation or in the event of fore seeable or infrequent faults malfunc tions High G...

Page 12: ...and without power Ensure that no hazards arise from flows when gas connections are open from the effects of noise or from hot corrosive dangerous and environ mentally hazardous gases Classification o...

Page 13: ...perating pressure of the pump The maximum permissible operating pressure of the pump is stated in Chapter 4 Technical data Make certain that the permissible ambient temperature 4 Technical data is not...

Page 14: ...tainless steel Connection only N630 1 2 N630 3 N630 15 Stainless steel Tab 9 Pneumatic values Parameter Value N630 Value N630 1 2 Value N630 3 Value N630 15 Max permissible oper ating pressure bar rel...

Page 15: ...pump head is opened or after replacing diaphragm and valve plates seals A leak test can be used to determine whether the original gas tightness is achieved again max emission sound pressure level over...

Page 16: ...chnical data Diaphragm pump N630 EX 16 Translation of Original Operation and Installation Instruction english KNF 320945 04 21 Coupling Parameter Value EX designation II 2G h IIC T6 T4 Gb Size 24 Tab...

Page 17: ...1 17 5 Design and function Design 1 Pump outlet 2 Pump inlet 3 Electrical terminal box 4 Motor 5 Motor fan cover 6 Connection for water cooling Fig 1 Design N630 EX 1 Pump inlet 2 Connection for water...

Page 18: ...21 1 Pump outlet 2 Connection for water cooling 3 Union nut 4 Head connection 5 Motor 6 Motor fan cover 7 Electrical terminal box 8 Pump inlet Fig 3 Design N630 3 EX 1 Pump inlet 2 Connection for wat...

Page 19: ...5 Function of a diaphragm pump Diaphragm pumps transfer compress depending on the version and evacu ate gases and vapors The elastic diaphragm 4 is moved up and down by the eccentric 5 and the connec...

Page 20: ...he packaging Where appropriate wear suitable personal protective equipment e g safety shoes safety gloves Only for two headed pumps CAUTION Personal injury and or property damage due to in correct or...

Page 21: ...ion Instruction english KNF 320945 04 21 21 NOTICE Prior to commissioning make sure that the pump has reached the ambient temperature 4 Techni cal data Transport with carrying strap Fig 6 Position of...

Page 22: ...320945 04 21 2 Fasten the carrying strap between compressor housing and motor Fig 1 see Fig 7 3 Make certain that the lifting load cannot be transferred from the belt to the pump connection 4 Lift the...

Page 23: ...rated as an example 2 Screw the transport eyebolt 2 hand tight into the threaded hole The transport eyebolt 2 is available as an accessory see 11 2 Ac cessories 2 Transport eyebolt Fig 9 Transport eye...

Page 24: ...ures during pump op eration Depending on the medium being transferred breakage of the media contacting components can result in a dangerous mixture if the medium mixes with the air in the compressor h...

Page 25: ...Diaphragm pump N630 EX Installation and connection Translation of Original Operation and Installation Instruction english KNF 320945 04 21 25 Fig 11 Mounting dimensions N630 1 2 EX...

Page 26: ...Installation and connection Diaphragm pump N630 EX 26 Translation of Original Operation and Installation Instruction english KNF 320945 04 21 Fig 12 Mounting dimensions N630 3...

Page 27: ...NG Danger of burning on hot surfaces Hot surfaces could occur if the pump overheats When installing the pump make sure that sufficient cooling air infeed and discharge is ensured Immediate environment...

Page 28: ...indicated in Chapter 7 Installation and connection 7 2 Electrical connection DANGER Danger to life from electric shock Only have the pump connected by an autho rized specialist Only have the pump con...

Page 29: ...e the plugs during installation Wear appropriate personal protective equip ment Connected components Only connect components to the pump that are designed for the pneu matic data and thermal requireme...

Page 30: ...sure line for mounting dimen sions see Chapter 4 Technical data 3 Lay the suction line and the pressure line at a downward angle to pre vent condensate from running into the pump 7 4 Connecting water...

Page 31: ...Diaphragm pump N630 EX Installation and connection Translation of Original Operation and Installation Instruction english KNF 320945 04 21 31 Fig 14 Mounting dimensions N630 EX...

Page 32: ...Installation and connection Diaphragm pump N630 EX 32 Translation of Original Operation and Installation Instruction english KNF 320945 04 21 Fig 15 Mounting dimensions N630 1 2 EX...

Page 33: ...Diaphragm pump N630 EX Installation and connection Translation of Original Operation and Installation Instruction english KNF 320945 04 21 33 Fig 16 Mounting dimensions N630 3 EX...

Page 34: ...Installation and connection Diaphragm pump N630 EX 34 Translation of Original Operation and Installation Instruction english KNF 320945 04 21 Fig 17 Mounting dimensions N630 15 EX...

Page 35: ...n potentially explosive areas Ensure the proper use of the pumps See Chapter 2 1 Proper use Eliminate the possibility of improper use of the pumps see Chapter 2 2 Improper use Observe safety notices C...

Page 36: ...pump is at a standstill establish normal atmospheric pres sure in the lines Vapors as medium Preventing condensate from forming in the pump will extend the ser vice life of the diaphragm Therefore on...

Page 37: ...ervicing may only be performed by special ized personnel or trained and instructed per sonnel 9 1 Servicing schedule WARNING Risk of explosion from wear Have the connecting rod bearing replaced by KNF...

Page 38: ...dically for external damage or leakage Coupling Inspect coupling play periodi cally See operating instructions for coupling Tab 19 The ball bearings installed in the pump and in the drive motor are lu...

Page 39: ...isk of explosion flushing can also be performed with air Discharge the media safely 9 2 2 Cleaning the pump WARNING Risk of explosion from electrostatic charging of the components Only clean the pump...

Page 40: ...s possible Wear protective equipment if necessary e g protective gloves goggles Clean the pump with suitable measures CAUTION Risk of burns from hot pump parts The pump head or motor may still be hot...

Page 41: ...14 Cylindrical pin 15 Hexagon socket head cap screws 16 Slotted cap screw 17 Reed valve 18 Valve stopper 19 Washer ST head only Fig 18 Components of the pump head The following item numbers refer to F...

Page 42: ...rn the fan blade to move the conrod plate 6 to the middle position 7 Insert the new O ring 7 in the conrod plate 6 8 Only 13 Insert the new O ring 5 in the housing 11 9 Place the new diaphragm 12 on t...

Page 43: ...k the pump for smooth running by turning the fan wheel 8 For two headed pumps Perform steps 1 to 7 for the second pump head 9 Mount the motor fan cover see Fig 1 10 For two headed pumps Remount the pn...

Page 44: ...CAUTION Personal injury and or property damage due to in correct or improper transport of the motor In the event of incorrect or improper transport the motor can fall down be damaged or injure per so...

Page 45: ...coupling half 6 Pump side coupling half 7 Compressor housing 8 Stud bolts 9 Motor fan cover 10 Fastening screw for mo tor fan cover Fig 21 Replacing sprocket depicted pump as an example Dismounting th...

Page 46: ...p side coupling half 6 The sprocket is symmetric and can be pushed on in both possible po sitions Mounting the motor 1 Align the motor side 5 and pump side coupling halves 6 with one an other 2 Place...

Page 47: ...onnected to the elec trical mains Connect the pump to the electrical mains No voltage in the electrical mains Check the circuit breaker for the room and switch it on if necessary Pneumatic connections...

Page 48: ...o deter mine the output values Eliminate any throttling e g valve if necessary Use lines or connection parts with a larger cross section if necessary Leaks occur at pneumatic connec tions lines or pum...

Page 49: ...pump to KNF Customer Service contact data see www knf com 1 Flush the pump with air for a few minutes if necessary for safety rea sons with inert gas to free the pump head of dangerous or aggressive g...

Page 50: ...ng D38 x 3 2 2 4 O ring 105 x 3 only 13 3 5 2 4 Slotted cheese head screw 16 2 4 Tab 27 See Chapter 9 3 Changing diaphragm and reed valves Spare parts set Order number N630 1 2 3ST 9E 321882 N630ST 9E...

Page 51: ...pump 3 Clean the pump see Chapter 9 2 2 Cleaning the pump 4 Send the pump together with the completed Health and Safety Clear ance and Decontamination Form to KNF stating the nature of the transferred...

Page 52: ...gm pump N630 EX 52 Translation of Original Operation and Installation Instruction english KNF 320945 04 21 13 Appendix 13 1 Declaration of Conformity For further information see also Konformit tserkl...

Page 53: ......

Page 54: ......

Page 55: ......

Page 56: ......

Page 57: ...N630 EX Appendix Translation of Original Operation and Installation Instruction english KNF 320945 04 21 57 13 2 Motor For further information see also BA Ex63 225 ATEX IECEx pdf HEW KE D_Ex 63 315 1...

Page 58: ...Table of contents 2018 01 08 Operating manual Electric motors Size 63 225 ATEX IECEx Doc ID 6316 Read the operating manual before starting all work...

Page 59: ...ord Tel 49 0 5221 5904 0 Fax 49 0 5221 5904 34 E Mail info hew hf de Internet www hew hf de Release Created by Kothes Technische Kommunikation GmbH Co KG www kothes de This issue replaces all previous...

Page 60: ...uipment and clothing 13 2 5 Special hazards 14 2 6 Safety devices 17 2 7 Securing the machine to prevent it from being switched back on 17 2 8 How to act in case of hazards and accidents 18 2 9 Enviro...

Page 61: ...tion resistance 40 6 4 Commissioning 40 7 Operations 42 7 1 General information 42 7 2 Shutting down in an emergency 42 8 Faults 43 8 1 Safety 43 8 2 Fault table 45 8 3 Commissioning after remedied fa...

Page 62: ...at all times Staff must have carefully read and understood this manual before starting all work Adherence to all the specified safety instructions and instructions for actions in this operating manua...

Page 63: ...dents personal injury and material damage DANGER indicates an immediately dangerous situation which will lead to death or serious injuries if not avoided WARNING indicates a possibly dangerous situati...

Page 64: ...141997892953_0 doc 75471 Pos 1 12 KN 2006 SM Allgemeines 130 1 1 H aftungsbeschr nkung 8 mod_1142091543501_1 doc 75810 1 3 Limitation of liability All the information and instructions in this manual h...

Page 65: ...ailure to adhere to these instructions will lead to a loss of the explosion protection Purchase spare parts from authorised dealers or directly from the manufacturer See page 2 for the address Pos 1 1...

Page 66: ...served The following in particular applies The user must fully acquaint himself with the valid occupational safety regulations and in addition carry out a risk assessment to determine the hazards whic...

Page 67: ...ren Wer ke Sicherheit ATEX 003 1 1 0 Verantw d Betr Verl ust des Explosi onsschutzes Gesamtanl age 59 mod_1203493477106_1 doc 1039352 Loss of explosion protection EXPLOSION PROTECTION On machines whic...

Page 68: ...ft 59 mod_1203494636587_1 doc 1039373 Qualified specialist for the potentially explosive area is capable of carrying out the work on plants or components in the potentially explosive area and recognis...

Page 69: ...004 Personal 004 1 1 1 U nter weisung 8 mod_1142946308736_1 doc 79799 2 2 3 Training Staff must be provided with regular training by the user Training must be logged to keep better track Date Name Typ...

Page 70: ...and clothing must be worn in order to minimise health hazards Always the safety clothing and equipment required for the respective task whilst working Follow the instructions in the working area on p...

Page 71: ...ollowing section points out residual risks which have been determined by a risk analysis Adhere to the safety instructions listed here and the warnings in other chapters in order to reduce health haza...

Page 72: ...rk switch off the power supply and secure it to prevent it from being switched back on Do not jumper or disable any fuses or circuit breakers When replacing fuses or circuit breakers make sure to adhe...

Page 73: ...objects lying around CAUTION Risk of stumbling due to soiling and objects left lying around Soiling and objects left lying around are sources of slipping and stumbling ad can cause considerable injuri...

Page 74: ...gerous situations for people and objects of material value cannot arise if the energy supply is broken or the energy supply is activated after being broken The emergency stop devices must be freely ac...

Page 75: ...the danger area 6 Make sure that all safety devices and mechanisms are installed and fully functional 7 Do not remove the sign until you have done so Pos 2 49 KN 2006 SM nL Abschnittsende 8 mod_11419...

Page 76: ...ty of the damage The following environmentally hazardous substances are used Pos 2 53 KN 2006 SM Sicher hei t 011 U mweltschutz Schmierstoffe 9 mod_1143987769095_1 doc 84196 Lubricants Lubricants such...

Page 77: ...t Specification Value Unit Temperature range standard 20 40 C Temperature range optional 50 85 C Maximum installation height above sea level 1000 m Pos 3 7 KN2006 SM nL Abschnittsende 8 mod_1141997892...

Page 78: ...EX size 63 II 2G Ex db IIC T4 T6 Gb or Ex db e IIC T4 T6 Gb II 2G Ex db IIB T4 T6 Gb or Ex db e IIB T4 T6 Gb II 2D Ex tb IIIC T 135 85 C Db II 2D Ex tb IIIB T 135 85 C Db Marking acc to IECEx size 63...

Page 79: ...protection type Pressurised enclosure Increased safety Protection by housing IIC IIB IIIC IIIB Explosion group Dust group Maximum experimental safe gap MESG T ype and shape T1 T6 Temperature class max...

Page 80: ...132 1 13 1 2 3 4 5 14 15 16 17 18 10 10 12 11 10 9 8 7 6 Fig 5 Overview of sizes 63 to 132 1 Flange rings 2 Sealing rings DS 1 3 Rolling bearings DS 1 4 Stator housing complete 5 Motor foot 6 Terminal...

Page 81: ...5 Base flange 6 Stator housing complete 7 Motor foot 8 Terminal box adapter 9 Cable bushing 10 Lower terminal box section 11 Terminal board 12 Terminal box cover seal 13 Terminal box cover 14 Screwed...

Page 82: ...ection by temperature monitoring with thermal sensor for all modes other than S1 is only permitted in connection with a certified triggering device These triggering devices must have been certified an...

Page 83: ...onstant internal fan reduced 400 690V 400 V U f constant 2 5 50 Hz 230 400 V 400 V Y U f constant external ventilation constant 400 690V 400V U f constant 3 50 87Hz 230 400 V 400 V Y U constant intern...

Page 84: ...stening equipment is securely fastened Only use approved lifting gear and fastening equipment with sufficient load bearing capacity Do not use any torn or frayed ropes or belts Do not attach ropes and...

Page 85: ...und Lager ung 004 1 1 0 Transporti nspektion Inhalt Kurzfor m 9 mod_1144054141858_1 doc 84699 Inspect the delivery for damage and to make sure it is complete immediately after receiving it Proceed as...

Page 86: ...can be transported directly by crane on the following conditions The crane and lifting gear must be designed for the weight of the packages The operator must be authorised to operate the crane Fasten...

Page 87: ...005 1 1 0 Zur Ver packung 9 mod_1144055345537_1 doc 84784 Information on packaging The individual packages are packaged appropriately for the expected transportation conditions Only environmentally f...

Page 88: ...tect from sunlight Make sure to store in a low vibration environment veff 0 2 mm s Avoid large fluctuations in storage temperature Relative humidity max 60 Check the insulation resistance as necessary...

Page 89: ...L Abschnittsende 8 mod_1141997892953_0 doc 75471 Pos 6 8 KN2006 Proj ekte H erfor der El ektromotoren Wer ke Install ation Inbetriebnahme 003 1 1 0 Pers nliche Schutzausr stung 54 mod_1196342349679_1...

Page 90: ...nergy supply will be switched on without authorisation This puts the life of people in the danger area at risk Therefore Before beginning all work shut off all energy supplies and secure them to preve...

Page 91: ...meter of the motor Make sure that the exhaust air is not sucked directly back in In case of heavy soiling clean the air ways regularly Pos 6 20 KN 2006 SM nL Abschnittsende 8 mod_1141997892953_0 doc 7...

Page 92: ...eet Construction type IM B3 Fastening on the ceiling IM B35 IM 2001 2 bearing covers with feet Securing flange type A IM B34 IM 2101 2 bearing covers with feet Securing flange type C IM B5 IM 3001 2 b...

Page 93: ...s without feet Shaft end top Securing flange type C IM V6 IM V19 2 bearing covers with feet Shaft end top Securing flange type C IM V36 IM 2031 2 bearing covers with feet Shaft end top Securing flange...

Page 94: ...Herforder Elektromotoren Wer ke Installation Inbetri ebnahme 005 1 1 1 M ontag e 54 mod_1196342352100_1 doc 832987 6 2 4 Installation Installation varies depending on the construction type In case yo...

Page 95: ...ns only When any work is carried out on the electrical equipment disconnect it from the power and make sure it is free of voltage Before carrying out maintenance cleaning and repair work switch off th...

Page 96: ...proved 2 Make sure that the supply cable is connected in line with the instructions of the wiring diagram in the terminal box 3 Properly insert the seals on the terminal box into the grooves provided...

Page 97: ...als carry partly dangerous voltages Therefore Do not touch the terminals Discharge after measuring Before commissioning the motor after a longer period of storage or without use the insulation resista...

Page 98: ...n 59 mod_1203079708164_1 doc 1034523 Before commissioning make sure that the minimum insulation resistance values are adhered to chapter Checking the insulation resistance the protective earth conduct...

Page 99: ...uations machine movements must be stopped as quickly as possible and the energy supply has to be switched off Shutting down in an emergency In case of danger proceed as follows 1 Trigger an emergency...

Page 100: ...006 SM nL Abschnittsende 8 mod_1141997892953_0 doc 75471 Pos 8 6 KN2006 Proj ekte H erfor der El ektromotoren Wer ke St rungen 003 1 1 0 Pers nliche Schutzausr stung 54 mod_1196342589631_1 doc 833025...

Page 101: ...at the energy supply will be switched on without authorisation This puts the life of people in the danger area at risk Therefore Before beginning all work shut off all energy supplies and secure them...

Page 102: ...ttsende 8 mod_1141997892953_0 doc 75471 Pos 8 18 KN 2006 SM St rungen 005 1 1 St rungstabelle_Titel 9 mod_1144442349705_1 doc 87246 8 2 Fault table Pos 8 19 KN 2006 Pr ojekte Herforder Elektromotoren...

Page 103: ...he mains connection Qualified electrician Motor does not start up Motor is too warm Considerable drop in speed Safety device is triggered Incorrect circuit Adhere to wiring diagram and type plate Qual...

Page 104: ...d_1141997892953_0 doc 75471 Pos 8 24 KN 2006 Pr ojekte Herforder Elektromotoren Wer ke St r ung en ATEX 007 1 1 0 Potential ausgleich und Er dung anbring en EX SCHUTZ 60 mod_1203499601815_1 doc 104001...

Page 105: ...ng 003 1 1 0 Pers nliche Schutzausr stung 54 mod_1196342705414_1 doc 833082 Personal safety equipment and clothing Wear the following safety equipment and clothing for all maintenance work Occupationa...

Page 106: ...f all energy supplies and secure them to prevent them from being switched back on Pos 9 13 KN 2006 SM nL Abschnittsende 8 mod_1141997892953_0 doc 75471 Pos 9 14 KN 2006 SM Wartung 003 1 1 0 Grundlegen...

Page 107: ...explosions in the potentially explosive area Therefore Prevent layers of dust deposits from exceeding a thickness of 5 mm by regularly cleaning the location Only carry out cleaning work to the exclus...

Page 108: ...160 and above can be fitted with lubricating equipment The lubricating intervals depend on many influence factors The values in the table below apply under normal operating conditions Before lubricati...

Page 109: ...Only carry out maintenance work to the exclusion of a potentially explosive atmosphere Only use tools which are approved for use in the potentially explosive area Failure to adhere to these instructio...

Page 110: ...Nm M 4 2 3 M 14 105 M 5 4 6 M 16 160 M 6 7 9 M 20 330 M 8 19 M 24 560 M 10 38 M 30 1100 M 12 66 M 36 1900 9 4 3 Screw connections of property class 5 6 NOTE Only use tightening torque values for screw...

Page 111: ...he motor is earthed to prevent static charging To be performed by a qualified electrician only Failure to adhere to these instructions will lead to a loss of the explosion protection Pos 9 33 KN 2006...

Page 112: ...emontagear beiten EX SCHUTZ 60 mod_1203501579116_1 doc 1040381 Explosion protection EXPLOSION PROTECTION The introduction of ignition sources such as sparks open flames and hot surfaces can cause exp...

Page 113: ...ght Use lifting gear as necessary Secure parts to prevent them from falling or toppling In case of doubt contact the manufacturer Pos 10 13 KN 2006 SM nL Abschnittsende 8 mod_1141997892953_0 doc 75471...

Page 114: ...or recycling Sort and dispose of other components according to the material properties CAUTION Risk of environmental damage due to incorrect disposal Electrical scrap electronic components lubricants...

Page 115: ...b IIC T4 T6 Gb or II 2G Ex db IIC T4 T6 Gb II 2D Ex tb IIIC T135 C 85 C Db DEx 315 II 2G Ex de IIC T4 T6 or II 2G Ex d IIC T4 T6 II 3D Ex tc IIIB T135 C 85 C Dc are conform to the regulations of the f...

Page 116: ...Appendix Diaphragm pump N630 EX 116 Translation of Original Operation and Installation Instruction english KNF 320945 04 21 13 3 Coupling For further information see also Rotex BA pdf...

Page 117: ...Pz Wb Replacing KTR N dated 2017 09 06 Verified 2019 07 23 Pz Replaced by ROTEX Torsionally flexible jaw couplings type No 001 shaft coupling No 018 DKM with taper clamping sleeve and their combinatio...

Page 118: ...ansport and packaging 9 3 1 Storage 9 3 2 Transport and packaging 9 4 Assembly 10 4 1 Components of the coupling 10 4 2 Advice for finish bore 11 4 3 Assembly of the hubs 12 4 4 Assembly of taper clam...

Page 119: ...60 9 24 78 30 18 14 2 0 56 27 40 24 1a 22 28 56 28 1 95 160 10 28 90 35 20 15 2 5 67 30 48 28 1a 28 38 67 Table 3 Material aluminium Al H Size Com ponent Spider 1 component 2 Rated torque Nm Dimensio...

Page 120: ...0 60 160 65 30 22 4 0 120 60 98 52 1a 55 74 118 65 1 625 940 1175 22 70 185 75 35 26 4 5 135 68 115 61 75 1 1280 1920 2400 30 80 210 85 40 30 5 0 160 80 135 69 90 1 2400 3600 4500 40 97 245 100 45 34...

Page 121: ...3 5 105 51 95 32 1b 188 80 105 55 1 410 685 825 0 75 160 65 30 22 4 0 120 60 110 37 1b 210 90 120 65 1 625 940 1175 0 80 185 75 35 26 4 5 135 68 115 47 1b 235 100 135 75 1 1280 1920 2400 0 95 210 85...

Page 122: ...42 24 35 60 112 30 18 14 2 0 55 27 16 52 28 95 160 128 35 20 15 2 5 65 30 18 58 38 190 325 158 45 24 18 3 0 80 38 20 68 42 265 450 174 50 26 20 3 0 95 46 22 74 48 310 525 192 56 28 21 3 5 105 51 24 8...

Page 123: ...75 149 52 45 34 5 5 200 218 230 100 160 14 3020 100 1 3300 4950 35 90 230 90 50 38 6 0 225 246 260 113 180 69 3535 125 1 6650 10000 55 110 288 114 60 46 7 0 290 315 330 147 230 86 4545 1 Maximum torq...

Page 124: ...ure to read through and observe the following safety indications All operations on and with the coupling have to be performed taking into account safety first Please make sure to switch off the power...

Page 125: ...alculation The couplings supplied by KTR should be considered as components not machines or partly completed machines according to EC Machinery Directive 2006 42 EC Consequently KTR does not have to i...

Page 126: ...1 4 2 Setscrews DIN EN ISO 4029 1 Optionally spider or DZ elements 2 With size 180 the number is 6 Components of ROTEX type DKM 1 Component Number Description Illustration 7 ROTEX type DKM 1 2 Hub 2...

Page 127: ...e customer bears the sole responsibility for all machining processes performed subsequently on unbored or pilot bored as well as finish machined coupling components and spare parts KTR does not assume...

Page 128: ...lease pay attention to the ignition risk in potentially explosive atmospheres STOP Touching the heated hubs causes burns Please wear safety gloves With the assembly make sure that the distance dimensi...

Page 129: ...onto the taper sleeve and thus the sleeve is pressed onto the shaft By light blows of the hammer the taper clamping sleeve must be pushed further into the taper bore by means of a suitable sleeve Afte...

Page 130: ...ple heat expansion or foundation settling In order to ensure a long service life of the coupling and avoid risks with the use in potentially explosive atmospheres the shaft ends must be accurately ali...

Page 131: ...2 30 2 90 3 80 4 20 5 00 Table 12 Displacement figures for 64 Shore D Size 14 19 24 28 38 42 48 55 65 75 90 100 110 125 140 160 180 Max axial displacement Ka mm 0 5 0 5 0 5 0 7 0 7 1 0 1 0 1 0 1 0 1...

Page 132: ...ng must not operate in an accumulation of dust For covers with unlocked openings on the top face no light metals must be used if the couplings are used as equipment of equipment group ll if possible m...

Page 133: ...ements stored for too long are used Maintenance intervals are not observed Breakdowns Causes Hazard notes for potentially explosive atmospheres Elimination Different operating noise and or vibrations...

Page 134: ...er Ignition risk due to sparking with metallic contact of the cams 1 Set the unit out of operation 2 Disassemble the coupling and remove residues of the spider 3 Inspect coupling components and replac...

Page 135: ...f the driving and driven side settle during the course of load inspect the alignment of the coupling and re align the coupling if necessary The coupling components have to be inspected for damages The...

Page 136: ...clamping screws only 7 6 Half shell hub DH with feather keyway 7 9 Half shell hub H with feather keyway Type standard AFN BFN CF CFN DF DFN DKM ZS DKM ZS DKM H SP and TB with hubs corresponding to th...

Page 137: ...C 95 C T6 30 C to 60 C 80 C Explanation The maximum surface temperatures each result from the maximum permissible ambient or operating temperature Ta plus the maximum temperature increase T of 20 K t...

Page 138: ...remain the same If you note significant wear during the initial inspection so that it would be recommendable to replace the spider DZ elements find out the cause according to the table Breakdowns if p...

Page 139: ...ROTEX spider Illustration 16 ROTEX coupling Here the backlash between the cams of the coupling and the flexible spider DZ element must be inspected by means of a feeler gauge When reaching the wear li...

Page 140: ...t be performed with the machine at standstill Reaching the limits for replacing depends on the operating conditions and the existing operating parameters In order to ensure a long service life of the...

Page 141: ...ut aluminium Category 3 hubs resp clamping hubs without feather keyway ROTEX Year I M2 Ex h I Mb II 3G Ex h IIC T6 T4 Gc II 3D Ex h IIIC T80 C T110 C Dc 30 C Ta 60 C 90 C KTR Systems GmbH Carl Zeiss S...

Page 142: ...or PUR only II 2G c IIC T6 T5 resp T4 30 C Ta 65 C 80 C resp 90 C II 2D c T 110 C I M2 c 30 C Ta 90 C Substance group gases fogs and vapours The marking with explosion group llC includes explosion gro...

Page 143: ...lth requirements according to enclosure II of directive 2014 34 EU The coupling described in here complies with the specifications of the following standards rules DIN EN ISO 80079 36 DIN EN ISO 80079...

Page 144: ...KNF worldwide You can find our local KNF partners at www knf com...

Reviews: