background image

10 

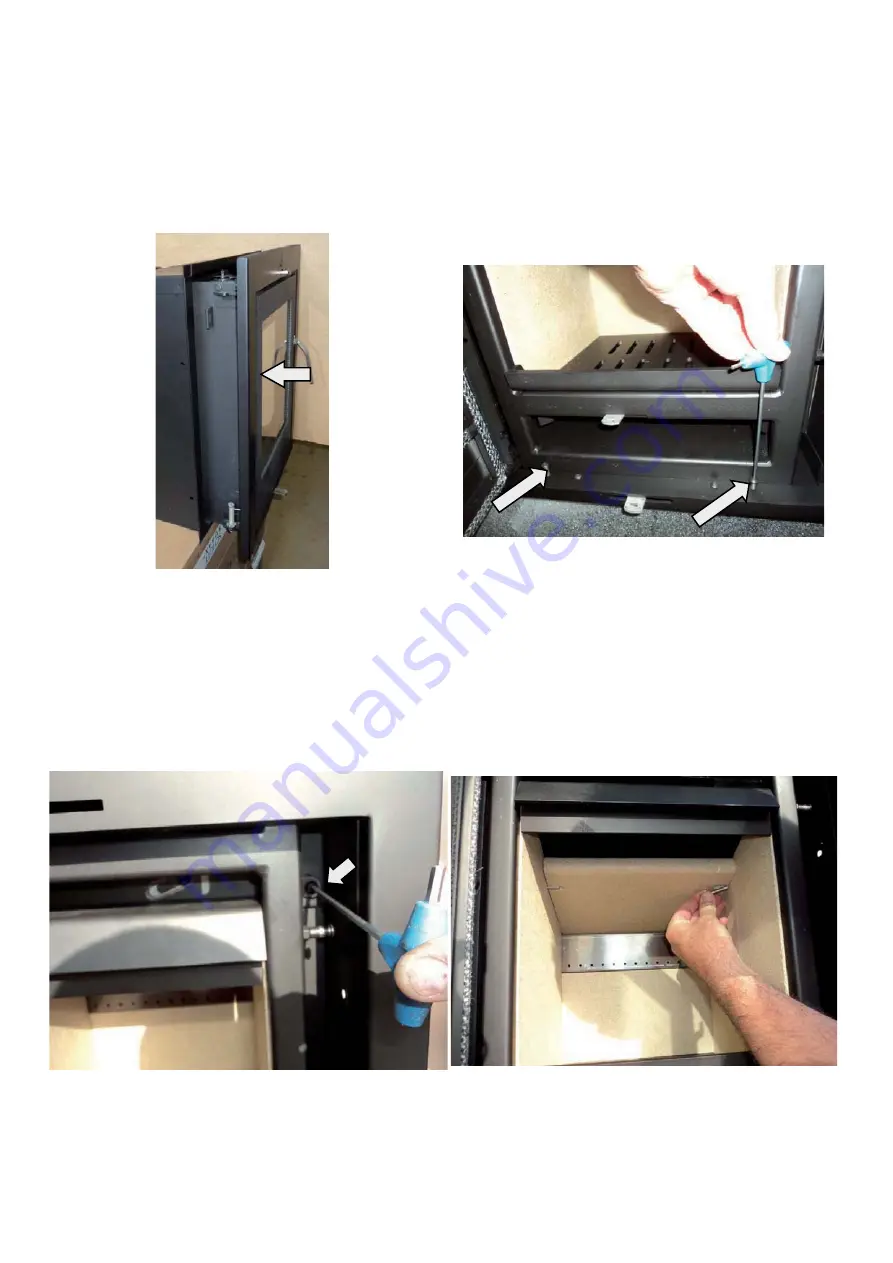
After fixing of the box you need to put stove back in the box (Picture 15). Then put back the two 
screws (Picture 16). 

Picture 15 

Picture 16 

Also you need to twist and thinghten screw on the upper part of the stove in order to 
completely fix stove and box (Picture 17).  At the end of instalation you need to place back 
buffer plate and pins (Picture 18).  

Picture 17 

Picture 18 

Summary of Contents for ILD 6

Page 1: ...1 ILD 6 Insert EN13229 NS3058 AEA Manual version No 12 1a GB 22 11 2012 Model 6 insert ...

Page 2: ...12 Closed combustion system 13 Chimney flue collar 14 The chimney effect 15 Measurements 17 Setup Examples 18 Refuelling on to a low fire bed 19 Fuel overloading 19 Environmental use 19 Smoke Control Areas 20 Primary air control 21 Secondary air control 22 Ash drawer and bottom grate 23 Dampers left open 23 Fuel 24 Lightning the stove 25 Cleaning maintenance 27 Trouble shooting 28 ...

Page 3: ...his booklet and our homepage www ildstoves com carefully First use Before the stove is heated up for the first time we advise you to open all windows and doors in the room to ensure optimum ventilation When the stove is at operating temperature the surface treatment will harden and emit a strong odour for a short time As a result of the heating and due to the ensuing change in temperature the stov...

Page 4: ...Recommended underpressure in flue connection piece 16 Pa Flue pipe underpressure EN 13229 12 Pa Combustion air requirements 13 m3 h Fuelconsumption 1 3 Kg h Stokingquantity 1 0 Kg Weight 54 Kg Flue connectionpiece Øi 126 mm Flue connectionpiece Øu 130 mm Max Fuelsize diameter 100 Cm Max Fuel length 20 Cm Power band 0 6 Kw Type of verification EN 13229 DEFRA NS3058 ...

Page 5: ...nimum draft of 12 Pa Ensure that the rated power of stove are suitable for the room Ensure that combustible material are at least 800 mm from rear part of the stove Warning It is not allowed to make any unauthorized changes to the stove Packing The stove comes packaged in the karton box on wooden pallet nailed down on vertical boards at the corners In karton box stove is fixed with EPS styrofoam e...

Page 6: ... it must reach out 450 mm from frame After unpacking of the stove first thing which needs to be done is removing buffle plate from firebox In order to remove buffle plate you need to remove two pins Picture 1 and after that draw buffle plate out from the firebox Picture 2 Picture 1 Picture 2 After removing of buffle plate you need to unscrew 4 bolts which hold connectiong piece for close combustio...

Page 7: ...hed to the box Picture 4 Furthermore two outside bolts on the bottom part of stoves needs to be removed also Picture 5 Picture 4 Picture 5 Next step of remving stove from the box is to lift stove a little and than drag stove toward yourself Picture 6 In order to continue instalation of the stove you need to unscrew 4 bolts on the box which holds flange of connecting piece Picture 7 Picture 6 Pictu...

Page 8: ...ll be installed on connecting piece with two bolts as it is showed on Picture 9 Picture 8 Picture 9 The next step of instalation is to install box in prepared hole Furthermore after installing box into the hole you need to pull through upper hole on the box connecting piece with installed smoke pipe Picture 10 Picture 10 ...

Page 9: ... you need to level box by 4 screws as it is presented on the Picture 12 Picture 11 Picture 12 There are provided 4 holes on the box for fixing on the down part Picture 13 and also 4 holes on the sides Box of the stove needs to be fixed by turbo bolts in the bottom or on the sides Picture 14 Picture 13 Picture 14 ...

Page 10: ...t back the two screws Picture 16 Picture 15 Picture 16 Also you need to twist and thinghten screw on the upper part of the stove in order to completely fix stove and box Picture 17 At the end of instalation you need to place back buffer plate and pins Picture 18 Picture 17 Picture 18 ...

Page 11: ...H JUDWHV DUH SODFHG ZKHUH EORFNLQJ ZRQW KDSSHQ Effective open area Min 350 mm for combustible setup Min 200 mm for non combustible setup Effective open area Min 500 mm for combustible setup Min 200 mm for non combustible setup Minimum distance to furniture 800 mm ...

Page 12: ...Distance to com mbustible Fla Bri e wall p ammable ma ick or Jøtul rotected aterials Firewall d by bric ck or Jøtul Firew 1 wall 12 ...

Page 13: ...r aro you on regu at it protects el or glass a tem floor observ ound the stov ulations conce the floor and and the stov ve national a ve erning flamm d flammable ve can be se The ca filled w mater Upper Lower and local reg mable mater material aga et up on bric avity may n with insula rial r convectio r convectio ulations on t ials in the v ainst sparks ck natural st not be ting n opening n openin...

Page 14: ...se for longer periods then these can be activated to prevent draft Chimney flue collar Chimney must have a minimum draught of 16 Pa this measured at the stove s connection piece If you are not sure of the stove s draught a chimney sweep can measure it The chimney sweep will also ensure that the chimney is airtight safe and equipped with a cleanout door If there are any other connections to the chi...

Page 15: ...flue mean a large area of masonry to cool down the gases especially if their outer surface is outside the building and exposed to the cold Efficient modern stoves release less heat into the flue and need especially strict attention to the chimney HEIGHT of the chimney the higher it is the more draught will be generated There is a procedure for calculating chimney height in BS EN13384 1 2002 but it...

Page 16: ...gh doors windows etc it is often necessary to fit a purpose made air vent An extractor fan or another fuel using appliance even in a different room can remove this air Chimney fire It is important to avoid soot in the chimney to avoid a fire See trouble shooting If a fire occurs close primary and secondary air completely call fire rescue and calmly go through their questioner ...

Page 17: ...17 Measurements ...

Page 18: ...heat Stoking overloading The stove is approved as an intermittent heater which means that you must stoke the stove with a suitable amount of fuel see data which then burns down into embers before you stoke it the next time Be careful of over stoking this causes great wear and tear to the stove and may in serious cases destroy the stove Stoking frequency with the recommended fuel is approximately 4...

Page 19: ...it is an advantage to all and as a bonus fuel is used much better Air supply for the combustion is added through 2 valves which are controlled through 2 controls the lower control handle is primary air which is used for lightning a cold stove and when firing dense wood Maximum air is added when the control is in outmost right position when fire is clear gently close the primary control by sliding ...

Page 20: ...ances for use in smoke control areas in England In Scotland and Wales this power rests with Ministers in the devolved administrations for those countries Separate legislation the Clean Air Northern Ireland Order 1981 applies in Northern Ireland Therefore it is a requirement that fuels burnt or obtained for use in smoke control areas have been 20uthorized in Regulations and that appliances used to ...

Page 21: ...ow density wood and 30 for high density wood In special weather conditions causing poor draft it can be necessary start up stove with full primary air as stove heats up slowly decrease the primary lever towards left also see section for lightning the stove Picture 28 Outmost left closed primary air Outmost right full open primary air ...

Page 22: ...ating the secondary air vent Picture 29 is typically open between 50 and 100 The secondary air vent determines the performance of the stove this stove is delivered with a lock which prevent complete closure of secoundary air control Picture 29 ...

Page 23: ...o make sure stoves airflow is optimal It is recommended to vacuum clean the drawer compartment and air channels with a suitable vacuum cleaner Make it a routine to check door gasket is firm and intact each time stove is cleaned out Warning To avoid gas leaks always make sure that the door grate and ash drawer is closed during any other operation than stocking Picture 30 Dampers left open Operation...

Page 24: ...Don t ever use any liquid fuels Don t ever use the stove for any kind of waste materials Use wood fuel only Type of wood Dry wood Kg m3 Compared to beech Hornbeam 640 110 Beech 580 100 Ash 570 98 Oak 570 98 Maple 570 98 Birch 540 88 Mountain pine 490 83 Spruce 370 65 Poplar 370 65 It is recommend to buy a moist measuring device make it a habit to check that your wood has less than 18 moist and pre...

Page 25: ... log Place firelighters between the sticks and then light Ensure that both air regulation valves are completely open pushed to the right Once logs are burning well close the primary air lever I by moving it slowly outmost to the left and afterwards adjust the secondary lever II to calm and clear flames within the needed power level Warning All exposed surfaces of this stove will reach high tempera...

Page 26: ...oke no less than 2 pieces of wood at each refueling After lighting procedure please see section regarding primary and secondary air control for intermittent use Never leave the fuel door open except from refueling procedure door should always be closed when hands doesn t touch the handle it should be locked ...

Page 27: ...os illustration With daily use make sure that the seals are intact and ensure that they are replaced before they are considered uptight Always remember to air out the room after repairs to painted surfaces and the use of care products The stove is specially designed for a fast and easy refit please see installation section Once a year or more according to national and local rules stove should be r...

Page 28: ... Soot build up on glass Incorrect secondary airflow setting Excessive primary air Fuel too wet See Fuel Wood pieces too large on lighting Inproper firewood waste wood pallets etc See Fuel Chimney draft insufficient dimensions height diameter or blockings See The chimney effect and cleaning Vacuum in room See Closed combustion Excessive soot build up in chimney Fuel too wet See Fuel The air valves ...

Reviews: