KNIGHT D-SERIES SERVO HOIST OPERATION MANUAL
SECTION 2
INSTALLATION
8
Step 2c) 19-pin Coil Cable Installation:
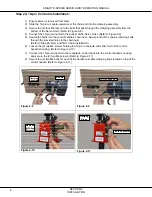
1) Ensure power is removed from hoist.
2) Slide the 19-pin coil cable upward over the chain and into the clamping assembly.
3) Secure the (4) four M6 nuts onto the bolts that pass through the clamping assembly from the
bottom of the Servo Hoist. (Refer to Figure 2-8)
4) Connect the 19-pin connector to the bottom of the Servo Hoist. (Refer to Figure 2-9)
5) Seat both chains into the control handle’s chain nest. Secure both of the chain’s retaining bolts
through the provided holes in the chain nest.
(Refer to Step 2d “4mm and 5mm Chain Installation”)
6) Loosen the (2) two M4 screws holding the 19-pin receptacle and slide it out of the control
handle’s housing. (Refer to Figure 2-10)
7) Connect the 19-pin connector to the receptacle, slide it back into the control handle’s housing
and secure the (2) two M4 screws. (Refer to Figure 2-11)
8) Secure the (2) two M6 bolts for each of the handle coil cable clamping rings located on top of the
control handle. (Refer to Figure 2-11)
Figure 2-8
Figure 2-9
Figure 2-10
Figure 2-11
19-Pin Connector
19-Pin Connector
Clamping
Rings
M6 Nuts
M4 Bolts
(M3 Allen
Wrench)
Clamping
Assembly


