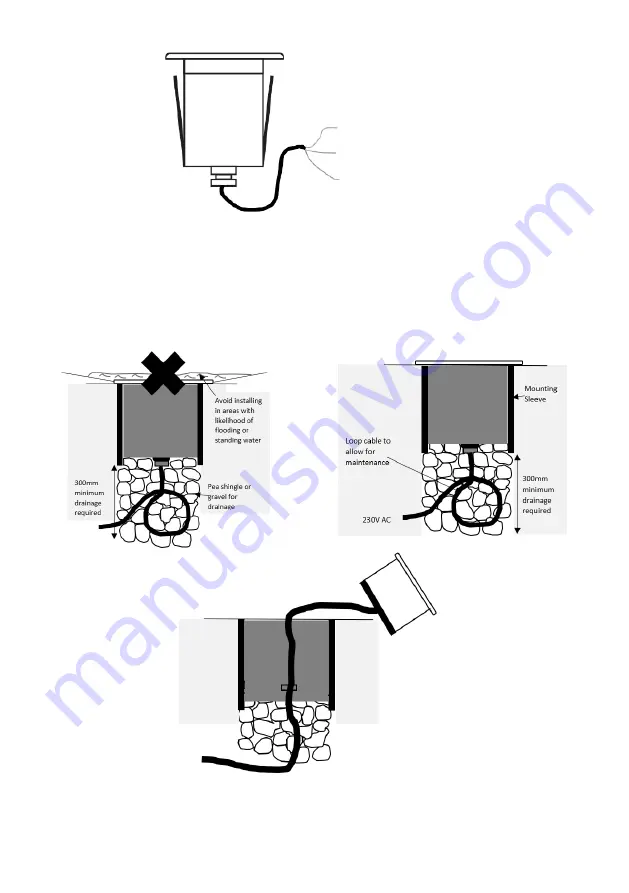
• We recommend not installing in areas where there is a high risk of flooding or areas where water may sit
on top of the fitting (see Fig. 3)
• Ensure a minimum of 300mm of drainage is put below the luminaire (see Fig. 4) and there must be
enough cable below the luminaire in order to carry out maintenance work (see Fig. 4 and Fig. 5)
• Switch on and check for correct operation
3
•
Connect the luminaire to the mains supply ensuring that correct polarity is observed (see Fig. 2):
Live (Brown), Earth (Green/Yellow), Neutral (Blue)
Fig. 2 (LEDGL5 without mounting sleeve shown in image)
•
We recommend not installing in areas where there is a high risk of flooding or areas where water
may sit on top of the fitting (see Fig. 3)
•
Ensure a minimum of 300mm of drainage is put below the luminaire (see Fig. 4) and there must be
enough cable below the luminaire in order to carry out maintenance work (see Fig. 4 and Fig. 5)
•
Switch on and check for correct operation
Live (Brown)
Earth (Green/Yellow)
Neutral (Blue)
Fig. 5
Fig. 4
Fig. 3
•
Connect the luminaire to the mains supply ensuring that correct polarity is observed (see Fig. 2):
Live (Brown), Earth (Green/Yellow), Neutral (Blue)
Fig. 2 (LEDGL5 without mounting sleeve shown in image)
•
We recommend not installing in areas where there is a high risk of flooding or areas where water
may sit on top of the fitting (see Fig. 3)
•
Ensure a minimum of 300mm of drainage is put below the luminaire (see Fig. 4) and there must be
enough cable below the luminaire in order to carry out maintenance work (see Fig. 4 and Fig. 5)
•
Switch on and check for correct operation
Live (Brown)
Earth (Green/Yellow)
Neutral (Blue)
Fig. 5
Fig. 4
Fig. 3
Fig. 2
(LEDGL5 without mounting sleeve shown in image)
Fig. 3
Fig. 4
Fig. 5


