18
3
Service Instructions
Step
Service task
1
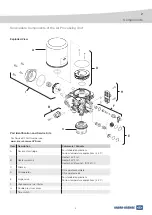
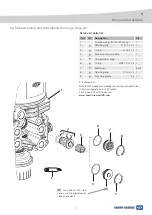
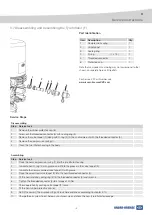
Lubricate the purge valve bore of the APU housing unit (1) with grease (9).
2
Lubricate new O-ring (4.2) and new sealing ring (4.3) with grease (9) and fit onto new piston (4.1). Note: Make sure
O-ring and sealing ring are correctly fitted to piston (4.1).
3
Place assembled exhaust piston assembly (4) into APU housing unit (1).
4
Place new compression spring (5) centrally onto exhaust piston assembly (4).
5
Select required new cover (7 or ‘S’) in accordance to ZB44.. type (see removal steps), lubricate new O-ring (6 or 3)
with grease (9) and fit into groove on selected cover (7 or ‘S’).
6
Push assembled cover (7 or ‘S’) into APU housing unit (1).
7
Press down and hold cover (7 or ‘S’) against compression spring (5) and fit retaining ring (8 or 2) securely into groove of the
APU housing unit (1) using suitable tool e.g. circlip pliers.
Fitting the new purge valve
Step
Service task -
Read and understand all steps before commencing work!
1
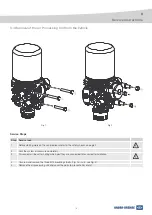
Clean the outside of the APU and its surroundings to prevent entry of dirt.
2
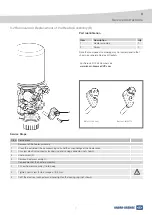
Position APU so that the purge valve points vertically upwards. Secure in a way to prevent movement but allow for
easy access to the required part.
3
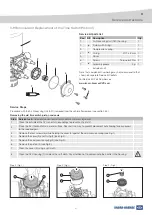
Remove retaining ring (8 or 2) using suitable tool e.g. circlip pliers, whilst holding cover (7 or ‘S’) against
compression spring (5).
4
Check type of cover fitted ( 7 or ‘S’ as shown in above diagram) and carefully remove. Then remove compression
spring (5) and piston assembly (4) (see Fig.2).
5
Clean the purge valve bore of APU housing unit (1) with a soft cloth.
Removing the old purge valve
Service Steps
Procedure with the Air Processing Unit (APU) removed from the vehicle (for removal see section 3 4)

