Measurement Operation
6
To avoid damage to the Meter or to the
equipment under test, disconnect circuit power
and discharge all high-voltage capacitors before
measuring capacitance. Use the DC Voltage
function to confirm that the capacitor is discharged.
To measure capacitance, connect the Meter as
follows:
1. Insert the red test lead into the terminal and the
black test lead into the COM terminal.
2. Set the rotary switch to and press BLUE
button to select nF measurement mode.
• At that time, the Meter will display a fixed
value as below which is the Meter internal fixed
distributed capacitance value. To ensure
accuracy when measuring a small value of
capacitance, the tested value must subtract
this value, REL mode can help on that.
• For more convenience, use the included
multi-purpose socket for measuring capacitor
with leads or SMT capacitor. Insert the
capacitor to be tested into the corresponding
“+” and “-” jack of the multi-purpose socket.
This method is more stable and correct for
small value of capacitance testing.
3. Connect the test leads across with the object
being measured. The measured value shows on
the display.
Note
• It takes a longer time when the tested
capacitor is more than 100uF
• The LCD displays OL indicating the tested
capacitor is shorted or it exceeds the
maximum range.
• When capacitance measurement has been
completed, disconnect all the connection
between multi-purpose socket, capacitor
and the meter.
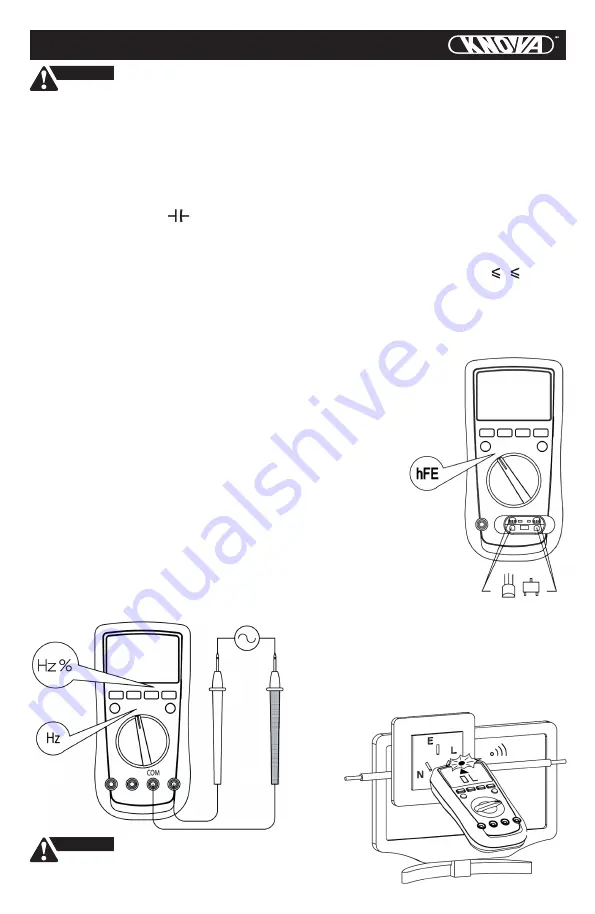
To measure frequency, connect the meter as
follows:
1. Insert the red test lead into the COM terminal.
2. Set the rotary switch to
Hz%
; frequency
measurement (Hz) is default or press
Hz%
button to select
Hz
measurement mode.
3. Connect the test leads across with the object
being measured. The measured value shows
on the display.
4. If you need to measure duty cycle, press
Hz%
button to select
%
measurement mode.
Note
• Input amplitude: (DC electric level is zero)
}
When 10Hz ~ 10MHz: 200mV a 30Vrms.
• When frequency measurement has been
completed, disconnect the connection
between the testing leads and the circuit
under test, and remove the testing leads
away from the input terminals of the Meter.
1. Set the rotary
switch to hFE.
2. Insert the multi-purpose
socket into the input
terminal as
shown on
figure 9.
3. Insert the transistor
to be tested into the
corresponding
multi-purpose socket jacks.
4. The LCD display hFE
nearest value
Note
• When transistor measurement has been
completed, disconnect all the connection
between multi-purpose socket, transistor
and the Meter.
To use EF function, connect the Meter as follows:
1. Set the rotary switch to EF and remove the test
lead from
the input
terminals.
WARNING
G. Frequency Measurement
(See figure 8)
I Transistor hFE
Measurement
(See figure 9)
J. EF Function
(See figure 10)
figure 8
figure 9
To avoid personal harm, do not attempt to
input higher than 30V rms tested frequency voltage
WARNING
figure 10
front
line


