background image

4

ASSEMBLY

ASSEMBLING CASTERS TO BASE

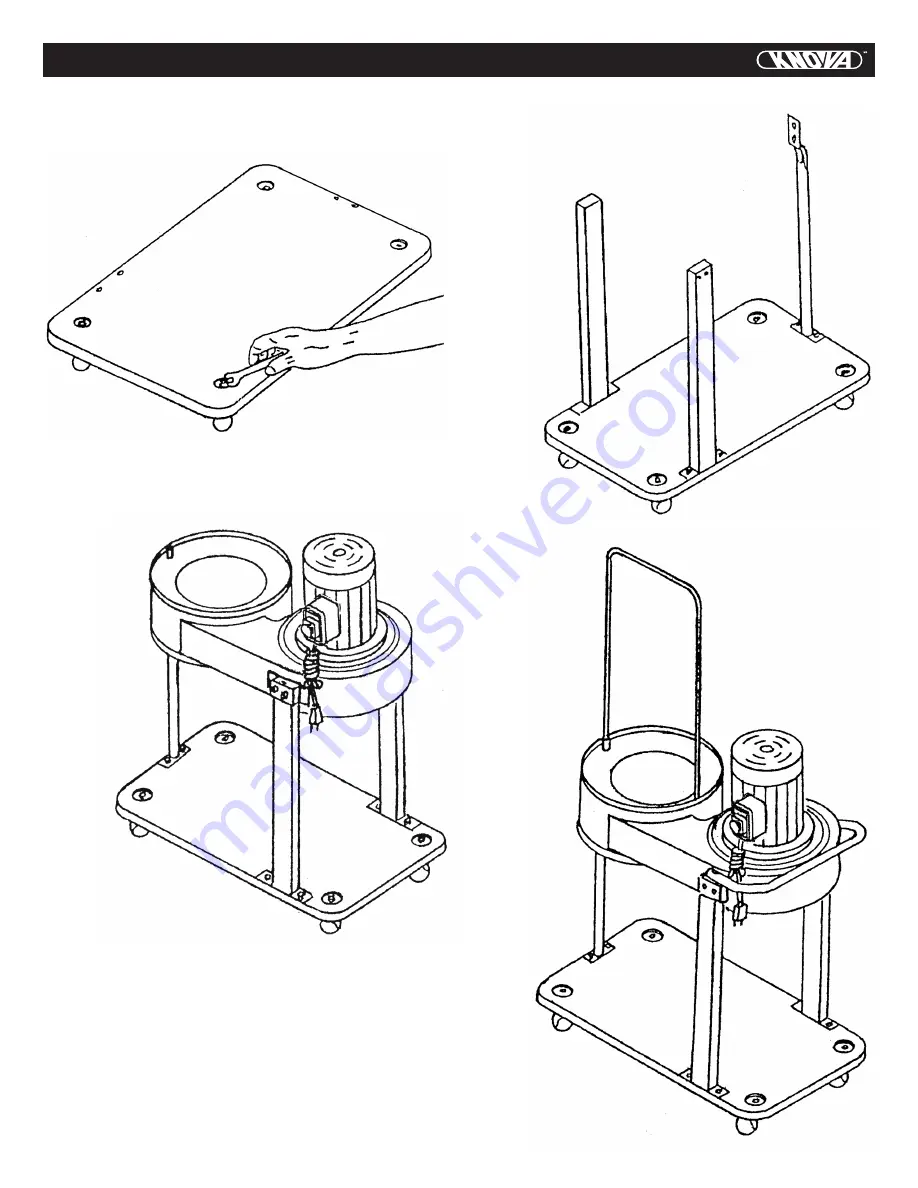
To assemble, place the base plate upside down and install

the four casters in holes provided and tighten with the screw

driver as shown Fig. 1

Install the upper

bag support to

the collector body

hole asshownin

Fig. 4

Next, the base plate side up, attach

the three coll support to the base plate

provided and tighten with the screw

driver as shown in Fig. 2

Fig. 1

Fig. 2

ASSEMBLING THE COLLECTOR BODY

WITH MOTOR TO SUPPORT

Attach place the

collector body

to the collector

support and

tighten with

open end

wrench as

shown in

Fig. 3

Fig. 3

ASSEMBLING

THE UPPER

BAG

SUPPORT

Fig. 4

ASSEMBLING CASTERS TO BASE

Summary of Contents for KN CP-1041B

Page 1: ...KN CP 1041B Dust collector 1 Colector de polvo H P ...

Page 2: ...llector wood material only Never use the collector to pick up combustible liquids metal shavings dust or other objects 4 Remove or fasten loose artlcles of clothing such as neckties confine hair Use safety face shield goggles or glasses to protect eyes 5 Remember to wear the ear protecting if the working environ ent is too noisy IMPORTANT SAFETY RULES Woodworking can be dangerous if safe and prope...

Page 3: ...or if the cutting tool is accidentally contacted 21 CHECK DAMAGED PARTS Before further use of the tool a guard or other part that is damaged should be carefully checked to ensure that it will operate properly and perform its intended function check for alignment of moving parts binding of moving parts breakage of parts mounting and any other conditions that may affect its operation A guard or othe...

Page 4: ...OWER SOURCE UNTIL THE MACHINE IS COMPLETELY ASSEMBLED AND YOU HAVE READ AND UNDERSTAND THE ENTIRE OWNER S MANUAL Figures 2 illstrates the components after they are removed from the shipping container A Base plate B Collector body with motor C Upper bag support D Handle bar E Two collector support If not properly earthed this power tool can cause an electrical shock Be sure that your outlet is eart...

Page 5: ... collector body hole asshownin Fig 4 Next the base plate side up attach the three coll support to the base plate provided and tighten with the screw driver as shown in Fig 2 Fig 1 Fig 2 ASSEMBLING THE COLLECTOR BODY WITH MOTOR TO SUPPORT Attach place the collector body to the collector support and tighten with open end wrench as shown in Fig 3 Fig 3 ASSEMBLING THE UPPER BAG SUPPORT Fig 4 ASSEMBLIN...

Page 6: ...NG DO NOT EXPOSE THE DUST COLLECTOR TO RAIN OR OPERATE THE MACHINE IN DAMP LOCATIONS The motor of the Dust Collector is shipped wired for 220 240 Volts Before connecting the dust collector to the power source make certain the switch is in the OFF position WARNING THIS TOOL MUST BE GROUNDED WHILE IN USE TO PROTECT THE OPERATROR FROM ELECTRIC SHOCK This dust collector must be grounded If it should m...

Page 7: ...nsport the machine with a full dust bag 3 Clean and apply a dry silicone lubricant monmthly to the impeller to remove any dirt or build up of pitch gum and wood shavings Removing dust and dirt Blow off motor with low pressure air to remove dust or dirt Air pressure above 50 P S I should not be used as high pressure may damage insulation and blow dirt under loosened tape The operate peforming this ...

Page 8: ...7 PARTS DIAGRAM Dust collector 1 Colector de polvo H P KN CP 1041 ...

Page 9: ...ra Antes de acceder a las terminales o partes eléctricas se deben interrumpir todos los circuitos 1 LEA Y ENTIENDA EL MANUAL DE INSTRUCCIONES ANTES DE OPERAR EL COLECTOR DE POLVO 2 Para reducir el riesgo de lesiones por las partes móviles desconecte la máquina antes de limpiar o dar servicio a la bolsa colectora o la manguera No se opere si la manguera no está correctamente conectada al puerto de ...

Page 10: ... REDUZCA AL MÍNIMO EL RIESGO DE ENCENDIDO NO INTENCIONAL Asegúrese que el botón esté en la posición APAGADO antes de conectar el cable de alimentación 20 NUNCA SE PARE SOBRE LA MÁQUINA Se puede lesionar gravemente si la máquina se inclina o si la pieza de corte se toca accidentalmente 21 REVISE LAS PIEZAS DAÑADAS Antes de continuar con el uso de la máquina cualquier guarda o pieza de la máquina qu...

Page 11: ...nectar DESEMPAQUE A B G E F I H J C D Fig 2 a3 10 NO jale el colector de polvo por el cable NUNCA permita que el cable haga contacto con bordes filosos superficies calientes aceite o grasa 11 NO desconecte el colector de polvo jalando el cable de alimentación SIEMPRE sujete la clavija al desconectarlo 12 NO maneje la clavija o el colector de polvo con las manos mojadas 13 REMPLACE un cable dañado ...

Page 12: ...erior en los orificios del cuerpo del colector como se muestra en la fig 4 A continuación instale los tres soportes de colector a la placa de base y apriete con un destornillador como se muestra en la fig 2 Fig 1 Fig 2 ENSAMBLE DEL CUERPO DEL COLECTOR CON MOTOR A LOS SOPORTES Una el cuerpo del colector a los soportes y apriete con una llave como se muestra en la fig 3 Fig 3 ENSAMBLE DE LA BOLSA SU...

Page 13: ...ERTENCIA NO EXPONGA EL COLECTOR DE POLVO A LA LLUVIA NI OPERE LA MAQUINAEN LUGARES HUMEDOS El motor del colector de polvo está cableado en fábrica para 220 240 V Antes de conectar el colector de polvo a la corriente eléctrica asegúrese de que esté en la posición OFF APAGADO ADVERTENCIA ESTA MAQUINA DEBE ESTAR ATERRIZADA DURANTE EL USO PARA PROTEGER AL OPERADOR CONTRA CHOQUE ELECTRICO Este colector...

Page 14: ...orte la máquina con la bolsa llena 3 Mensualmente limpie y aplique un lubricante seco de silicón al impulsor para retirar cualquier suciedad o acumulación de brea pegamento o aserrín Retiro de polvo y suciedad Aplique aire a baja presión sobre el motor para retirar el polvo o suciedad No se debe usar una presión de aire superior a 50 PSI ya que una alta presión puede dañar el aislamiento y soplar ...

Page 15: ...Dust collector 1 Colector de polvo H P KN CP 1041 14 DIAGRAMA DE PARTES ...

Page 16: ...www knova com mx ...

Reviews: