background image

8

CARE AND MAINTENANCE


All maintenance should only be carried out by 

a qualified service technician.

Cleaning


Before cleaning or performing any 

maintenance, remove the attachment from the 

screwgun. For safe and proper operation, always 

keep the attachment clean.
Always use only a soft, dry cloth to clean your 

screwgun; never use detergent or alcohol.
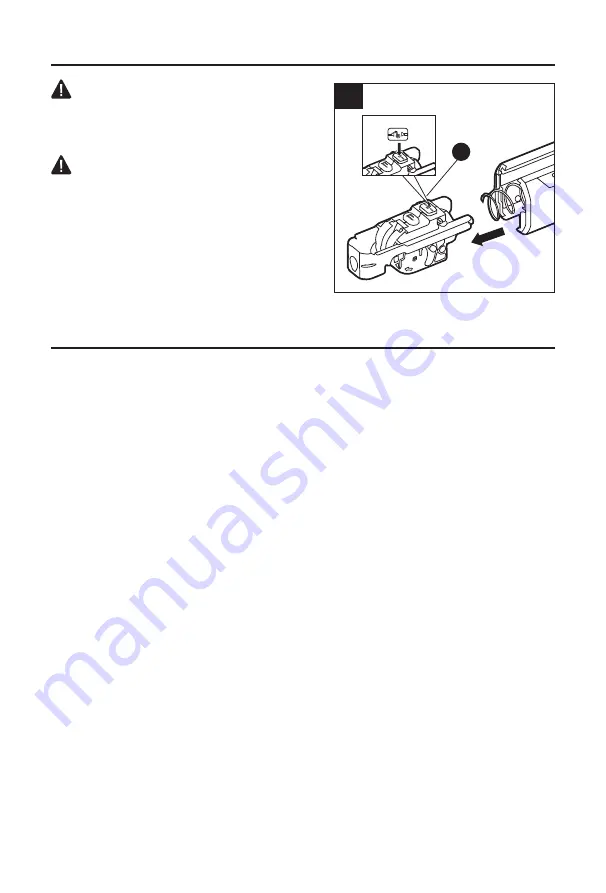
Remove the collated attachment: Press the locking 

button (F) and hold it, then pull out the carriage 

from the collated attachment.

WARRANTY

For 5 years from the date of purchase, the attachment is warranted for the original purchaser 

to be free from defects in material and workmanship. This guarantee does not cover damage 

due to abuse, normal wear, improper maintenance, neglect, unauthorized repair/alteration, or 

expendable parts and accessories expected to become unusable after a reasonable period of 

use. This warranty is limited to 90 days for commercial and rental use.
If you think your product meets the above guarantee criteria, please return it to the place of 

purchase with valid proof of purchase and the defective product will be repaired or replaced at 

no charge. This guarantee gives you specific legal rights, and you may also have other rights 

that vary from state to state.

5

Printed in China

F

Summary of Contents for 1260307

Page 1: ...ore returning to your retailer call our customer service department at 1 888 3KOBALT 1 888 356 2258 8 a m 8 p m EST Monday Friday ATTACH YOUR RECEIPT HERE Serial Number Purchase Date Español p 9 ITEM 1260307 SCREWGUN ATTACHMENT MODEL KDSA 124 03 ...

Page 2: ...cifications 2 Packaging Contents 3 Safety Information 4 Preparation 5 Operating Instructions 6 Care and Maintenance 8 Warranty 8 PRODUCT SPECIFICATIONS COMPONENT SPECIFICATIONS Screw capacities 1 1 1 8 1 1 4 1 1 2 1 5 8 1 7 8 2 2 1 8 ...

Page 3: ...ay for screw in depth I Depth adjustment dial J Screwgun bit WARNING Remove the tool from the package and examine it carefully Do not discard the carton or any packaging material until all parts have been examined If any part of the tool is missing or damaged do not attach the battery pack or use the tool until the part has been repaired or replaced Failure to heed this warning could result in ser...

Page 4: ...WARNING Read all safety warnings instructions illustrations and specifications provided with this tool Failure to follow all instructions listed below may result in electric shock fire and or serious injury SAVE ALL WARNINGS AND INSTRUCTIONS FOR FUTURE REFERENCE Do not expose to rain or wet conditions Keep work area clean and well lit Cluttered or dark areas invite accidents Keep children and byst...

Page 5: ...ount the working conditions and the work to be performed Use of the power tool for operations different from those intended could result in a hazardous situation Keep handles and grasping surfaces dry clean and free from oil and grease Slippery handles and grasping surfaces do not allow for safe handling and control of the tool in unexpected situations Have your power tool serviced by a qualified ...

Page 6: ...pth stop can cause damage during operation 2 Installing Screw Strips WARNING Remove the battery before carrying out any work on the power tool Insert screw strips from the guide shaft D to the guide rail C NOTICE Be sure that the screw strip aligns with the groove on the screw shaft and rail and insert it into place Improper operation can cause damage during operating 3 Adjusting Screw in Depth Th...

Page 7: ...th the hole on the collated attachment b Push the collated attachment until it snaps into place NOTE The bit is magnetized and will hold most commercial drywall screws Operating the screwgun with the collated attachment a Install the screw strip b Adjust the depth stop A set the screw length and adjust the screw in depth c Set direction of rotation clockwise on the screwgun d Grip the tool with bo...

Page 8: ...e attachment is warranted for the original purchaser to be free from defects in material and workmanship This guarantee does not cover damage due to abuse normal wear improper maintenance neglect unauthorized repair alteration or expendable parts and accessories expected to become unusable after a reasonable period of use This warranty is limited to 90 days for commercial and rental use If you thi...

Page 9: ...4 03 Preguntas problemas piezas faltantes Antes de volver a la tienda llame a nuestro departamento de servicio al cliente al 1 888 3KOBALT 1 888 356 2258 de lunes a viernes de 8 a m a 8 p m hora estándar del Este ADJUNTE SU RECIBO AQUÍ Número de serie Fecha de compra ...

Page 10: ... del paquete 11 Información de seguridad 12 Preparación 13 Instrucciones de funcionamiento 14 Cuidado y mantenimiento 16 Garantía 16 ESPECIFICACIONES DEL PRODUCTO COMPONENTE ESPECIFICACIONES Capacidad de tornillos 1 1 1 8 1 1 4 1 1 2 1 5 8 1 7 8 2 2 1 8 ...

Page 11: ...rofundidad de atornillado I Disco de ajuste de profundidad J Punta de pistola atornilladora ADVERTENCIA Retire la herramienta del paquete y examínela con cuidado No deseche la caja ni ningún material de embalaje hasta después de examinar todas las piezas Si falta alguna pieza o si alguna pieza está dañada no fije el paquete de baterías ni use la herramienta hasta reparar o reemplazar la pieza El i...

Page 12: ...CAS ADVERTENCIA Lea todas las advertencias las instrucciones las ilustraciones y las especificaciones de seguridad que se incluyen con esta herramienta No cumplir con todas las instrucciones que se detallan a continuación podría provocar descargas eléctricas incendios o lesiones graves GUARDE TODAS LAS ADVERTENCIAS E INSTRUCCIONES PARA REFERENCIA FUTURA No exponga el producto a la lluvia o a condi...

Page 13: ...se la herramienta eléctrica los accesorios las brocas etc de acuerdo con estas instrucciones considerando las condiciones de trabajo y el trabajo que desea realizar Utilizar la herramienta eléctrica en operaciones distintas para las que se diseñó podría crear una situación de peligro Mantenga los mangos y las superficies de agarre secas limpias y libres de aceite y grasa Las manijas y superficies ...

Page 14: ...e el funcionamiento 2 Instalación de las tiras de tornillos ADVERTENCIA Retire la batería antes de realizar cualquier trabajo en la herramienta eléctrica Inserte las tiras de tornillos desde el eje guía D hasta el riel guía C AVISO asegúrese de que la tira de tornillos esté alineada con la ranura del eje y el riel de los tornillos e insértela en su lugar Un uso inadecuado puede causar daños durant...

Page 15: ...ra hasta que encaje en su lugar NOTA la punta está magnetizada y aguantará la mayoría de los tornillos para paneles de yeso comerciales Operación de la pistola atornilladora con el accesorio en tira a Instale la tira de tornillos b Ajuste el tope de profundidad A ajuste la longitud de los tornillos y ajuste la profundidad de atornillado c Ajuste la dirección de rotación en dirección de las manecil...

Page 16: ...ado contra defectos de fabricación en los materiales y la mano de obra por 5 años a contar de la fecha de compra para el comprador original Esta garantía no cubre daños por abuso desgaste normal mantenimiento inadecuado negligencia reparación alteración no autorizada ni piezas fungibles o accesorios cuya inutilidad es esperable después de un período de uso razonable Esta garantía está limitada a 9...

Reviews: