14
200-2449
1.
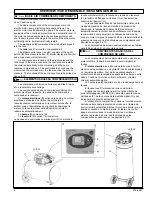
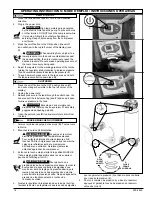
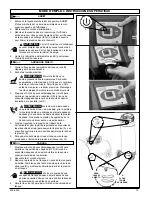
Close the tank petcock (see D). Turn in the clockwise
direction.
2.
Plug in the power cord.
High temperatures are generated
by the electric motor and the pump. To prevent burns
or other injuries, DO NOT touch the compressor while
it is running. Allow it to cool before handling or
servicing. Keep children away from the compressor
at all times.
3.
Press the on/off button to the ON position (the on/off
icon will show in the top left corner of the display) (see
C).
When adjusting from a higher to a
lower pressure, turn the knob counterclockwise past
the desired setting, then turn clockwise to reach the
desired pressure. Do not exceed operating pressure of
the tool or accessory being used.
4.
Adjust the regulator to the working pressure of the tool by
turning the regulator knob clockwise to increase pressure
(A) and counterclockwise to decrease the pressure (E).
5.
To see how much pressure is in the tank, press and hold
the tank pressure button down (see G).
1.
Press the on/off button to the OFF position (the on/off
icon will no longer be visible in the top left corner of the
display).
2.
Unplug the power cord.
3.
Reduce pressure in the tank through the outlet hose. You
can also pull the relief valve ring (see F) and keep it open
to relieve pressure in the tank.
Escaping air and moisture can
propel debris that may cause eye injury. Wear safety
goggles when opening petcock.
4.
Open the petcock (see B) to allow moisture to drain from
the tank.
1.
Fermez le robinet de purge du réservoir (D). Tourner vers
la droite.
2.
Branchez le cordon d'alimentation.
La pompe et le moteur
électrique produisent des températures élevées.
Pour éviter les brûlures et autres blessures, NE
touchez PAS le compresseur quand il est en marche.
Laissez-le refroidir avant de le manipuler ou
d'effectuer son entretien. Ne laissez jamais les
enfants s'approcher du compresseur.
3.
Enfoncez la touche marche/arrêt à la position MARCHE
(l'icône marche/arrêt apparaîtra dans le coin supérieur
gauche de l'affichage) (voir C).
Pour passer d’une
pression élevée à une pression plus basse, tournez le
bouton dans le sens contraire des aiguilles d’une
montre au–delà du réglage de pression désiré, puis
tournez–le dans le sens des aiguilles d’une montre
pour atteindre la pression désirée. Ne pas dépasser la
pression de fonctionnement de l’outil ou de
l’accessoire utilisé.
4.
Ajustez le régulateur à la pression de service de l'outil en
tournant le bouton du régulateur dans le sens des aiguilles
pour augmenter la pression (A) et dans le sens contraire
pour réduire la pression (E).
5.
Pour voir combien de pression il y a dans le réservoir,
appuyez et gardez la touche de pression du réservoir
enfoncée (voir G).
WARNING:
WARNING:
CAUTION:
AVERTISSEMENT:
AVERTISSEMENT:
OPERATING INSTRUCTIONS \ MODE D’EMPLOI \ INSTRUCCIONES OPERATIVAS
DAILY STARTUP
SHUTDOWN
MISE EN MARCHE QUOTIDIENNE
D
CLOSE
FERMÉ
SE CIERRAN
B
OPEN
OUVERT
ABIERTO
C
G
F
Summary of Contents for 200-2449
Page 23: ...200 2449 23 NOTES REMARQUES NOTAS ...
Page 24: ......


