background image

6

kobalttools.com

SAFETY INFORMATION

WARNING: Some dust created by power sanding, sawing, grinding, drilling and other 

construction activities contains chemicals known to the state of California to cause cancer, 
birth defects or other reproductive harm.

Some examples of these chemicals are:


— Lead from lead-based paints.


— Crystalline silica from bricks, cement, and other masonry products.


— Arsenic and chromium from chemically treated lumber.

Your risk from these exposures varies, depending upon how often you do this type of work.

To reduce your exposure to these chemicals:


; <!   %*


;  <! %        !      


X   %   %  %     
  <    %   %   %

Allowing dust to get into your mouth or eyes or to lie on the skin may promote absorption of 
harmful chemicals.

PREPARATION

Know Your Reciprocating Saw  

=      % &  %      
and safety requirements.

Summary of Contents for K18LD-26A

Page 1: ...18 VOLT LITHIUM ION DRILL DRIVER ITEM 0233310 MODEL K18LD 26A Français p 19 Español p 37 Questions problems missing parts Before returning to your retailer call our customer service department at 1 888 3KOBALT 1 888 356 2258 8 a m 8 p m EST Monday Friday ATTACH YOUR RECEIPT HERE Serial Number Purchase Date ...

Page 2: ...ge Contents 7 Operating Instructions 8 Care and Maintenance 17 Troubleshooting 18 Warranty 18 PRODUCT SPECIFICATIONS Component Motor 18 Volt DC Switch VSR Variable Speed Reversible No load speed 0 400 0 1650 RPM Clutch settings 23 1 Chuck capacity 1 2 in Maximum torque 415 in lbs ...

Page 3: ...er tools create sparks which may ignite the dust or fumes Distractions can cause you to lose control Electrical Safety adaptor plugs with earthed grounded power tools reduce the risk of electric shock refrigerators There is an increased risk of electric shock if your body is earthed or grounded Water entering a power tool will increase the risk of electric shock tool Keep the cord away from heat o...

Page 4: ...sed Power Tool Use and Care The correct Any power tool that cannot be controlled with the switch is dangerous and must be repaired 5 3 Such preventive safety measures reduce the risk of starting the power tool accidentally the power tool or these instructions to operate the power tool Power tools are dangerous in the hands of untrained users 6 7 and any other condition that may affect the power to...

Page 5: ...act hidden wiring or its own cord Contact with a live wire may make exposed metal parts of the power tool live and could give the operator an electric shock Clamping devices or a vise will hold the workpiece in place better and more safely than holding it by hand The tool as well as when transporting and storing it always set the rotational direction switch to the center position J There is risk o...

Page 6: ...bricks cement and other masonry products Arsenic and chromium from chemically treated lumber Z J X Work in a well ventilated area out microscopic particles Avoid prolonged contact with dust from power sanding sawing grinding drilling and other construction activities Wear protective clothing and wash exposed areas with soap and water Allowing dust to get into your mouth or eyes or to lie on the sk...

Page 7: ...irection of rotation selector forward center lock reverse C D LED work light E Handle F Gear selector G Keyless chuck H Belt clip 1 I Screw 1 WARNING Do not allow familiarity with the drill driver to cause carelessness Remember that become familiar with all of the operating features and safety instructions ...

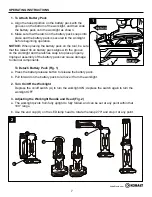
Page 8: ...nap into place properly Improper assembly of the battery pack can cause damage to internal components To Detach Battery Pack Fig 1 a Make sure that the trigger switch A is in the OFF position b Press the battery release button to release the battery pack c Pull forward on the battery pack to remove it from the drill driver WARNING Battery tools are always in operating condition Therefore the direc...

Page 9: ...applications and 2 for fast drilling or driving applications Use 1 for starting holes without a center punch drilling metals plastics or ceramics or in applications that require a higher torque 2 is better for drilling wood and wood composites and for using abrasive and polishing accessories NOTICE Never change gears while the tool is running Failure to obey this caution could result in serious da...

Page 10: ...possibility of accidental starting when not in use NOTICE To prevent gear damage always allow the drill driver to come to a complete stop before changing the direction of rotation NOTICE The drill driver will not run unless the direction of rotation selector is engaged fully to the left or right Electric Brake To stop the drill driver release the trigger switch and allow the tool to come to a comp...

Page 11: ...er the torque setting the more force the drill driver produces to When using the drill driver for different driving applications it is necessary to increase or decrease the torque to help prevent the possibility of damaging screw heads threads workpiece etc X Y and the type of bit fastener and material you will be using In general use greater torque for larger screws If the torque is too high the ...

Page 12: ...switch is depressed This provides additional light on the surface of the workpiece for operation in lower light areas The LED work light will turn off when the trigger switch is released 9 Installing The Belt Clip a Align the rib of the belt clip H with the hole on the base of the drill b Insert the screw I and tighten the screw securely with a Phillips screwdriver not included Removing the Belt C...

Page 13: ...the OFF center position opening is slightly larger than the shank of the bit you intend to use c Insert the bit NOTICE Rotate the chuck body in the direction of the Z WARNING Make sure to insert the drill bit straight shown in Fig 10a This could cause the drill bit to be thrown from the drill driver resulting in possibly serious 10 G 10a ...

Page 14: ...ill at your side 12 Drilling a Check the direction of rotation selector for the correct setting forward or reverse b Secure the material to be drilled in a vise or with clamps to keep it from turning as the drill bit rotates point to be drilled d Depress the trigger switch to start the drill driver e Move the drill bit into the workpiece applying only enough pressure to keep the bit cutting Do not...

Page 15: ...When drilling metals use light oil on the drill bit to keep it from overheating The oil will prolong the life of the bit and increase the drilling action c Begin drilling at a very low speed to prevent the bit from slipping off the starting point d Maintain a speed and pressure which will allow cutting without overheating the bit Applying too much pressure will Overheat the drill driver Wear the b...

Page 16: ...ge of the material a pilot hole will also help to prevent splitting of the wood e Use a countersinking bit available separately to accommodate the screw head so that it does not protrude from the surface pilot hole but remember that there must be enough remaining material for the screw to grip If as when using very hard woods try using a lubricant such as soap liquid soap is usually best z h To st...

Page 17: ... Removal The chuck can be removed and replaced a Lock the trigger switch by placing the direction of rotation selector in the center position c Use a screwdriver to remove the chuck screw by turning it in a clockwise direction d Insert a 5 16 in or larger hex key into the chuck of around the hex key e Tap the hex key sharply with a mallet in a counter clockwise direction This will loosen the chuck...

Page 18: ...his drill driver is warranted for the original user to be free from defects in material and workmanship return the drill driver along with proof of purchase to the place of purchase for a free replacement or refund or call 1 888 3KOBALT 1 888 356 2258 for warranty service This warranty is void if defects in materials or workmanship or damages result from repairs or parts the damage is due to norma...

Page 19: ...erved 18 VOLT CIRCULAR SAW ITEM 0233310 MODEL K18LC 26A Français p 21 Español p 41 Questions problems missing parts Before returning to your retailer call our customer service department at 1 888 3KOBALT 1 888 356 2258 8 a m 8 p m EST Monday Friday ATTACH YOUR RECEIPT HERE Serial Number Purchase Date ...

Page 20: ...ation 8 Contents 9 Operating Instructions 11 Care and Maintenance 18 Troubleshooting 19 Warranty 19 PRODUCT SPECIFICATIONS Component Motor 18V DC No load speed 4 500 RPM Saw blade size 5 1 2 in Cutting angle 50 Depth of cut at 90 1 1 2 in Depth of cut at 45 1 1 16 in ...

Page 21: ...may ignite the dust or fumes Keep children and bystanders away while operating a power tool Distractions can cause you to lose control Electrical safety adaptor plugs with earthed grounded power tools reduce the risk of electric shock refrigerators There is an increased risk of electric shock if your body is earthed or grounded Water entering a power tool will increase the risk of electric shock K...

Page 22: ...from moving parts If devices are provided for the connection of dust extraction and collection ensure that these are connected and properly used Use of these devices can reduce dust related hazards Power Tool Use and Care The correct Any power tool that cannot be controlled with the switch is dangerous and must be repaired 5 before making any adjustments changing accessories or storing power tools...

Page 23: ...andle or the motor housing If both hands are holding the saw they cannot be cut by the blade The guard cannot protect you from the blade below the workpiece 3 Less than a full tooth of the blade teeth should be visible below the workpiece a stable platform binding and loss of control cutting tool may contact hidden wiring or its own cord Contact with a live wire will also make 0 This improves the ...

Page 24: ...r attempt to remove the saw from the work or pull the saw backward while the blade is in motion or kickback may occur Investigate and take corrective actions to eliminate the cause of blade binding saw teeth are not engaged in the material If the saw blade is binding it may walk up or kickback from the workpiece as the saw is restarted Larger panels tend to sag under their own weight Supports must...

Page 25: ...otection Do not use with any abrasive wheels WARNING Some dust created by power sanding sawing grinding drilling and other construction activities contains chemicals known to the state of California to cause cancer birth defects or other reproductive harm Some examples of these chemicals are Lead from lead based paints Crystalline silica from bricks cement and other masonry products Arsenic and ch...

Page 26: ...ools com PREPARATION Know Your Circular Saw Before attempting to use the circular saw familiarize yourself with all of its operating features and safety requirements S K P U I R J C D F E T T G O B M N Q H V L A ...

Page 27: ...er blade guard J Base plate K Upper blade guard L Depth locking lever M Depth scale N Spindle lock button O Blade P Blade bolt Q R Lock off button S Blade guide notch T Edge guide slots U Blade rotation indicator V Blade wrench WARNING Do not allow familiarity with the saw to cause carelessness Remember that one become familiar with all of the operating features and safety instructions WARNING ...

Page 28: ...l the part has been repaired or replaced Failure to heed this warning could result in WARNING removing blades cleaning or when it is not in use Applications This saw can be used for the purpose listed below Cutting all types of wood and wood products NOTICE The use of abrasive cut off wheels is not recommended with this saw ...

Page 29: ...red to the tool before beginning operation CAUTION When placing the battery pack on the tool be sure that the raised rib on battery pack aligns with the groove on the saw and the latches snap into place properly Improper assembly of the battery pack can cause damage to internal components To Detach Battery Pack Fig 2 a Ensure that the trigger switch is in the OFF position b Depress the battery rel...

Page 30: ...o move freely f Verify that the saw teeth the arrow on the saw blade and the blade rotation indicator U on the blade guard are all pointing in the same direction NOTICE The saw teeth should point upward at the front of the saw as shown in Fig 3 g Fit the saw blade O inside the lower blade guard I and onto the spindle i Depress and hold the spindle lock button N and replace the blade bolt P the saw...

Page 31: ... is operating correctly when it moves freely and instantly returns to the closed position If the saw is dropped check the lower blade guard and bumper for damage at all depth settings before using it If the lower blade guard does not snap closed at any time remove the battery pack from the saw from the full open position to the closed position several times This will usually restore the guard to i...

Page 32: ...e the depth locking lever L to release it c Determine the desired depth of cut and raise or lower the saw until the indicator mark on the saw aligns with the desired depth on the depth scale M e Lower depth locking lever to lock it into position 7 Adjusting the Cutting Angle a Loosen the bevel locking knob E located on the 0 50 bevel scale F on the base plate J b Tilt the body of the saw until the...

Page 33: ...ble cut follow these helpful hints b Avoid placing your hand on the workpiece while making a cut Fig 8 c Support the workpiece so that the cut is always to the operator s side and not directly in line with the operator s body d Support the workpiece near the cut e Clamp the workpiece securely so that the workpiece will not move during the cut Fig 8a f Always place the saw on the portion of the wor...

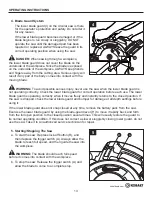
Page 34: ... guideline is the amount by which the guide should be offset Use a guide when making long or wide rip cuts Rip Cutting Using a Straight Edge Fig 9a a Secure the workpiece b Clamp a straight edge to the workpiece using C clamps not included NOTICE Position the C clamps so that they will not interfere with the saw housing during the cut c Press the lock off button and depress the trigger switch to s...

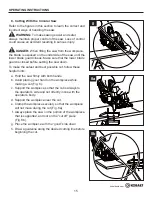
Page 35: ...guideline on the cutting material X between 0 and 50 WARNING Attempting a bevel cut without having the bevel locking knob securely locked in place can result e Rest the front edge of the base on the workpiece without touching the blade to the workpiece f Start the saw and allow the blade to reach full speed g Guide the saw into the workpiece and make the cut h Release the trigger switch and allow ...

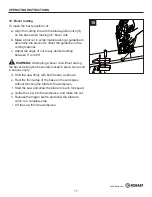
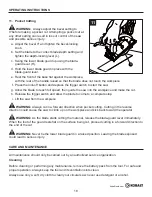
Page 36: ... saw into the workpiece and make the cut h Release the trigger switch and allow the blade to come to a complete stop i Lift the saw from the workpiece WARNING Always cut in a forward direction when pocket cutting Cutting in the reverse direction could cause the saw to climb up on the workpiece and kick back toward the operator WARNING As the blade starts cutting the material release the blade guar...

Page 37: ...olt 5 YEAR HASSLE FREE WARRANTY This circular saw is warranted for the original user to be free from defects in material and workmanship return the circular saw along with proof of purchase to the place of purchase for a free replacement or refund or call 1 888 3KOBALT 1 888 356 2258 for warranty service This warranty is void if defects in materials or workmanship or damages result from repairs or...

Page 38: ...ved 18 VOLT RECIPROCATING SAW ITEM 0233310 MODEL K18LR 26A Français p 15 Español p 31 Questions problems missing parts Before returning to your retailer call our customer service department at 1 888 3KOBALT 1 888 356 2258 8 a m 8 p m EST Monday Friday ATTACH YOUR RECEIPT HERE Serial Number Purchase Date ...

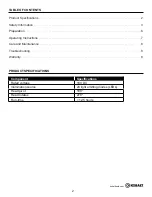
Page 39: ...TS 2 Safety Information 3 Preparation 6 Contents 7 Operating Instructions 8 Care and Maintenance 12 Troubleshooting 13 Warranty 13 PRODUCT SPECIFICATIONS Component Rated voltage 18V DC No load speed 0 3 000 SPM Blade stroke 7 8 in 22mm ...

Page 40: ...operating a power tool Distractions can cause you to lose control Electrical Safety adapter plugs with earthed grounded power tools reduce the risk of electric shock refrigerators There is an increased risk of electric shock if your body is earthed or grounded the risk of electric shock tool Keep the cord away from heat oil sharp edges or moving parts Damaged or entangled cords increase the risk o...

Page 41: ...roper footing and balance at all times This enables better control of Dress properly Do not wear loose clothing or jewelry Keep your hair clothing and gloves away from moving parts If devices are provided for the connection of dust extraction and collection facilities ensure that these are connected and properly used Use of these devices can reduce dust related Power Tool Use and Care The correct ...

Page 42: ...connection from one terminal to another 3 9 4 4 Service parts 2 2 cutting accessory may contact hidden wiring or its own cord A cutting accessory contacting electric shock platform of control 5 3 base J Check that it has been securely seated before use 6 3 7 Accidental starting could cause It may be hot after prolonged use Use a dust mask or dust of the blade to your hand is hidden from your sight...

Page 43: ...se chemicals are Lead from lead based paints Crystalline silica from bricks cement and other masonry products Arsenic and chromium from chemically treated lumber Your risk from these exposures varies depending upon how often you do this type of work To reduce your exposure to these chemicals X Allowing dust to get into your mouth or eyes or to lie on the skin may promote absorption of harmful chem...

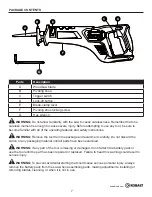
Page 44: ...ACKAGE CONTENTS A B C D E F Parts Description A B Pivoting shoe C D Lock off button E Blade clamp lever F G WARNING WARNING WARNING If any part of the tool is missing or damaged do not attach the battery pack or WARNING G ...

Page 45: ... components To Detach Battery Pack Fig 1 b Depress the battery release button located on the front of the battery pack to release the battery pack 2 Blade Selection important to select the correct blade for the particular application and type of material to be cut more teeth are better for cutting metal or plastic We recommend 14 TPI blades for plastics and soft metals and 18 TPI blades for hard m...

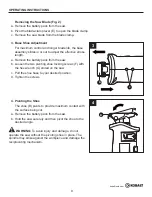
Page 46: ...the Saw Blade Fig 2 b Pivot the blade clamp lever E to open the blade clamp 3 Base Shoe Adjustment length Z c Pull the shoe base to your desired position 4 Pivoting the Shoe the surface being cut desired angle WARNING reciprocating mechanism 4 B 3 B F ...

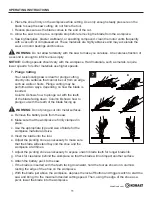
Page 47: ...rease or decrease the 6 General Cutting WARNING Before attaching the battery pack to the WARNING Hold the tool only by the plastic handle and the insulated grip area to help prevent electrical electric shock place X X Y g Mark the line of cut clearly If cutting metal apply cutting oil to the line X areas only 6 5 C D ...

Page 48: ...ssure as the blade comes to the end of the cut X WARNING NOTICE Y 7 Plunge Cutting directly into surfaces that cannot be cut from an edge inserted Y X Y WARNING Do not plunge cut into metal surfaces place d Insert the blade into the tool X X Y X Y X A B 7 ...

Page 49: ...blade is not supplied Y blade cool increase cutting action and prolong blade life WARNING Never use gasoline because normal sparking could ignite the fumes vise clamp the layers together to reduce vibration and tearing of the material CARE AND MAINTENANCE X Cleaning Before cleaning or performing any maintenance remove the battery pack from the tool For safe and X ...

Page 50: ...2 Dull blade 3 Improper blade 4 Warped blade X Z Y 2 Replace or sharpen blade 3 Replace blade 4 Replace blade Blade cannot be removed blade clamp slot Y shakes 1 Damaged blade 2 Loose blade 1 Replace blade 2 Remove the blade and reinstall it 5 YEAR HASSLE FREE WARRANTY Qz X Q JJ _ to state Printed in China KOBALT and the K Design are registered trademarks of LF LLC All Rights Reserved ...

Page 51: ...18 VOLT LITHIUM ION LED WORKLIGHT ITEM 0233310 MODEL K18LL 26A Français p 9 Español p 19 Questions problems missing parts Before returning to your retailer call our customer service department at 1 888 3KOBALT 1 888 356 2258 8 a m 8 p m EST Monday Friday ATTACH YOUR RECEIPT HERE Serial Number Purchase Date ...

Page 52: ...tion 3 Preparation 6 Operating Instructions 7 Care and Maintenance 8 Troubleshooting 8 Warranty 8 PRODUCT SPECIFICATIONS Component Rated voltage 18V DC Illumination source 24 light emitting diodes LEDs Head pivot 180 Head rotates 270 Run time 12 5 hours ...

Page 53: ...istractions can cause you to lose control Electrical Safety Power tool plugs must match the outlet Never modify the plug in any way Do not use any adaptor plugs with earthed grounded power tools reduce the risk of electric shock refrigerators There is an increased risk of electric shock if your body is earthed or grounded the risk of electric shock tool Keep the cord away from heat oil sharp edges...

Page 54: ...er Tool Use and Care The correct X 5 3 Such Store idle power tools out of the reach of children and do not allow persons unfamiliar with the power tool or these instructions to operate the power tool the hands of untrained users Maintain power tools Check for misalignment or binding of moving parts breakage of parts and any other condition that may affect the power tool s operation If damaged have...

Page 55: ...suitable for Use of any other battery 3 3 from one terminal to another 3 9 4 4 Service parts 2 2 9 CAUTION Hot Surface Risk of Burns Do Not Touch Risk of Fire Keep Away From Combustible Materials IMPORTANT SAFETY INSTRUCTIONS WARNING _ children z X z Q X z JQX Save These Instructions ...

Page 56: ...6 kobalttools com PREPARATION Know Your Worklight requirements Part Description A B Center pivot C LED D End cap E Handle WARNING B C D A E ...

Page 57: ...lacing the battery pack on the tool be sure Improper assembly of the battery pack can cause damage to internal components To Detach Battery Pack Fig 1 a Press the battery release button to release the battery pack 2 Turn On Off the Worklight X 3 180 range b Use the end cap D on the LED lamp head to rotate the lamp 270 and stop it at any point D B D 2 1 ATTACH DETACH ...

Page 58: ...TROUBLESHOOTING WARNING before performing troubleshooting procedures Problem Possible Cause Corrective Action 1 Battery is depleted 1 Charge the battery 2 The light is broken 2 Return it to the service center 5 YEAR HASSLE FREE WARRANTY Qz X Q JJ _ to state Printed in China Kobalt K Design are registered trademarks of LF LLC All rights reserved ...

Page 59: ...are registered trademarks of LF LLC All Rights Reserved Questions problems missing parts Before returning to your retailer call our customer service department at 1 888 3KOBALT 1 888 356 2258 8 a m 8 p m EST Monday Friday AB13463 ATTACH YOUR RECEIPT HERE Serial Number Purchase Date Français p 13 Español p 27 ...

Page 60: ...F CONTENTS 2 Safety Information 3 Preparation 7 Operating Instructions 8 Care and Maintenance 12 Warranty 12 SPECIFICATIONS Component Model K18 LBS23A Battery type Lithium Battery voltage 18V DC Battery charger model K18 LC25A ...

Page 61: ... warnings and all instructions Failure to follow all warnings and instructions may result in electric Save all warnings and instructions for future reference The term power tool in the warnings refers to your mains operated corded power tool or battery operated cordless power tool Work area safety Keep the work area clean and well lit Cluttered and dark areas invite accidents Power tools create sp...

Page 62: ...se the risk of electric shock Battery Tool Use and Care 2 manufacturer A charger that is suitable for one type of battery pack packs metal objects such as paper clips coins keys nails screws or other small metal objects that can make a connection from one terminal to another Shorting the battery terminals 3 9 4 4 Service using only identical replacement parts This will ensure that the safety of th...

Page 63: ...y are always in operating condition Be aware of changing accessories Following this rule will reduce the risk of battery pack or charger that has been dropped or received a sharp blow X dispose of a dropped or damaged battery immediately presence of a source of ignition such as a pilot light To X immediately ...

Page 64: ...s 4 3 4 them with clean water for at least 10 minutes and then seek immediate medical attention Following this rule will reduce the 0 come in contact with plastic parts These substances contain chemicals that can damage weaken or destroy plastic Refer to them frequently and use them to instruct others who may use this tool If you lend someone this tool lend them these instructions also to prevent ...

Page 65: ... Know Your Battery Pack Before attempting to use the battery pack familiarize yourself with all of its operating features and safety requirements Part Description A Battery release button B Electrical contacts C Battery vents C B A ...

Page 66: ...ck s charge status Press the power indicator button to display the LED lights The LED lights will stay lit for approximately 4 seconds NOTICE The power indicator can be used whether the battery is attached or removed from tool 80 100 charge 60 79 charge 40 59 charge 20 39 charge Under 20 charge Completely discharged or overloaded High low temperature ...

Page 67: ...attery circuitry protects the battery pack from extreme temperature over discharge and over charge To protect the battery from damage and prolong its life the battery pack circuitry will turn off the battery pack if it becomes overloaded or if the temperature becomes too high during use This may happen in extremely high torque binding and stalling situations This intelligent system will shut down ...

Page 68: ...ot develop a memory if it is charged after only a partial discharge It is not necessary to completely discharge the battery pack before recharging Remove the battery pack from the tool and recharge it when it is convenient or when it is not in use Use the POWER BAR to determine when the battery pack needs to be recharged It is recommended that the battery pack be brought up to full charge This lit...

Page 69: ...ed battery pack model K18 LBS23A will charge in about 30 minutes in a surrounding temperature between 32 F 0 C and 104 F 40 C a Always charge the battery pack with the correct charger b Connect the charger to a power supply c Attach the battery pack to the charger by aligning the raised ribs of the battery pack with the slot in the charger Slide the battery pack onto the charger Fig 1 1 ...

Page 70: ...manship If you believe that the battery pack is defective at any time during the purchase to the place of purchase for a free replacement or refund or call 1 888 3KOBALT for warranty service This warranty is void if defects in materials or workmanship or damages result from repairs or alterations which have been made or attempted by others or the unauthorized use of nonconforming parts the damage ...

Page 71: ...registered trademarks of LF LLC All Rights Reserved Questions problems missing parts Before returning to your retailer call our customer service department at 1 888 3KOBALT 1 888 356 2258 8 a m 8 p m EST Monday Friday AB13455 ATTACH YOUR RECEIPT HERE Serial Number Purchase Date Français p 17 Español p 35 ...

Page 72: ... input 120 Volts 60Hz AC only Charging output 18V DC Charging time for batteries K18 LB15A 30 min K18 LB30A 60 min K18 LBS23A 30 min Optimum charging temperature 32 F 0 C 131 F 55 C NOTICE For use with the following batteries only Battery Pack Voltage Battery Capacity Type K18 LB15A 18V 1 500 mAh max Li Ion K18 LB30A 18V 3 000 mAh max Li Ion K18 LBS23A 18V 1 300 mAh max Li Ion ...

Page 73: ...batteries Other types of batteries may burst causing personal injury and damage SAFETY INFORMATION Know the Tool To operate this tool carefully read this manual and all labels to the tool before using it Keep this manual available for future reference Important Read All Instructions Thoroughly General Safety Rules for all Power Tools WARNING Read all safety warnings and all instructions Failure to...

Page 74: ...s radiators ranges and refrigerators There is an increased risk of electric shock if your body is earthed or grounded Water entering a power tool will increase the risk of electric shock pulling or unplugging the power tool Keep the cord away from heat oil sharp edges or moving parts Damaged or entangled cords increase the risk of electric shock cord suitable for outdoor use Use of a cord suitable...

Page 75: ...tion before connecting to a power source and or battery pack picking up or carrying the tool Carrying power have the switch on invites accidents 2 3 power tool on A wrench or a key left attached to a rotating part of the power tool may result in personal injury all times This enables better control of the power tool in unexpected situations 3 your hair clothing and gloves away from moving parts Lo...

Page 76: ...ith the power tool or these instructions to operate the power tool Power tools are dangerous in the hands of untrained users 6 7 of moving parts breakage of parts and any other condition that may affect the power tool s operation If damaged have the power tool repaired before use Many accidents are caused by poorly maintained power tools Properly maintained cutting tools with sharp cutting edges a...

Page 77: ... pack packs Use of any other battery packs may create a risk of injury 3 3 connection from one terminal to another Shorting the battery 3 9 4 4 help Liquid ejected from the battery may cause irritation or burns Service person using only identical replacement parts This will ensure that the safety of the power tool is maintained ...

Page 78: ...mage Do not use the charger outdoors or expose it to wet or damp conditions Water entering the charger will increase the risk of electric shock Use of an attachment not recommended or sold by the battery or injury to persons Do not abuse the cord or charger Never use the cord to carry the charger Do not pull the charger cord to disconnect the plug from a receptacle Damage to the cord or charger co...

Page 79: ...f the plug on charger X Y _ Cord Length Feet 25 ft 50 ft 100 ft Cord Size AWG 16 16 16 NOTICE AWG American Wire Gauge Do not operate the charger with a damaged cord or plug which could cause shorting and electric shock If damaged have the charger repaired or replaced by an authorized service technician Do not operate the charger if it has received a sharp blow been dropped or has otherwise been da...

Page 80: ...mage to the charger if metal items should fall into the opening It will also help prevent damage to the charger during a power surge Risk of electric shock Do not touch the uninsulated portion of output connector or uninsulated battery terminal Save these instructions Refer to them frequently and use them to instruct others who may use this tool If you loan this tool to someone else also loan thes...

Page 81: ...afety requirements Part Description A Electric Contacts B Air Vents WARNING Do not allow familiarity with the charger to cause carelessness Remember that one careless moment is enough to cause severe injury Before attempting to use any tool be sure to become familiar with all of the operating features and safety instructions A B ...

Page 82: ...vent possible problems 1 Lithium Ion Batteries It is not necessary to run down the Lithium Ion battery pack charge before recharging Remove the battery pack from the tool and recharge it when it is convenient NOTICE A fully discharged battery pack will charge about 30 60 minutes depending on the type ...

Page 83: ...of the battery pack charging 6 After charging is complete the green LED on the charger will be on and the power indicator LED lights will turn off The power indicator LED lights will illuminate when the power indicator button is pressed while the battery pack is off the charger NOTICE The battery pack will fully charge but will not overcharge if left on the charger NOTICE The charger may warm with...

Page 84: ...31 F 55 C Defective Flashing Off Battery pack or charger is defective Charging Off Flashing Charging Fully charged Off On Charging is complete DEFECTIVE BATTERY BATTERY CHARGING BATTERY FULL HI LO TEMP Wall mount holes Fig 2 The charger has hanging holes for convenient storage Install screws in the wall 5 inches strong to hold the combined weight of the charger and battery pack 2 ...

Page 85: ...material and workmanship period simply return the charger along with proof of purchase to the place of purchase for a free replacement or refund or call 1 888 3KOBALT for warranty service This warranty is void if defects in materials or workmanship or damages result from repairs or alterations which have been made or attempted by others or the unauthorized use of nonconforming parts the damage is ...

Reviews: