background image

5

SAFETY INFORMATION

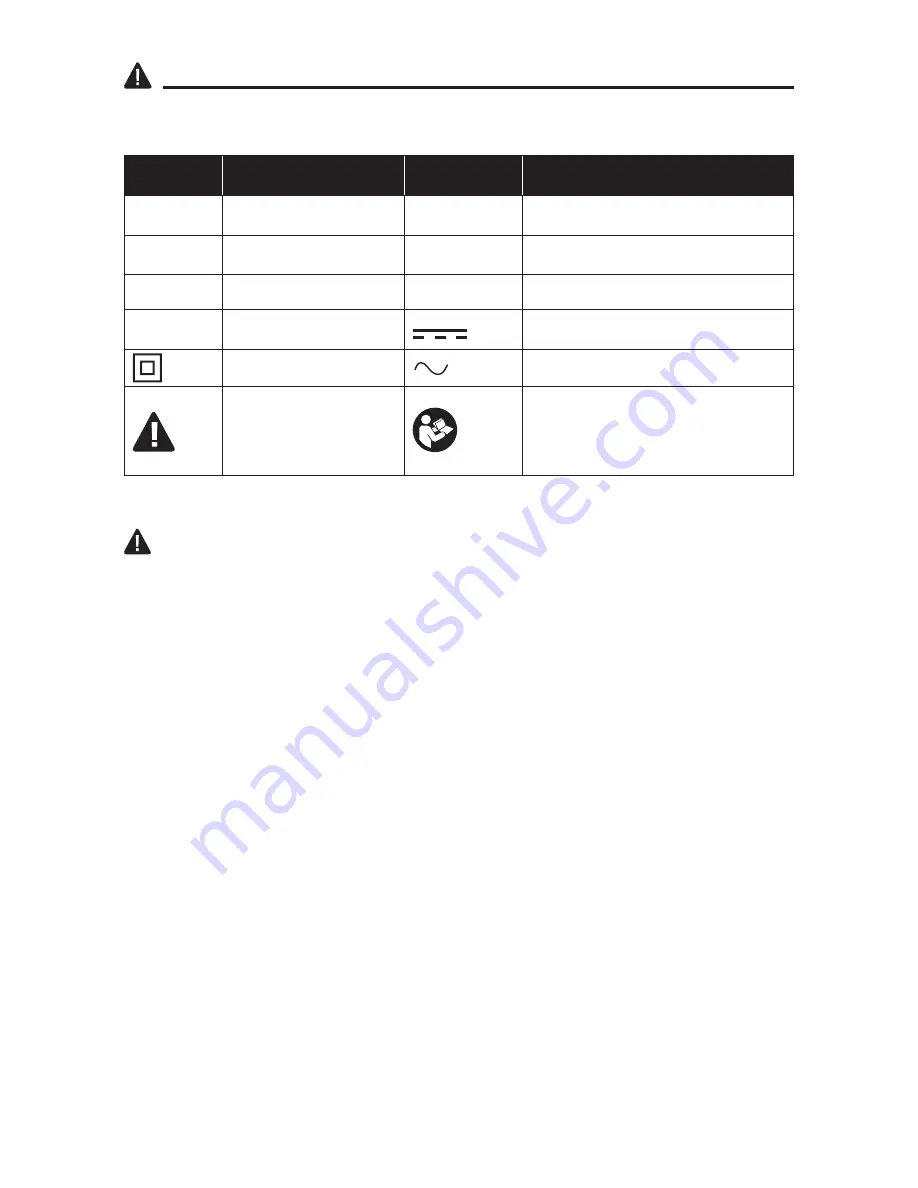
Some of the following symbols may be used on this tool. Please study them and their meaning. 

Proper interpretation of these symbols will allow you to operate the tool better and more safely.

SYMBOL

DEFINITION

SYMBOL

DEFINITION

V

Volts

n

0

No-load Speed

A

Amps

/min

Revolutions or Strokes per Minute

Hz

Hertz

IPM

Impact per Minute

W

Watts

Direct Current

Class II Construction

Alternating Current

A danger, warning, 

or caution. It means 

‘Attention! Your safety 

is involved.’

To reduce the risk of injury, user 

must read instruction manual. 

General Power Tool Safety Warnings 

 WARNING

•  Read all safety warnings and all instructions. 

Failure to follow the warnings and 

instructions may result in electric shock, fire and/or serious injury.

Save all warnings and instructions for future reference

The term “power tool” in the warnings refers to your mains-operated (corded) power tool or 

battery-operated (cordless) power tool.

Work Area Safety
•  Keep work area clean and well lit. 

Cluttered or dark areas invite accidents.

•  Do not operate power tools in explosive atmospheres, such as in the presence of 

flammable liquids, gases or dust. 

Power tools create sparks which may ignite the dust or 

fumes.

•  Keep children and bystanders away while operating a power tool. 

Distractions can cause 

you to lose control.

Electrical Safety
•  Power tool plugs must match the outlet. Never modify the plug in any way. Do not use 

any adaptor plugs with earthed (grounded) power tools. 

Unmodified plugs and matching 

outlet will reduce the risk of electric shock.

•  Avoid body contact with earthed or grounded surfaces, such as pipes, radiators, 

ranges and refrigerators. 

There is an increased risk of electric shock if your body is 

earthed or grounded.

•  Do not expose power tools to rain or wet conditions. 

Water entering a power tool will 

increase the risk of electric shock. 

•  Do not abuse the cord. Never use the cord for carrying, pulling or unplugging the 

power tool. Keep cord away from heat, oil, sharp edges or moving parts. 

Damaged or 

entangled cords increase the risk of electric shock.

Summary of Contents for K7RH-03

Page 1: ...eturning to your retailer call our customer service department at 1 888 3KOBALT 1 888 356 2258 8 a m 8 p m EST Monday Friday ATTACH YOUR RECEIPT HERE Serial Number Purchase Date ITEM 0953776 7 AMP ROTARY HAMMER MODEL K7RH 03 Español p 29 Français p 14 ...

Page 2: ...and Maintenance 13 Troubleshooting 13 Warranty 13 PRODUCT SPECIFICATIONS COMPONENT SPECIFICATION Rated power input 120 V 60 Hz 7A No load speed 0 1 150 min Rated impact 0 4 000 IPM Maximum drilling diameter Concrete 1 1 32 in 26mm Wood 1 3 16 in 30mm Steel 1 2 in 13mm Brickwork with hollow bit 2 11 16 in 68mm Tool holder SDS plus ...

Page 3: ...ndle recess E Lock on button J Depth gauge WARNING Remove the tool from the package and examine it carefully Do not discard the carton or any packaging material until all parts have been examined If any part of the tool is missing or damaged do not connect the plug to the power source or use the tool until the part has been repaired or replaced Failure to heed this warning could result in serious ...

Page 4: ...cts or other reproductive harm Some examples of these chemicals are Lead from lead based paints Crystalline silica from bricks cement and other masonry products Arsenic and chromium from chemically treated lumber Your risk from these exposures varies depending upon how often you do this type of work To reduce your exposure to these chemicals Work in a well ventilated area Work with approved safety...

Page 5: ...ol Work Area Safety Keep work area clean and well lit Cluttered or dark areas invite accidents Do not operate power tools in explosive atmospheres such as in the presence of flammable liquids gases or dust Power tools create sparks which may ignite the dust or fumes Keep children and bystanders away while operating a power tool Distractions can cause you to lose control Electrical Safety Power too...

Page 6: ... Loose clothes jewelry or long hair can be caught in moving parts If devices are provided for the connection of dust extraction and collection facilities ensure that these are connected and properly used Use of dust connection can reduce dust related hazards Power Tool Use and Care Do not force the power tool Use the correct power tool for your application The correct power tool will do the job be...

Page 7: ...ands Secure the workpiece A workpiece clamped with clamping devices or in a vice is held more secure than by hand Always wait until the power tool has come to a complete stop before placing it down The tool insert can jam and lead to loss of control over the power tool Do not use the power tool with a damaged cord Do not touch the damaged cord and pull the plug from the outlet when the cord is dam...

Page 8: ...h b To unlock the lock on button and stop continuous operation press the trigger switch 3 Mode Selector WARNING ALWAYS unplug the rotary hammer before making any adjustments Failure to unplug the rotary hammer could result in accidental starting which can cause serious personal injury The mode selector C allows the tool to be set for various applications To change the operating mode press the butt...

Page 9: ...justments Failure to unplug the rotary hammer could result in accidental starting which can cause serious personal injury This rotary hammer is equipped with an auxiliary handle H For ease of operation you can use the handle with either the left or right hand For optimal operation the handle can be positioned at any location around the tool To assemble the auxiliary handle a Disconnect the plug fr...

Page 10: ...ing any adjustments or installing accessories Failure to unplug the rotary hammer could result in accidental starting which can cause serious personal injury Accessory selection For drilling in wood metal and plastic and for screw driving use the corresponding SDS plus adapter not included to use a normal bit that is not SDS plus type For hammer drilling and chiseling use SDS plus bits To Install ...

Page 11: ...every two or three holes when drilling When using a rotary hammer for upward drilling operations in concrete attach the dust receptacle to collect dust or particles for easy operation Insert the dust receptacle from the tip of the bit 9 Operating the Rotary Hammer WARNING To reduce the risk of explosion identify any utility lines such as electricity gas or water supply lines that are hidden in the...

Page 12: ... Drilling WARNING Do not use a bit without SDS plus for hammer drilling the bit and drill chuck will be damaged by hammer drilling When working with an SDS plus bit set the mode selector C to hammer drilling mode Chipping and Chiseling a Unplug the rotary hammer b Set the mode selector C to chiseling mode c Install an appropriate chisel accessory d To adjust the head of the chisel to the desired a...

Page 13: ...inal purchaser from the original purchase date for five 5 years subject to the warranty coverage described herein This rotary hammer is warranted for the original user to be free from defects in material and workmanship If you believe the rotary hammer is defective at any time during the specified warranty period simply return the rotary hammer along with proof of purchase to the place of purchase...

Page 14: ...s questions des problèmes des pièces manquantes Avant de retourner l article au détaillant appelez notre service à la clientèle au 1 888 3KOBALT 1 888 356 2258 entre 8 h et 20 h HNE du lundi au vendredi ARTICLE 0953776 MARTEAU ROTATIF DE 7 A MODÈLE K7RH 03 ...

Page 15: ...arantie 28 CARACTÉRISTIQUES DU PRODUIT COMPOSANT CARACTÉRISTIQUES Puissance d alimentation nominale 120 V 60 Hz 7 A Vitesse à vide De 0 à 1150 min Nombre de coups nominal 0 à 4000 coups par minute Diamètre de perçage maximal Béton 26 mm 1 1 32 po Bois 30 mm 1 3 16 po Acier 13 mm 1 2 po Maçonnerie de briques avec foret creux 68 mm 2 11 16 po Porte outils SDS Plus ...

Page 16: ...liaire E Bouton de verrouillage J Jauge de profondeur AVERTISSEMENT Retirez l outil de l emballage et examinez le soigneusement Ne jetez ni la boîte ni le matériel d emballage avant d avoir examiné toutes les pièces Si une pièce de la scie est manquante ou endommagée évitez de brancher la fiche sur le cordon d alimentation ou d utiliser l outil tant que la pièce n a pas été réparée ou remplacée Le...

Page 17: ...omb provenant de peintures à base de plomb silice cristalline provenant de la brique du ciment ou d autres matériaux de maçonnerie arsenic et chrome provenant du bois d œuvre traité avec un produit chimique Les risques liés à l exposition à ces produits varient selon le nombre de fois où vous pratiquez ces activités Pour réduire votre exposition à ces produits chimiques Travaillez dans un endroit ...

Page 18: ...es consulter ul térieurement L expression outil électrique utilisée dans les avertissements correspond aux outils électriques alimentés sur secteur à fil ou alimentés par piles sans fil Mesures de sécurité dans l aire de travail L aire de travail doit être propre et bien éclairée Une aire de travail encombrée et peu éclairée augmente le risque d accident N utilisez pas d outils électriques dans un...

Page 19: ... protection comme un masque antipoussières des chaussures de sécurité antidérapantes un casque de protection et des protecteurs auditifs lorsque les conditions l exigent réduit les risques de blessures Prenez des mesures afin d éviter que l outil se mette en marche accidentellement Assurez vous que l interrupteur est sur la position d arrêt avant de brancher l outil sur une source d alimentation o...

Page 20: ...ortez des protecteurs d oreilles Une exposition à du bruit peut entraîner une perte auditive Utilisez une poignée auxiliaire si elle est fournie avec l outil La perte de maîtrise de l outil peut causer des blessures Tenez l outil électrique par sa poignée isolée lorsque l accessoire tranchant est susceptible d entrer en contact avec des fils dissimulés ou avec son propre cordon d alimentation Si u...

Page 21: ...signes de sécurité AVERTISSEMENT Maintenez votre vigilance à mesure que vous prenez l habitude de vous servir de votre marteau rotatif Gardez à l esprit qu il suffit d être négligent une fraction de seconde pour causer de graves blessures Avant d utiliser un outil familiarisez vous avec toutes ses caractéristiques et fonctions ainsi qu avec les consignes de sécurité Ne tentez pas de modifier cet o...

Page 22: ...terrupteur b Appuyez sur l interrupteur pour libérer le bouton de verrouillage et arrêter le fonctionnement continu 3 Sélecteur de mode AVERTISSEMENT Débranchez TOUJOURS le marteau rotatif avant de lui apporter des ajustements Omettre de débrancher le marteau rotatif pourrait provoquer des mises en marche accidentelles ce qui peut entraîner des blessures graves Le sélecteur de mode C permet de rég...

Page 23: ...ièrement enclenché vers la gauche ou la droite 5 Poignée auxiliaire AVERTISSEMENT Débranchez TOUJOURS le marteau rotatif avant de lui apporter des ajustements Omettre de débrancher le marteau rotatif pourrait provoquer des mises en marche accidentelles ce qui peut entraîner des blessures graves Ce marteau rotatif est doté d une poignée auxiliaire H Par souci de commodité cette poignée peut être di...

Page 24: ...ez sur le bouton de serrage de la poignée auxiliaire H puis insérez la jauge de profondeur dans le trou hexagonal de la poignée Placez la jauge de profondeur afin que les nervures soient orientées tel qu il est illustré Assurez vous que le côté avec les nervures est orienté vers le bas c Réglez la jauge de profondeur à la position désirée puis relâchez le bouton de serrage La jauge de profondeur s...

Page 25: ...B vers l arrière b Tenez le manchon de blocage et retirez l accessoire Les accessoires SDS Plus sont conçus pour une liberté de mouvement ce qui cause une excentricité lorsque l outil est déchargé cependant l accessoire se centre automatiquement lorsqu il fonctionne et ce sans modifier la précision du perçage AVERTISSEMENT N utilisez pas de forets et de ciseaux dont la tige est endommagée 8 Utilis...

Page 26: ...s de type SDS Plus par exemple un foret avec une tige cylindrique utilisez un adaptateur SDS Plus compatible non inclus a Supportez la pièce travaillée près de l emplacement du perçage b Fixez solidement la pièce travaillée afin qu elle ne se déplace pas durant le perçage c Débranchez le marteau rotatif d Installez l adaptateur approprié e Réglez l outil au mode de perçage et réglez la profondeur ...

Page 27: ... REMARQUE Mettez l outil en marche et appliquez une légère pression sur celui ci afin qu il ne rebondisse pas de façon non maîtrisée Appliquer une pression très forte sur l outil n augmentera pas son efficacité i Attendez toujours que l outil soit complètement arrêté avant de le déposer sur la pièce travaillée ou sur toute autre surface ENTRETIEN L entretien ne doit être effectué que par un techni...

Page 28: ...ti contre les défauts de matériaux et de fabrication Si vous croyez que le marteau rotatif est défectueux pendant la période de garantie retournez le simplement accompagné d une preuve d achat là où vous l avez acheté pour obtenir un remplacement ou un remboursement Vous pouvez également appeler au 1 888 3KOBALT 1 888 356 2258 pour effectuer une réclamation au titre de la garantie Cette garantie s...

Page 29: ...tantes Antes de volver a la tienda llame a nuestro Departamento de Servicio al Cliente al 1 888 3KOBALT 1 888 356 2258 de lunes a viernes de 8 a m a 8 p m hora estándar del Este ADJUNTE SU RECIBO AQUÍ ARTÍCULO 0953776 TALADRO PERCUTOR DE 7 AMPERIOS MODELO K7RH 03 ...

Page 30: ...lemas 43 Garantía 43 ESPECIFICACIONES DEL PRODUCTO COMPONENTE ESPECIFICACIONES Entrada de alimentación calificada 120 V 60 Hz 7 A Velocidad sin carga 0 a 1 150 min Clasificación contra impactos 0 a 4000 IPM Diámetro de perforación máximo Concreto 2 6 cm 1 1 32 pulg Madera 3 cm 1 3 16 pulg Acero 1 3 cm 1 2 pulg Ladrillo con broca hueca 6 8 cm 2 11 16 pulg Soporte para herramientas SDS plus ...

Page 31: ...go auxiliar E Botón de bloqueo J Medidor de profundidad ADVERTENCIA Retire la herramienta del paquete y examínela con cuidado No deseche la caja ni ningún material de embalaje hasta después de examinar todas las piezas Si falta alguna pieza de la herramienta o si alguna pieza está dañada no conecte el enchufe a la fuente de alimentación ni use la herramienta hasta reparar o reemplazar la pieza El ...

Page 32: ... congénitos u otros daños en el aparato reproductivo Algunos ejemplos de estos químicos son Plomo de pinturas a base de plomo Sílice cristalina de ladrillos cemento y otros productos de mampostería Arsénico y cromo de madera tratada con químicos El riesgo que corre debido a la exposición a estos químicos varía según la frecuencia con que realiza este tipo de trabajo Para reducir la exposición a es...

Page 33: ...dad y todas las instrucciones El incumplimiento de las advertencias y las instrucciones podría provocar descargas eléctricas incendios o lesiones graves Guarde todas las advertencias e instrucciones para referencia futura El término herramienta eléctrica que aparece en las advertencias se refiere a la herramienta eléctrica que se conecta a la línea principal con cable o a la herramienta eléctrica ...

Page 34: ...enta eléctrica No utilice una herramienta eléctrica si está cansado o bajo los efectos de drogas alcohol o medicamentos Un momento de desatención mientras opera herramientas eléctricas puede provocar lesiones personales graves Use un equipo de protección personal Use siempre lentes de protección Los equipos de protección como mascarillas antipolvo zapatos de seguridad antideslizantes cascos protec...

Page 35: ...entas de corte que se mantienen adecuadamente con sus bordes de corte afilados son menos propensas a trabarse y son más fáciles de controlar Use la herramienta eléctrica los accesorios las brocas etc de acuerdo con estas instrucciones considerando las condiciones de trabajo y el trabajo que desea realizar El uso de la herramienta eléctrica en operaciones distintas para las que fue diseñada podría ...

Page 36: ...argas eléctricas PREPARACIÓN Conozca su taladro percutor Este taladro percutor se puede usar para aplicaciones de perforación con martillo en concreto ladrillo y piedra además de cincelado ligero y para taladrar en madera metal y plástico así como también para atornillar con accesorios específicos Antes de intentar usar el taladro percutor familiarícese con todas sus características de operación y...

Page 37: ...continuamente mantenga presionado el interruptor de gatillo de velocidad variable D y luego presione el botón de bloqueo Suelte el interruptor de gatillo b Para desbloquear el botón de bloqueo y detener la operación continua presione interruptor de gatillo 3 Selector de modo ADVERTENCIA SIEMPRE desenchufe el taladro percutor antes de realizar cualquier ajuste El incumplimiento de esta advertencia ...

Page 38: ... completo antes de cambiar la dirección de la rotación NOTA el taladro percutor no funciona a menos que el selector de dirección de rotación esté completamente posicionado a la izquierda o la derecha 5 Mango auxiliar ADVERTENCIA SIEMPRE desenchufe el taladro percutor antes de realizar cualquier ajuste El incumplimiento de esta advertencia puede provocar un arranque accidental del taladro percutor ...

Page 39: ...e de alimentación b Presione el botón de la abrazadera en el mango auxiliar H luego inserte el medido de profundidad a través del orificio hexagonal del mango Ubique el medido de profundidad con las varillas orientadas como se muestra Asegúrese de que el costado con las varillas apunte hacia abajo c Ajuste el medidor de profundidad hasta la posición deseada luego libere el botón de la abrazadera E...

Page 40: ...irar el accesorio a Jale nuevamente del manguito de fijación B b Sostenga el manguito de fijación y retire el accesorio Un accesorio SDS plus está diseñado para brindar libertad de movimiento lo que causa excentricidad cuando la herramienta está sin carga sin embargo el accesorio se centra automáticamente durante la operación sin perjudicar la precisión de taladrado ADVERTENCIA No use brocas cince...

Page 41: ...o una broca para taladro con un vástago cilíndrico se debe usar un adaptador SDS plus correspondiente no se incluye a Apoye la pieza de trabajo cerca de la ubicación de taladrado b Sujete la pieza de trabajo con firmeza de forma que no se mueva mientras realiza el taladrado c Desenchufe el taladro percutor d Instale el adaptador adecuado e Establezca la herramienta en el modo de taladrado y config...

Page 42: ...rramienta y comience a trabajar NOTA encienda la herramienta y aplique una leve presión en ella de modo que no rebote descontroladamente Presionar demasiado fuerte la herramienta no aumentará su eficacia i Siempre espere a que la herramienta se detenga completamente antes de colocarla en la pieza de trabajo u otra superficie CUIDADO Y MANTENIMIENTO Todas las tareas de mantenimiento deben estar a c...

Page 43: ...a defectos en los materiales y la mano de obra Si cree que el taladro percutor presenta fallas en cualquier momento durante el período de garantía especificado simplemente devuélvalo junto con un comprobante de compra al lugar donde lo compró para obtener un reemplazo o reembolso sin cargo o llame al 1 888 3KOBALT 1 888 356 2258 para obtener el servicio de garantía Esta garantía es nula si los def...

Page 44: ......

Reviews: