background image


16

TROUBLESHOOTING

 WARNING: 

Turn off the tool and detach the battery pack from the tool before performing 

troubleshooting procedures.

PROBLEM

POSSIBLE CAUSE

CORRECTIVE 

ACTION

Workpiece contact element does not 

depress fully - tool does not operate.

Too few nails in the 

magazine.

Reload the magazine 

with nails.

Workpiece contact 

element is jammed.

Remove the battery pack 

and clear debris.

Tool operates properly, but the nails are 

not fully driven into the workpiece.

Depth of drive isn’t deep 

enough.

Adjust the depth of drive;

Nail is too long for wood 

hardness.

Use the nail length that 

is appropriate for the 

wood type.

Tool operates properly, but the nails are 

driven too deep into the workpiece.

Depth of drive is too 

deep.

Adjust the depth of drive.

Tool jams frequently.

Incorrect nails.

Verify that the nails are 

the correct size.

Damaged nails.

Replace nails.

Dirty magazine.

Clean the magazine.

Tool will not drive a fastener or cycles 

without driving a nail

Driving mechanism is 

dirty.

Clean the nail channel 

as described in the 

Maintenance section of 

the manual.

WARRANTY

For 5 years from the date of purchase, the power tool is warranted and for 3 years from date of 

purchase the battery & charger are warranted for the original purchaser to be free from defects 

in material and workmanship. This guarantee does not cover damage due to abuse, normal 

wear, improper maintenance, neglect, unauthorized repair/alteration, or expendable parts and 

accessories expected to become unusable after a reasonable period of use.
If you think your product meets the above guarantee criteria, but the nailer doesn’t shoot nails 

any more or the workpiece contact/magazine doesn’t work after being used for a period of 

time, please return it to the place of purchase with valid proof of purchase and the defective 

product will be repaired or replaced at no charge. This guarantee gives you specific legal 

rights, and you may also have other rights that vary from state to state.

Lowe’s Home Centers LLC.

MOORESVILLE, NC 28117

Printed in China

Summary of Contents for KNA 124B-03

Page 1: ...OBALT and logo design are trademarks or registered trademarks of LF LLC All rights reserved Questions problems missing parts Before returning to your retailer call our customer service department at 1 888 3KOBALT 1 888 356 2258 8 a m 8 p m EST Monday Sunday You could also contact us at partsplus lowes com Español p 17 ...

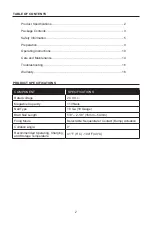
Page 2: ...14 Troubleshooting 16 Warranty 16 PRODUCT SPECIFICATIONS COMPONENT SPECIFICATIONS Rated voltage 24 V d c Magazine Capacity 110 Nails Nail Type 18 Ga 18 Gauge Brad Nail Length 5 8 2 1 8 16mm 54mm Firing Mode Selectable Sequential or Contact Bump Actuation Collation angle 0 Recommended Operating Charging and Storage Temperature 41 F 5 C 104 F 40 C ...

Page 3: ...ode selector button J Trigger switch C LED work light K Handle D Magazine release button L Depth adjustment dial E Magazine M No mar pad 3pcs F Nail indicator windows N No mar pad storage G Workpiece contact O Belt clip H Jam release P 2 18Ga nails 100 count A J N C M K B P O H C D L E F G I ...

Page 4: ...not discard the carton or any packaging material until all parts have been examined WARNING If any part of the tool is missing or damaged do not attach the battery pack or use the tool until the part has been repaired or replaced Failure to heed this warning could result in serious injury ...

Page 5: ...eated by power sanding sawing grinding drilling and other construction activities contains chemicals known to the state of California to cause cancer birth defects or other reproductive harm Some examples of these chemicals are Lead from lead based paints Crystalline silica from bricks and cement and other masonry products and Arsenic and chromium from chemically treated lumber Your risk from thes...

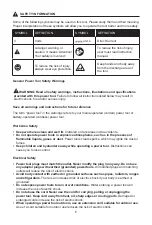
Page 6: ...ed or dark areas invite accidents Do not operate power tools in explosive atmospheres such as in the presence of flammable liquids gases or dust Power tools create sparks which may ignite the dust or fumes Keep children and bystanders away while operating a power tool Distractions can cause you to lose control Electrical Safety Power tool plugs must match the outlet Never modify the plug in any wa...

Page 7: ...used Use of dust collection can reduce dust related hazards Do not let familiarity gained from frequent use of tools allow you to become complacent and ignore tool safety principles A careless action can cause severe injury within a fraction of a second Power tool use and care Do not force the power tool Use the correct power tool for your application The correct power tool will do the job better ...

Page 8: ...fire explosion or risk of injury Do not expose a battery pack or tool to fire or excessive temperature Exposure to fire or temperature above 265 F 130 C may cause explosion Follow all charging instructions and do not charge the battery pack or tool outside the temperature range specified in the instructions Charging improperly or at temperatures outside the specified range may damage the battery a...

Page 9: ...Your Brad Nailer Your nailer has been designed for driving nails into wooden workpieces Before attempting to use the brad nailer familiarize yourself with all of its operating features and safety requirements WARNING Do not allow familiarity with the nailer to cause carelessness Remember that one careless moment is enough to cause severe injury Before attempting to use any tool be sure to become f...

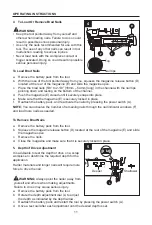
Page 10: ...se or when carrying the tool at your side 2 To Attach Belt Clip The belt clip O can be installed on the left or right side of the nailer depending on operator preference a Remove the battery pack from the tool b Align the belt clip and the screw hole on the right or left side of the nailer c Using a phillips head screwdriver not included tighten the screw securely 3 No Mar Pad The no mar pad M att...

Page 11: ...lace f Reattach the battery pack and reactivate the nailer by pressing the power switch A NOTE You can observe the number of remaining nails through the nail indicator windows F and load more nails as needed To Remove Brad Nails a Remove the battery pack from the tool b Squeeze the magazine release button D located at the rear of the magazine E and slide the magazine open c Remove the nails d Clos...

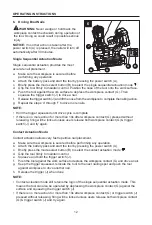
Page 12: ...here is no more action for more than 10s after workpiece contact G pressed without releasing firing will be locked unless users release both workpiece contact G trigger switch J and try again Contact Actuation Mode Contact actuation allows very fast repetitive nail placement a Make sure the workpiece is secured before performing any operation b Attach the battery pack and start the tool by pressin...

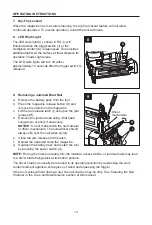
Page 13: ...jam release latch I and open the jam release H d Remove the jammed nail using a flat head screwdriver or pliers if necessary NOTICE Do not mar scratch the nail channel or driver mechanism The screwdriver should always slip over the nail when prying e Close the jam release and the latch f Reload the nails and close the magazine g Reattach the battery pack and restart the tool by pressing the power ...

Page 14: ...move the battery pack and keep the tool pointed away from you while cleaning the nail channel NOTICE Clean the nail channel regularly Failure to properly and regularly clean the channel will cause premature failure or void the warranty a Remove the battery pack from the tool b Press the magazine release button D to open the magazine E and then remove the nails from the magazine c Lift the jam rele...

Page 15: ...igh after continuous operation Let the tool to cool down Connection failure including Poor connection between the battery pack and the tool Other electric connection failure Remove and reattach the battery pack then restart the tool Or contact authorized service center for repairs Electronic components failure Contact authorized service center for repairs Electronic components failure Restart the ...

Page 16: ...ive a fastener or cycles without driving a nail Driving mechanism is dirty Clean the nail channel as described in the Maintenance section of the manual WARRANTY For 5 years from the date of purchase the power tool is warranted and for 3 years from date of purchase the battery charger are warranted for the original purchaser to be free from defects in material and workmanship This guarantee does no...

Page 17: ...tipo son marcas comerciales o marcas registradas de LF LLC Todos los derechos reservados Preguntas problemas piezas faltantes Antes de volver a la tienda llame a nuestro Departamento de Servicio al Cliente al 1888 3KOBALT 1 888 356 2258 de lunes a domingo de 8 a m a 8 p m hora estándar del Este También puede ponerse en contacto con nosotros en partsplus lowes com ...

Page 18: ... 34 Garantía 34 ESPECIFICACIONES DEL PRODUCTO COMPONENTE ESPECIFICACIONES Voltaje nominal 24 V de CC Capacidad del cargador 110 clavos Tipo de clavo Cal 18 calibre 18 Largo del clavo 5 8 2 1 8 16 0 mm 54 0 mm Modo de disparo Seleccionable actuación secuencial o de contacto golpe Ángulo de intercalación 0 Temperatura recomendada de funcionamiento carga y almacenamiento De 5 C 41 F a 40 C 104 F ...

Page 19: ...tor de modo J Interruptor tipo gatillo C Luz de trabajo LED K Manija D Botón de liberación del cargador L Dial de ajuste de profundidad E Cargador M Almohadilla antimarcas 3 pzs F Ventanas indicadoras de clavos N Almacenamiento de almohadillas antimarcas G Contacto con la pieza O Presilla para cinturón H Liberación de atascos P Clavos de 2 cal 18 100 unidades ...

Page 20: ... ni ningún material de embalaje hasta después de examinar todas las piezas ADVERTENCIA Si falta alguna pieza de la herramienta o si alguna pieza está dañada no coloque el paquete de baterías ni use la herramienta hasta reparar o reemplazar la pieza El incumplimiento de esta advertencia podría provocar lesiones graves ...

Page 21: ...ausado por el lijado eléctrico el serruchado la trituración el taladro y otras actividades de construcción contiene sustancias químicas que según el estado de California causan cáncer defectos congénitos u otros daños reproductivos Algunos ejemplos de estos productos químicos son los siguientes Plomo presente en las pinturas con base de plomo Sílice cristalina de ladrillos cemento y otros producto...

Page 22: ...ura El término herramienta eléctrica que aparece en las advertencias hace referencia a la herramienta eléctrica que se conecta a la línea principal con cable o a la herramienta eléctrica que funciona a batería inalámbrica Seguridad en el área de trabajo Mantenga el área de trabajo limpia y bien iluminada Las áreas oscuras o desordenadas propician los accidentes No opere herramientas eléctricas en ...

Page 23: ...ado antes de conectar la herramienta a la fuente de alimentación o al paquete de baterías o antes de levantarla o transportarla Transportar herramientas eléctricas con el dedo en el interruptor o enchufar herramientas eléctricas que tienen el interruptor encendido aumenta las posibilidades de sufrir accidentes Retire todas las llaves de ajuste o llaves inglesas antes de encender la herramienta elé...

Page 24: ... de agarre secas limpias y sin aceite ni grasa Las manijas y las superficies de agarre resbaladizos no permiten manipular ni controlar la herramienta de forma segura en situaciones inesperadas Uso y cuidado de herramientas a batería Recárguela solo con el cargador especificado por el fabricante Un cargador adecuado para un tipo de paquete de baterías puede ocasionar un riesgo de incendio si se usa...

Page 25: ...rá el sujetador y provocará una lesión No accione la herramienta a menos que se encuentre firmemente colocada en la pieza de trabajo Si la herramienta no está en contacto con la pieza de trabajo el sujetador puede desviarse de su objetivo Desconecte la herramienta de la fuente de alimentación cuando el sujetador se atasque en la herramienta Al retirar un sujetador atascado la clavadora puede activ...

Page 26: ...lavadora lo vuelva descuidado Recuerde que un momento de descuido es suficiente para causar lesiones graves Antes de intentar utilizar cualquier herramienta asegúrese de familiarizarse con todas las características de funcionamiento e instrucciones de seguridad No intente modificar esta herramienta ni crear accesorios que no sean los recomendados para la misma Cualquier alteración o modificación s...

Page 27: ...años a los componentes internos Para retirar el paquete de baterías a Presione los botones de liberación de la batería para liberar el paquete de baterías b Jale el paquete de baterías hacia atrás para retirarlo de la herramienta ADVERTENCIA las herramientas con batería siempre están en condiciones de operación Por lo tanto siempre retire el paquete de baterías cuando no use la herramienta o cuand...

Page 28: ... cuando cargue clavos No hacerlo podría provocar lesiones personales graves Utilice solo los clavos recomendados para su uso con esta herramienta El uso de otros clavos puede producir un funcionamiento incorrecto de la herramienta o provocar lesiones graves Nunca cargue los clavos con el contacto de la pieza de trabajo o el gatillo activado El incumplimiento de dicho paso podría resultar en lesion...

Page 29: ...ofundidad de colocación en una pieza de trabajo de desecho para determinar la profundidad requerida para la aplicación Los materiales más duros y los clavos más largos requerirán más fuerza para colocar el clavo ADVERTENCIA siempre apunte la clavado ra lejos de usted y de los demás cuando realice ajustes El incumplimiento de dicho paso podría provocar lesiones graves a Retire el paquete de batería...

Page 30: ...o apriete interruptor tipo gatillo J para colocar un clavo f Suelte el interruptor tipo gatillo J y levante la punta de la pieza de trabajo para completar la acción de clavado g Repita los pasos d a f para colocar más clavos NOTA Mantenga apretado el gatillo hasta que se complete el trabajo de clavado Si no hay más acción durante más de 10 segundos después de presionar el contacto de la pieza de t...

Page 31: ...uncionamiento vuelva a cargar la herramienta con clavos 8 Luz de trabajo LED La luz de trabajo LED C que se muestra en la FIG 8 se iluminará cuando se presione el interruptor tipo gatillo J o el contacto de la pieza de trabajo G Esto brinda más iluminación en la superficie de la pieza de trabajo para usar la herramienta en áreas con poca iluminación Las luces de trabajo LED se apagarán aproximadam...

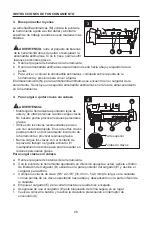
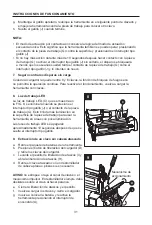
Page 32: ...s de la herramienta Para un uso seguro y adecuado siempre mantenga limpias la herramienta y sus ranuras de ventilación Siempre use solo un paño suave y seco para limpiar su clavadora nunca use detergente ni alcohol 11 Limpieza de la canaleta de clavos ADVERTENCIA retire la batería y mantenga la herramienta apuntando lejos de usted mientras limpia la canaleta de clavos AVISO limpie la canaleta de c...

Page 33: ...erramienta Fallo de conexión que incluye Mala conexión entre el paquete de baterías y la herramienta Otro fallo de conexión eléctrica Retire y vuelva a colocar el paquete de baterías luego reinicie la herramienta O comuníquese con el centro de servicio autorizado para realizar reparaciones Fallo de componentes electrónicos Comuníquese con el centro de servicio autorizado para realizar reparaciones...

Page 34: ...dañados Reemplazar clavos Cargador sucio Limpie el cargador La herramienta no clava tornillos o lleva adelante su ciclo sin colocar clavos El mecanismo está sucio Limpie la canaleta de los clavos como se describe en la sección de Mantenimiento del manual GARANTÍA Desde la fecha de compra la herramienta eléctrica posee una garantía de 5 años y la batería y el cargador una garantía de 3 años Esta ga...

Page 35: ......

Page 36: ......

Reviews: