background image

14

Instructions manual | 

www.grupotemper.com 

KOBAMATIC DIGI

Plug-In Digital Timer

CLOCK Button once to return to real 
time display.

Program Setting

1. When the LCD is in real time 

display, press ▲+ Button once to 

change to program setting display, 
“1ON” will be shown on the 
lower left corner of the LCD:
•  “1” iindicates the program 

group’s number (program 
group is from 1 to 14).

•  “ON” indicates power on time. 
•  “OFF” indicates power off time.

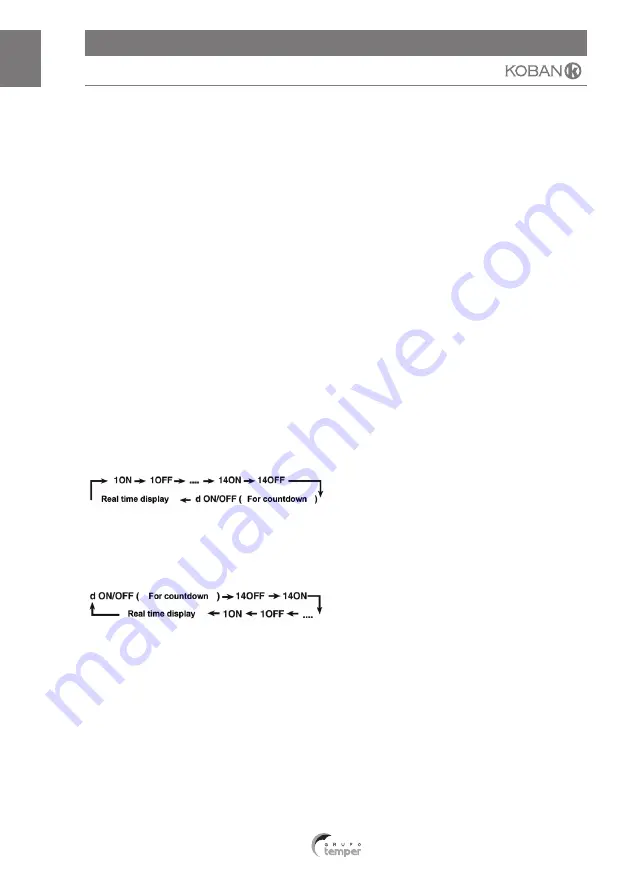
2. To chose the program group and 

on/off status, press ▲+ Button 

to increase the group number, 
sequence as follows:

3. To reduce the program group 

number, press –Button, LCD 
displays in the following sequence:

4. After choosing the program group, 

then can set the week and time. 
Press SET Button until the week 

display flashes, press ∧+ Button 

each time, the LCD will display the 
following in sequence:

  • Mo Tu We Th Fr Sa Su

  • Mo → Tu → We → Th → Fr → Sa → Su

  • Mo We Fr
  • Tu Th Sa

  • Sa Su
  • Mo Tu We
  • Th Fr Sa
  • Mo Tu We Th Fr
  • Mo Tu We Th Fr Sa
5. 

By pressing the ▼–Button, the 

week display will be shown in 
the opposite direction as above 
sequence.

6. 

Press ▲+/▼-Button once will 

increase or reduce the week 
display slowly. To press and hold 
the button, the display moves 
quickly. Release the button until 
your desired week pattern shown 
on the display. Press SET Button 
to confirm, week display stops 
flashing.

7. After set the day of the week, 

the hour display flashes, repeat 
procedures mentioned in Part Time 
Setting to set time.

8. To set other program group’s 

on/off time, repeat procedures 
mentioned from 2 to 7.

NOTE:

•  To change a preset program, 

repeat procedures 2 to 7 and input 
the new data to replace the old 
setting.

•  After program setting, press 

CLOCK Button to return to clock 
display at once, or it will be 
returned automatically after 15 
seconds without pressing any 
other buttons.

Summary of Contents for KOBAMATIC DIGI

Page 1: ...KOBAMATIC DIGI Programador enchufable digital Plug In Digital Timer www grupotemper com...

Page 2: ...raci n de programas 6 Configuraci n de cuenta atr s 7 Configuraci n de la funci n aleatoria 8 Cancelar continuar el programa predefinido 9 Conexiones 9 Precauciones de seguridad 9 Contents Specificati...

Page 3: ...por ejemplo con cafeteras y l mparas Es ideal para ahorrar energ a y proteger el hogar 2 La funci n de cuenta atr s permite encender apagar el eletrodom stico despu s de un tiempo predefinido y graci...

Page 4: ...o en la toma de corriente 4 Bot n RND Pulse este bot n para iniciar o detener el programa aleatorio cuando se encuentre en estado AUTO y cuando el programador est enchufado en la toma de corriente 5 B...

Page 5: ...ot n SET hasta que parpadee el icono de la semana indicando que puede hacer los ajustes 2 Pulse el bot n para avanzar en la secuencia de los d as o para retroceder El orden de aparici n de los d as es...

Page 6: ...el horario de verano vuelva a pulsar los botones CLOCK y a la vez NOTA Para poder ajustar el d a de la semana y la hora la pantalla LCD deber encontrarse en el modo de hora real Si se encuentra en el...

Page 7: ...en la secci n Programaci n de la hora para establecer la hora 8 Para establecer la hora de apagado y encendido de otro grupo de programas repita los pasos indicados en los puntos 2 al 7 NOTA Para mod...

Page 8: ...r que la cuenta atr s est en marcha Vuelva a pulsar el bot n CD para detener la funci n de cuenta atr s NOTA Cuando la cuenta atr s est en marcha la pantalla LCD se encontrar en modo de hora real Puls...

Page 9: ...se encuentre en estado AUTO y enchufado a la toma de corriente Cuando se active la funci n de cuenta atr s los ajustes de la funci n aleatoria y de encendido y apagado de programas no estar n activos...

Page 10: ...l temporizador para su limpieza y programaci n Al conectarlo introduzca el enchufe completamente Se trata de un aparato para uso exclusivo de interiores no lo instale en lugares h medos Peligro de inc...

Page 11: ...n off time of your home electrical appliances e g using in coffee machine lamps It is ideal for energy saving and home security 2 The countdown function can switch on off your appliance on your pre se...

Page 12: ...status and Timer is plugged into AC socket 5 On Off Button Change the setting mode to ON ATUO or OFF When press the button each time the horizontal line in the LCD moves to ON AUTO OFF which were sil...

Page 13: ...hold the button the week display moves quickly Release the button until your desired day of the week shown on the display Press SET Button to confirm your setting Time Setting 1 After setting the day...

Page 14: ...lay the following in sequence Mo Tu We Th Fr Sa Su Mo Tu We Th Fr Sa Su Mo We Fr Tu Th Sa Sa Su Mo Tu We Th Fr Sa Mo Tu We Th Fr Mo Tu We Th Fr Sa 5 By pressing the Button the week display will be sho...

Page 15: ...rease or reduce the hour display and press SET Button to confirm Setting interval is from 99 59 59 to 1 second 7 Connect the Timer to the AC socket and set the Timer to AUTO status in order to start s...

Page 16: ...ide the preset program and appliance remains off at all time NOTE The preset countdown or random functions only activates when the Timer is in AUTO status and plugged into the AC socket When countdown...

Page 17: ...KOBAMATIC DIGI Plug In Digital Timer Do not use in wet locations the timer is for indoor use only Risk of fire Do not use to control appliances that contain heating elements cooking appliances heaters...

Page 18: ...18 Instructions manual www grupotemper com KOBAMATIC DIGI Plug In Digital Timer...

Page 19: ...AL S L garantit cet apareil pour le dur e de 2 ann es contre tout d fault de fabrication Pour le service de garantie vous devez pr senter ce re u avec du ticket de caisse ou la facture TEMPER ENERGY I...

Page 20: ...TEMPER ENERGY INTERNATIONAL S L Pol gono industrial de Granda nave 18 33199 Granda Siero Asturias Tel fono 34 902 201 292 Fax 34 902 201 303 Email info grupotemper com Una empresa del grupo...

Reviews: