background image

10

TROUBLE-SHOOTING

If  you have any problems with your shredder, check the symptoms and remedies described below.

If you are unable to solve the problem this way, contact your nearest Kobra dealer.

Do not open the head of the shredder 

to attempt to repair it yourself. You could get a serious electric shock and 

invalidate your warranty

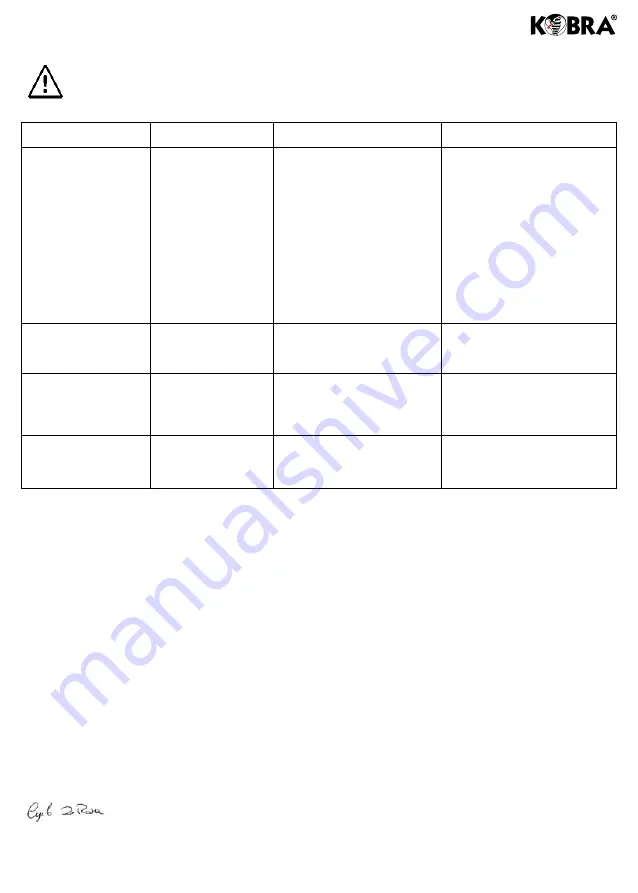
PROBLEM

SIGNS

CAUSE

ACTION

The shredder fails to 

start

- The light (G) does 

not come on

- Red light (I) comes 

on

- Light (G) comes on

- Switch position ( H )

- Power cable not properly 

connected

- No power

- Door (C)  not closed properly

- Bag full 

- Motor in heat protection mode 

- Turn switch to the position (I) 

- Check that the cable is plugged 

in properly

- Check that socket is switched on.

- Close the door properly

- Empty bag

- Wait 15 minutes for motor to 

cool down

The shredder never 

stops

- Light (G) on and 

cutters in operation

Material and/or dirt deposited 

on or between the photocells 

Remove the deposit from or free 

the photocells 

Clean the photocells with a brush

Significant reduction of 

shredding capacity

- Capacity is less than 

the declared capacity

- Cutters dirty or adhesive on 

blades

- Carry out maintenance by 

inserting a sheet of paper 

sprinkled with lubricant

Documents are not 

drawn in and shredded

- Documents remain 

in the paper feeder 

tray

- Dirty belts covered in paper 

dust

Turn the belts manually and 

clean them carefully with a damp 

cloth

DECLARATION OF COMPLIANCE WITH EC STANDARDS

Compliant with    - directive  LVD 2014/35/UE

                                     - directive 2011/65/EU RoHS

                                     - directive 2014/30/UE

The manufacturer    ELCOMAN SRL - VIA GORIZIA, 9 - 20813 BOVISIO MASCIAGO (MB) - ITALY

hereby declares that the KOBRA shredders listed below are compliant with the standards of directive LVD 2014/35/UE

- Kobra AF series: Kobra AF+1, Kobra AF.1, Kobra AF.2. 

Standards applied are :

EN 60950-1:2006 / A11:2009 / A1:2010 / A12:2011 / A 2:2013  

EN 62368-1:2014+A11:2017

EN 55014-1:2006+A1:2009+A2:2011

EN 55014-1:2017

EN 55014-2:2015

EN 61000-3-2:2014

EN 61000-3-3:2013

EN 55014-2:1997+A1:2001+A2:2008

EN 61000-3-2:2019


Bovisio Masciago, 02.2020

A. De Rosa

TECHNICAL OFFICE

Summary of Contents for AF.1

Page 1: ...er Destructora de documentos Destructeur de documents Уничтожитель бумаг LIBRETTO D ISTRUZIONI OPERATING INSTRUCTIONS BETRIEBSANLEITUNG INSTRUCCIONES DE MANEJO MODE D EMPLOI ИНСТРУКЦИЯ ПО ЭКСПЛУАТАЦИИ KOBRA AF 1 KOBRA AF 1 KOBRA AF 2 COMPACTOR Kobra AF 1 60 litres Kobra AF 1 40 litres ...

Page 2: ...2 Fig 1 Fig 3 Fig 4 Fig 2 AUTOMATIC OILER KOBRA AF 1 C2 KOBRA AF 1 KOBRA AF 1 C4 KOBRA AF 2 COMPACTOR ...

Page 3: ...cia automatica espellendo la carta in eccesso Togliere la carta in eccesso dall imbocco per liberare le fotocellule successivamente inserire una quantità inferiore di fogli nell imbocco e in automatico la macchina ripartirà per completare la distruzione con un ciclo distruttivo Si consiglia di limitare i bloccaggi dovuti ad introduzioni eccessive di carta e di far funzionare l apparecchio al di so...

Page 4: ...Nel caso la macchina venga spenta pulsante in posizione 0 durante la distruzione il sacco di raccolta potrebbe essere bloccato e non estraibile Riportare il pulsante in posizione I e aprire la porta INCEPPAMENTO Nell eventualità che il distruggidocumenti s inceppi agire come segue effettuare una o più volte la retromarcia manuale premendo il pulsante H in posizione R aprire il coperchio superiore ...

Page 5: ... imbocco L per far funzionare a vuoto per circa 8 10min consecutivi il distruggidocumenti Ora il Vostro distruggidocumenti è pronto e con il gruppo di taglio oliato Si consiglia di controllare periodicamente il livello di olio all interno del suo contenitore posto all interno del mobile SOSTITUZIONE CONTENITORE OLIO Aprire la porta Estrarre il contenitore olio P vuoto dalla sua sede svitare il tap...

Page 6: ...ne Materiale e o sporco depositato su fotocellule o tra le fotocellule Rimuovere il deposito dalle fotocellule o liberare le fotocellule Pulire le fotocellule con una spazzola Riduzione sensibile della capacita di taglio Capacita ridotta rispetto alla capacita dichiarata Gruppo di taglio sporco o con presenza di adesivo su lame Effettuare una manutenzione inserendo un foglio cosparso di lubrifican...

Page 7: ...ct the excess paper Take the excess paper out of the throat in order to free the photocells then insert a smaller amount of paper and the machine will automatically restart and finish shredding with a shred cycle It is advisable to limit jams caused by introducing too much paper and to operate the machine below maximum capacity in order to prolong the life of mechanical parts and the life of the m...

Page 8: ... the same time slowly extract the bag If the machine is switched off switch in 0 position during the destruction the collection bag could be blocked and not removable Return the switch to I position and then open the door PAPER JAMS This is what to do if the shredder jams Manually put the shredder into reverse once or more times by moving the switch H to the position R Open the top cover of the fe...

Page 9: ...ves might NOT be properly oiled since the oil feeder is not yet completely full In order to make it fill up more quickly trigger the photo cells inside the mouth so that the shredder runs empty for 8 10 minutes straight Now your shredder is ready for operation and the cutting knives are oiled It is recommended to periodically check the level of oil in the container inside the cabinet REPLACING THE...

Page 10: ...r free the photocells Clean the photocells with a brush Significant reduction of shredding capacity Capacity is less than the declared capacity Cutters dirty or adhesive on blades Carry out maintenance by inserting a sheet of paper sprinkled with lubricant Documents are not drawn in and shredded Documents remain in the paper feeder tray Dirty belts covered in paper dust Turn the belts manually and...

Page 11: ...te durch Rücklauf wieder aus dem Gerät führen MANUELLES SHREDDERN EINZELNER SEITEN Sobald Sie die Seiten in die Öffnung L einführen leuchtet das Licht G auf und das Gerät beginnt automatisch zu shreddern Zwei Lichtschranken erkennen wenn Papier eingeführt wird Dadurch stoppt das Gerät auch sobald kein Papier mehr vorhanden ist Wenn Sie mehr Papier zuführen als die Eingabeeinheit erlaubt geht das G...

Page 12: ...apiers darauf achten dass kein Papierabfall in den Unterschrank gelangt Wir empfehlen eine Hand oben auf den Papierabfall zu halten diesen leicht nach unten zu drücken und gleichzeitig den Beutel nach außen zu ziehen siehe Abb 5 Wenn das Gerät während eines Shreddervorgangs ausgeschaltet wird Position 0 könnte der Auffangbeutel blockiert werden und lässt sich nicht entfernen Schalten Sie das Gerät...

Page 13: ...n und schrauben Sie die Abdeckkappe wieder fest an BEDIENUNG Schalten Sie das Gerät an und drücken den Knopf H auf I Das Licht G leuchtet für wenige Sekunden auf dann startet der Aktenvernichter Während der ersten Minuten ist es möglich dass die Schneidemesser nicht richtig geölt sind da die Ölzuführung noch nicht ganz voll ist Um diese schneller zu füllen aktivieren bedecken Sie die Fotozellen im...

Page 14: ... Möglichkeit der FEHLERBEHEBUNG Der Aktenvernichter startet nicht Das Licht G leuchtet nicht auf Das rote Licht I leuchtet auf Das Licht G leuchtet auf Position am Schalter H Das Stromkabel ist nicht korrekt angeschlossen Der Shredder hat keinen Strom Die Tür C ist nicht richtig geschlossen Der Abfallsack ist voll Der Motor ist überhitzt Schalten Sie auf die Position I Prüfen Sie ob der Stecker ri...

Page 15: ...rcha atrás automática expulsando el papel en exceso Retirar el papel en exceso de la embocadura para liberar las fotocélulas y a continuación introducir una cantidad inferior de hojas en la embocadura y la máquina arrancará de nuevo para completar la destrucción con un ciclo destructor Se aconseja limitar los atascos debidos a introducciones excesivas de papel y hacer funcionar el aparato por deba...

Page 16: ...uearse y no extraerse Vuelva a poner el interruptor a la posición I y luego abra la puerta ATASCAMIENTO En caso de que la destructora de documentos se atasque actuar como se describe a continuación Efectuar una o más veces la marcha atrás pulsando el interruptor H en la posición R Abrir la tapa superior de la bandeja de alimentación de papel Retirar el papel atascado Una vez liberado el grupo de c...

Page 17: ...a L para hacer funcionar la destructora de documentos en vacío durante aprox 8 10 min consecutivos Ahora la destructora de documentos está lista y con las cuchillas lubricadas Se recomienda controlar periódicamente el nivel de aceite dentro de su contenedor ubicado dentro del mueble SUSTITUCIÓN CONTENEDOR ACEITE Abrir la puerta Extraer el contenedor de aceite P vacío de su alojamiento desenroscar ...

Page 18: ...tos no arranca No se enciende el indicador luminoso G Se enciende el indicador luminoso rojo I Se enciende el indicador luminoso G Posición del interruptor H Cable de alimentación no conectado correctamente Ausencia de tensión de alimentación Puerta C no cerrada correctamente Bolsa llena Motor en protección térmica Colocar el interruptor H en posición I Comprobar si el enchufe está correctamente i...

Page 19: ...ant de papier de la fente d introduction pour dégager les cellules photosensibles puis insérer une quantité moindre de feuilles dans la fente d introduction et la machine repartira automatiquement pour compléter la destruction avec un nouveau cycle Il est recommandé d éviter les blocages liés à une introduction excessive de papier et de faire fonctionner l appareil en sous régime de sa capacité de...

Page 20: ...uton à nouveau en position I et d ouvrir la porte du meuble BOURRAGE Dans le cas où un bourrage se produit dans le destructeur de documents procéder comme suit Effectuer une ou plusieurs fois le retour en mettant l interrupteur H en position R Ouvrir le capot supérieur du bac d alimentation papier Retirer le papier Une fois que le bloc de coupe a été dégagé du papier en bourrage insérer à nouveau ...

Page 21: ...consécutives Maintenant votre destructeur de documents est prêt et le groupe de coupe est graissé Il est conseillé de contrôler périodiquement le niveau d huile dans le réservoir situé à l intérieur du meuble REMPLACEMENT DU RÉSERVOIR D HUILE Ouvrir la porte Enlever le réservoir d huile P vide de son logement dévisser le bouchon Q situé sur la partie supérieure du réservoir et extraire le tube O P...

Page 22: ...ATIONS CAUSE ACTION Le destructeur de document ne s allume pas Le témoin lumineux G ne s allume pas La diode lumineuse rouge I s allume Le témoin lumineux G s allume Positionnement de l interrupteur H Câble d alimentation mal connecté Absence de courant au niveau de l alimentation Porte C mal fermée Sac plein Moteur en protection thermique Mettre l interrupteur H en position I Vérifier les branche...

Page 23: ...измельчения ножи автоматически остановятся Если максимальное количество уничтожаемой бумаги превышено то шредер автоматически остановится на несколько секунд автоматически включится режим реверса Удалите лишнюю бумагу из приёмного слота затем вставьте в него меньшее количество листов Шредер автоматически начнет новый цикл измельчения Для продления срока эксплуатации шредера рекомендуется непревыша...

Page 24: ...ли во время уничтожения машину выключить поставить переключатель в положении 0 то мешок для мусора может быть заблокирован и не сниматься Верните переключатель в положение I и откройте дверь ЗАСТРЕВАНИЕ БУМАГИ Если бумага застряла в шредере и автоматический режим реверса не устранил проблему Вручную запустите режим реверса переводя переключатель Н в положение R один или несколько раз Поднимите вер...

Page 25: ...е переведите переключатель Н в позицию I на несколько секунд загорится индикатор G Можно начинать процесс уничтожения В первые минуты работы ножи могут быть не достаточно смазаны так как емкость для автоматической смазки ещё не заполнилась до конца Чтобы емкость заполнилась быстрее аккуратно вставьте лист бумаги в приемный слот до момента когда датчик увидет бумагу и шредер начнет работать Дайте е...

Page 26: ...едует производить только в специализированном сервисном центре Самостоятельное открытие режущего блока может усугубить неисправности к тому же вы потеряете сервисную гарантию НЕИСПРАВНОСТЬ ПРИЗНАКИ ПРИЧИНА ДЕЙСТВИЯ Шредер не включается Индикатор G не горит Горит красным индикатор I Индикатор G горит Переключатель H находится в положении 0 Кабель питания не подключен Нет напряжения в сети Открыта д...

Page 27: ... Kw 230 50 Hz Kobra AF 1 240 mm 3 5x40 mm 10 12 0 250 Kw 230 50 Hz MODELLO LUCE ENTRATA TAGLIO CAPACITÀ A4 70gr POTENZA TENSIONE ALIM V 10 MODEL THROAT WIDTH SHRED SIZE CAPACITY A4 70gr POWER VOLTAGE V 10 MODELL LICHTE WEITE EINGANG SCHNITT LEISTUNG FÄHIGKEIT A4 70gr LEISTUNG VERSORGUNGSSPANNUNG V 10 MODELO AMPLITUD ENTRADA CORTE CAPACIDAD A4 70gr POTENCIA TENSIÓN ALIM V 10 MODÈLE LARGEUR D INTROD...

Page 28: ...zia 9 20813 Bovisio Masciago MB Italy T 39 0362 593584 F 39 0362 591611 kobra elcoman it www elcoman it UNI EN ISO 9001 2015 Cert No 9105 EL16 ISO 9000 REGISTERED QUALITY COMPANY Cod 60 072 DI 190 03 02 02 2020 ...

Reviews: