background image

D-6

A-61371   April 2010 

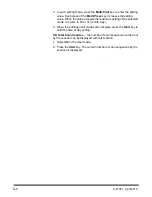
3. In each setting mode, press the 

Multi-Print 

key to enter the setting 

value. Each press of the 

Multi-Press

 key increases the setting 

value. When the value exceeds the maximum setting of the selected 
mode, it returns to 00 or 01 (month, day).

4. When the settings of all modes are complete, press the 

Start

 key to 

valid the time of day setting.

U8: Total Scan Counter 

— the number of scan sequences carried out 

by the scanner can be displayed with this function. 

1. Select 

U8

 in the User mode.

2. Press the 

Start

 key. The current number of scan sequences by the 

scanner is displayed. 

Summary of Contents for 3000 DV Plus

Page 1: ......

Page 2: ...et and then call your Kodak Service Representative A fire or electrical shock could result if you continue to use the product Connect the plug of the power cord to a wall socket outlet that is equippe...

Page 3: ...uipment generates uses and can radiate radio frequency energy and if not installed and used in accordance with the instruction manual may cause harmful interference to radio communications Operation o...

Page 4: ...he laser beam is emitted from the print head unit passes through the mirror unit then is radiated through the laser aperture of the mirror unit to the interior of the printer WARNING The print head un...

Page 5: ...ojalukitus ohitettaessa olet alttiina nakymattomalle lasersateilylle Aja katso sateeseen VARNING Osynlig laserstr ining n r denna del r ppnad och sp rren r urkopplad Betrakta ej str ien For Norway ADV...

Page 6: ...itioning the film image 3 4 Zooming focusing and image rotation 3 5 Selecting the film type 3 6 Selecting the paper size 3 7 Using the Auto Paper Selection function 3 7 Using the Auto Film Format Sele...

Page 7: ...misfeed from the paper cassette 4 12 Clearing a misfeed from inside the printer 4 12 Printer maintenance 4 14 Cleaning the paper cassette pickup rollers 4 14 5 Maintenance 5 1 Cleaning the scanner 5 1...

Page 8: ...e printer Chapter 5 Maintenance provides maintenance procedures for the scanner including replacement procedures for replacing the projection lamp Chapter 6 Troubleshooting Messages provides informati...

Page 9: ...m curtains or anything else that is easily flammable An area that is safe from spilled water or other liquids A dust free location NOTE If the scanner is located near a window do not face the screen t...

Page 10: ...local electrical standards NEVER connect the grounding wire to a gas pipe the grounding wire for a telephone or a water pipe Space requirements Scanner The illustration below provides the clearance d...

Page 11: ...n This scanner is available in the following configurations Printer mode connected to the printer The scanner is connected to a dedicated Kodak 34 ppm Video Laser Printer allowing scanned images to be...

Page 12: ...rotate the image on the screen 4 Projection Lens optional several projection lenses are available to change the size and adjust the focus of the image For more information on the projection lenses se...

Page 13: ...ptions Film Carrier and Controller 11 Power Cord Socket plug the power cord included with the scanner into this socket 12 Fuse Holder protects the circuit from overloading Ratings 6A 250V 13 Total Cou...

Page 14: ...vailable Auto retrieval Controllers Both controllers may be used in conjunction with the RFC 15A or RFC 15M Carriers Single lens 7 5X Zoom lens 9 16X Zoom lens 13 27X Zoom lens 20 50X Mini Mars 2 Cont...

Page 15: ...arrier for semi automatic loading of 16 and 35 mm open spool film microfiche aperture cards jackets UC8 a motorized carrier for roll films but manual threading RCF 15A for automatic loading of 16 mm A...

Page 16: ...zation operation When the Wait symbol goes out the system is ready for printing NOTE If you load the film in the Film Carrier and press Start while the printer is warming up you can scan and memorize...

Page 17: ...ower to the printer heater The Auto Projection Lamp OFF function that automatically turns off the Projection Lamp of the scanner Both are activated when the system is left idle for a specified period...

Page 18: ...entered A maximum of three settings can be memorized Negative or positive Print mode Print position Paper size Print image density Exposure mode Centering or Fit Manual Masking Auto Masking Auto Skew...

Page 19: ...in the center of the screen is printed Left the image on the left half of the screen is printed Page by Page the The images on both the left and right sides of the screen are printed consecutively on...

Page 20: ...ncreases the number of prints to be made in increments of 1 1 2 3 9 etc 13 Clear Stop clears the setting on the Multi Print display resets the display to 1 or stops a multi print cycle This function i...

Page 21: ...Mode when pressed with the Shift key enters into User Mode See Appendix D Setting System Default Values for more information 4 Electronic Zoom sets zoom magnification Zoom when pressed with the Shift...

Page 22: ...em has the optional Manual Masking Kit Off no masking or trimming will be done Masking prints only the image outside of the area that is defined on the screen Trimming prints only the area of the imag...

Page 23: ...is lit and any skew of the image will be corrected during printing After printing the skew is retained by default Contact your Kodak Service Representative to change the default 5 Manual Focus press t...

Page 24: ...mes When 11 x 17 A3 is selected The frames surrounding the center of both images are masked The Manual Frame Masking Kit is required Masking 1 Frame The center of the image appearing on the screen wil...

Page 25: ...uto Paper Select Print The system automatically detects either half size or full size film to determine the size of paper for printing half size film is printed on 8 1 2 x 11 A4 portrait paper full si...

Page 26: ...your Film Carrier for more information 2 Select and replace the lens 3 Position the image to be scanned or printed on the screen 4 If desired select zoom focus or rotation options 5 Select film type a...

Page 27: ...d with the system printer The size and format of one frame of film may vary depending on the shooting conditions Zoom the lens in and out to find the optimum ratio that will fit the scanning size Film...

Page 28: ...1 Grasp the Prism Holder lever and push it up 2 Pull out the projection lens unit 3 Slide the desired projection lens unit into the scanner along the lens holder guide NOTE When the projection lens un...

Page 29: ...he scanning size are marked on the screen Through zooming and image rotation and by operating the film carrier mounted on the system position the image on the screen so the image fits in the scanning...

Page 30: ...into focus NOTE You can use the Focus manual focus keys to manually adjust the focus of the displayed image Image rotation Turn the Image Rotation knob until the image is displayed at the desired rot...

Page 31: ...polarity of certain types of film If the system cannot detect a film type select it manually The system does not detect exterior conditions such as when the glass surface of the carrier is dirty or s...

Page 32: ...1 x 17 A3 and the 8 1 2 x 11 A4 LEDs light up The system automatically detects the image area and prints on 8 1 2 x 11 A4 paper for half size film and on 11 x 17 A3 paper for full size film NOTES The...

Page 33: ...key The system automatically detects the image area and prints on 8 1 2 x 11 A4 paper for portrait film and on 8 1 2 x 11 A4 paper for landscape film Selecting the Print Position Center The system pr...

Page 34: ...e Auto Exposure setting is not satisfactory press the appropriate Exposure Adjustment key either Lighter or Darker to set the desired image density Using Manual Exposure 1 Press the Exposure Mode key...

Page 35: ...the 1 key is pressed when 9 is displayed the number on the display is incremented by one 10 11 12 etc Entering a number from 10 99 1 Set the tens digit using the 10 key 2 Set the units digit using the...

Page 36: ...on this function NOTES The image area of the screen must provide at least 45 mm horizontally and vertically The width of the frame to be masked must be at least 10 mm If the film image on the screen d...

Page 37: ...the print area in the horizontal direction of the image on the screen The system makes a print of the image corresponding to the way the Area keys are illuminated A total of 61 Area keys are placed at...

Page 38: ...ed paper size and the print position may light up just after the Job Program is called Defining an area Define the end points for both the vertical and horizontal areas of the image on the screen usin...

Page 39: ...panels define the print areas of the image on the screen NOTES The horizontal indicator marked A does not light up and cannot be used for defining an area Four different areas cannot be defined on a s...

Page 40: ...similar to Trimming Refer to the previous procedures on Trimming and defining areas for Manual Masking procedures Using Centering and Fit Once the image on the screen has been manually trimmed or aut...

Page 41: ...ode cannot be used when the scanner is connected to the PC Using the Cycle Print mode This function automatically scans the next image following a preset period of time Images are manually loaded on t...

Page 42: ...tinue to operate until the Cycle Print mode is canceled The No of Copies value flashes during the scanning and waiting operations The next scanning job can be started manually by pressing the Start ke...

Page 43: ...the PR connection and the PC connection Once the Job Programs have been set you can recall them as needed 1 Press the Memory Input key in the Setting mode 1J starts blinking To change the program regi...

Page 44: ...ressed with the Shift key the magnification is increased by an increment of 0 01X up to 2 00X Zoom when the Zoom key is pressed with the Shift key the magnification is decreased by a decrement of 0 01...

Page 45: ...en any key is pressed the illumination returns to the maximum level When the illuminance of the screen is dark hold down the Shift key and the Illumination key together The illuminance of the screen i...

Page 46: ...on fold open when printing on B4 paper larger 3 Power indicator lights when the printer is turned on 3 Power switch use to turn the printer on and off 4 Paper guides slide the guides to secure the pap...

Page 47: ...pen to replace the toner cartridge and to clear misfed sheets of paper 10 Image transfer roller transfers the image onto a sheet of paper Do not touch this roller with your bare hands 11 Fusing unit p...

Page 48: ...1 2 x 11 11 x 8 1 2 8 1 2 x 14 11 x 17 or A3 A4 plain and recycled paper up to 250 sheets Paper Cassette 11 x 8 1 2 8 1 2 x 14 11 x 17 or A3 A4 plain and recycled paper up to 500 sheets Loading paper...

Page 49: ...E Make sure the paper fit easily between the guides Improperly adjusted guides may cause poor print quality paper jams or printer damage Loading paper in the paper cassette 1 Pull out the paper casset...

Page 50: ...rt the right end of the paper retainer into the slot for the size of paper to be loaded NOTE The paper size detected depending on the position of the paper retainer Correctly position the paper retain...

Page 51: ...orrectly 9 Press in the button on the paper guide and then slide the guide against the edge of the paper NOTE The paper should fit easily between the guides Improperly adjusted guides may cause poor p...

Page 52: ...il 2010 4 7 12 When printing on paper B4 or larger fold open the output tray extension 13 Affix the paper size labels supplied with the printer to the paper cassette in order to indicate the size of l...

Page 53: ...er and underneath the toner cartridge as a printer malfunction can result Be careful not to touch around the image transfer roller touching certain parts in this area may result in reduced print quali...

Page 54: ...red by your warranty 5 Slowly shake the toner cartridge tilting it to the left and right 7 or 8 times to distribute the toner The toner is nontoxic If you get toner on your hands wash them in cool wat...

Page 55: ...toner cartridge installed If toner spills within the printer decreased print quality may result or the printer may be damaged Guidelines are available for disposal of toner cartridges that are replac...

Page 56: ...the misfeed clearing procedure CAUTION The fusing unit inside the printer becomes very hot during operation To avoid a burn be very careful not to touch it Display Code Description P0 The wrong size p...

Page 57: ...en lever to its original position Do not use force to remove jammed paper 5 Before reinstalling the cassette check that the paper remaining in the cassette is loaded correctly Make sure no paper remai...

Page 58: ...s 5 Open the paper feed roller cover 6 Pull out the jammed paper 7 Close the paper feed roller cover 8 Align the tabs on the toner cartridge with the notches in the printer and insert the cartridge NO...

Page 59: ...o not touch around the image transfer roller may result in reduced print quality or around the fusing unit may result in burns 1 Before cleaning the printer turn off the power unplug the power cord an...

Page 60: ...ould be cleaned daily for optimal operating conditions Cleaning the scanner screen With a damp cloth clean and remove any dust or debris from the surface of the screen CAUTION Never use alcohol or any...

Page 61: ...Refer to Chapter 3 Installing the projection lens for procedures With a damp cloth clean and remove any dust or debris from the surface of the carrier glass To open the carrier glass Pull the handle...

Page 62: ...ng upon the stage of the job Once the system detects that the projection lamp has burnt out the scan job will be cancelled If the system is operating in the Cycle Print mode the scanner operation will...

Page 63: ...there is no gap between the projection lamp and the lamp socket CAUTION Do not touch the reflector mirror surface of the projection lamp Fingerprints smudges or debris should be wiped clean with a so...

Page 64: ...Clear Stop key is pressed the print is cancelled Replace the toner cartridge immediately PE Paper Empty indicator lights up when the printer is not loaded with the paper size selected or when the pape...

Page 65: ...inter CL A printer clock malfunction Scanner PC CC A communication malfunction PC Symptom Cause Action Light image Print density is not properly set Change the print density setting as necessary Toner...

Page 66: ...irror scanning Exposure Control Automatic and Manual Light Source Halogen lamp DC20V 150W DDL Type Power Requirement 120 VAC 60Hz or 220 240 VAC 50 60Hz Power Consumption Less than 350W Auto Power Sav...

Page 67: ...Time 19 seconds 11 x 17 or A3 600 dpi AE 16 5 seconds 8 1 2 x 11 or A4 600 dpi AE Print Speed 18 5 sheets per minute 11 x 17 or A3 600 dpi 34 sheets per minute 8 1 2 x 11 or A4 600 dpi Multiple Print...

Page 68: ...Center Print mode Text Resolution 600 dpi Kodak 34 ppm Video Laser Printer Electrical zoom magnification 1 00 System Setting Selection Initial Setting Description Auto Reset Enabled Disabled 200V Sett...

Page 69: ...et by the user onto the carrier glass in between cycles Paper Size of Paper Feeding tray PR mode only Same as the setting for U4 of the User mode Determines the desired paper size and orientation from...

Page 70: ...or A4 paper is loaded in lengthwise or crosswise orientations in the paper feed tray and the paper cassette Auto switching printing continues by automatically switching to the remaining paper source a...

Page 71: ...er department name floor number machine location etc K Mainframe and or Printer model name serial number condition or system s indications s on the display etc Model Name Kodak 3000 DV Plus Digital Sc...

Page 72: ...e U2 Engineering Enhancement mode Corrects slight image distortion occurring in the scan direction U3 Auto Power Save Used to set the time it takes the unit to be automatically set into the Auto Power...

Page 73: ...lay d The asterisk indicates the current setting value 4 Press the Exposure Adjustment key Darker or Lighter to select the specific setting value Pressing the Darker key scrolls through the setting va...

Page 74: ...eturns to the default value when the power switch is turned off You can register this setting by using the Job Program function U3 Auto Power Save time it takes the unit to be automatically set into t...

Page 75: ...the printer 1 Select U5 in the User mode 2 Press the Exposure Mode key to display d 3 Press the Exposure Adjustment key Darker or Lighter to select the desired setting value 4 Press the Start key to v...

Page 76: ...function to set the correct time 1 Select U7 in the User mode 2 Press the Exposure Mode key When the Exposure Mode key is pressed both the Exposure Display and Multi Print Display light up steadily NO...

Page 77: ...um setting of the selected mode it returns to 00 or 01 month day 4 When the settings of all modes are complete press the Start key to valid the time of day setting U8 Total Scan Counter the number of...

Page 78: ......

Reviews: